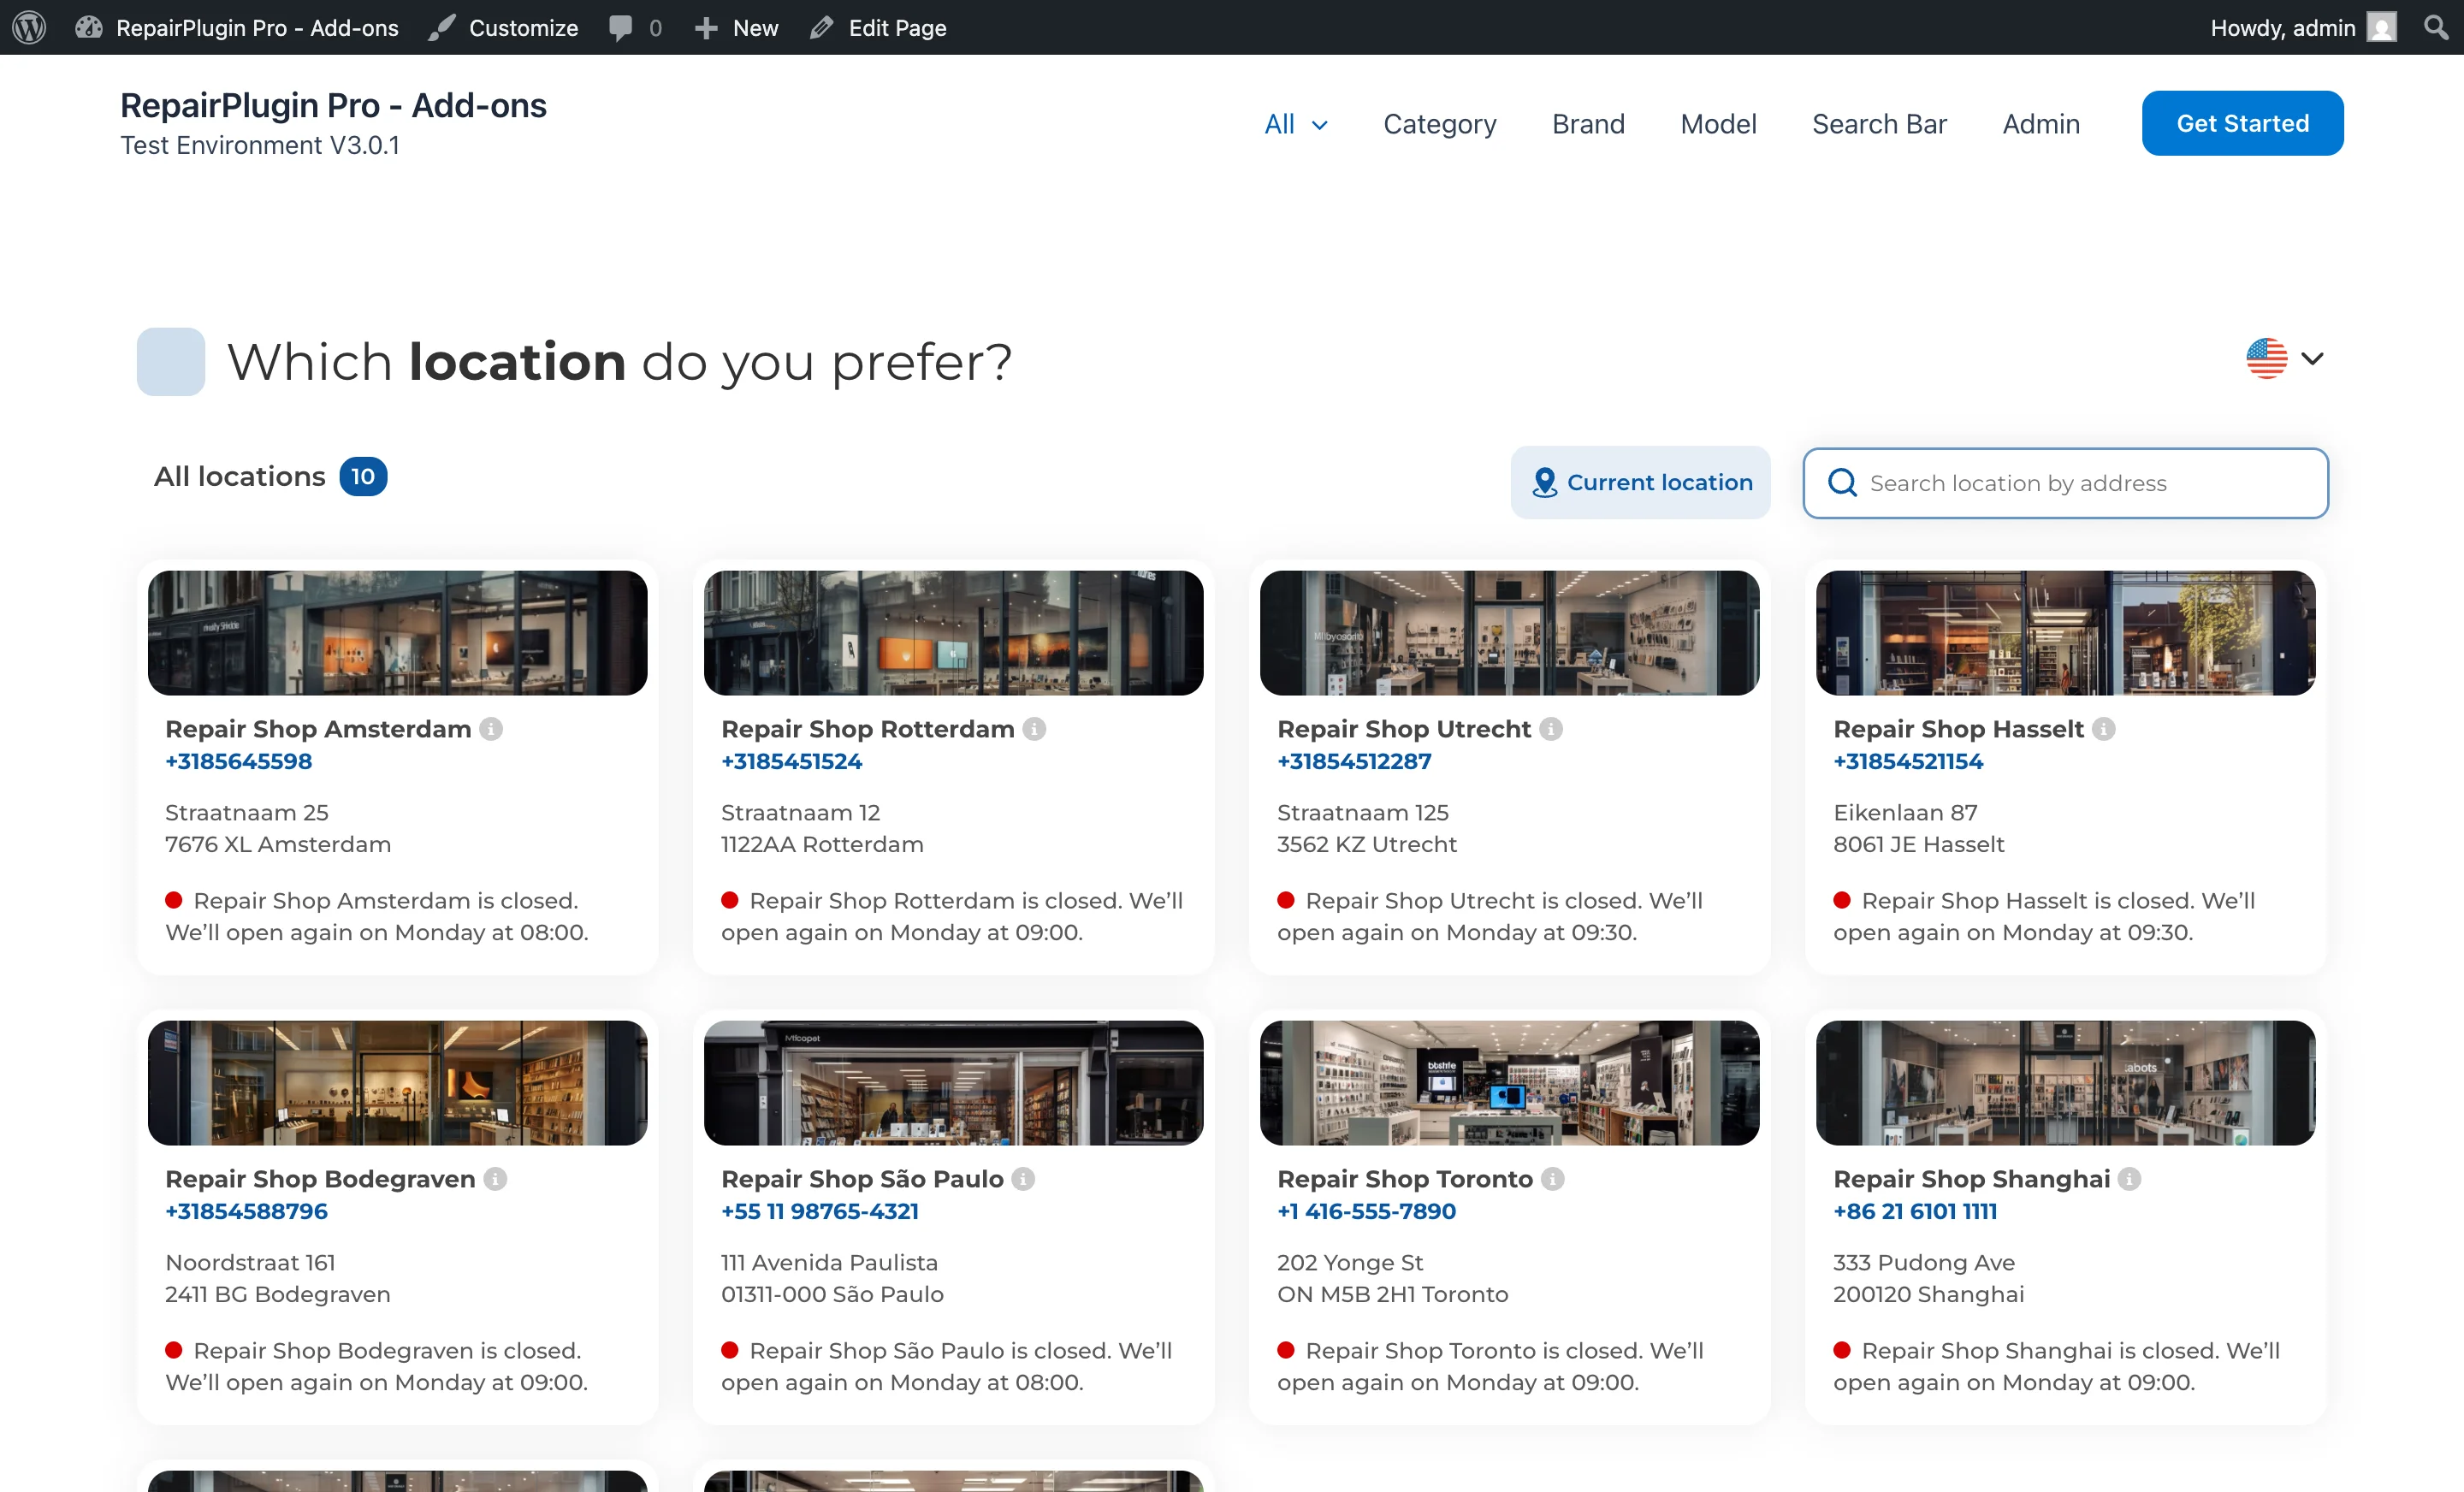
Enhanced Locations
Discover how Enhanced Locations in RepairPlugin lets you manage multiple repair shops with independent hours, pricing, staff, and service methods.
What can you do with this?
- Run multiple locations from one dashboard -- set up separate opening hours, contact details, service methods, and pricing for each branch.
- Help customers find the nearest store -- integrate with Google Maps so customers can search by address and get automatically routed to the closest location.
- Set location-specific pricing -- charge different prices at different branches, with each location maintaining its own rates and margins.
- Hide unavailable repairs per location -- automatically hide repairs with "Price on Request" pricing at specific branches, so customers only see services you actually offer there.
- Assign shop managers per location -- give staff members access to only their branch's appointments and pricing.
- Create virtual locations -- set up locations that only handle pickup and on-site repairs without a physical storefront.
Enhanced Locations is included in the Scale plan. It provides unlimited locations and requires an active RepairPlugin installation.
Where to find it
- In your WordPress admin, go to RepairPlugin in the left sidebar.
- Click Settings.
- Open the Enhanced Locations section.
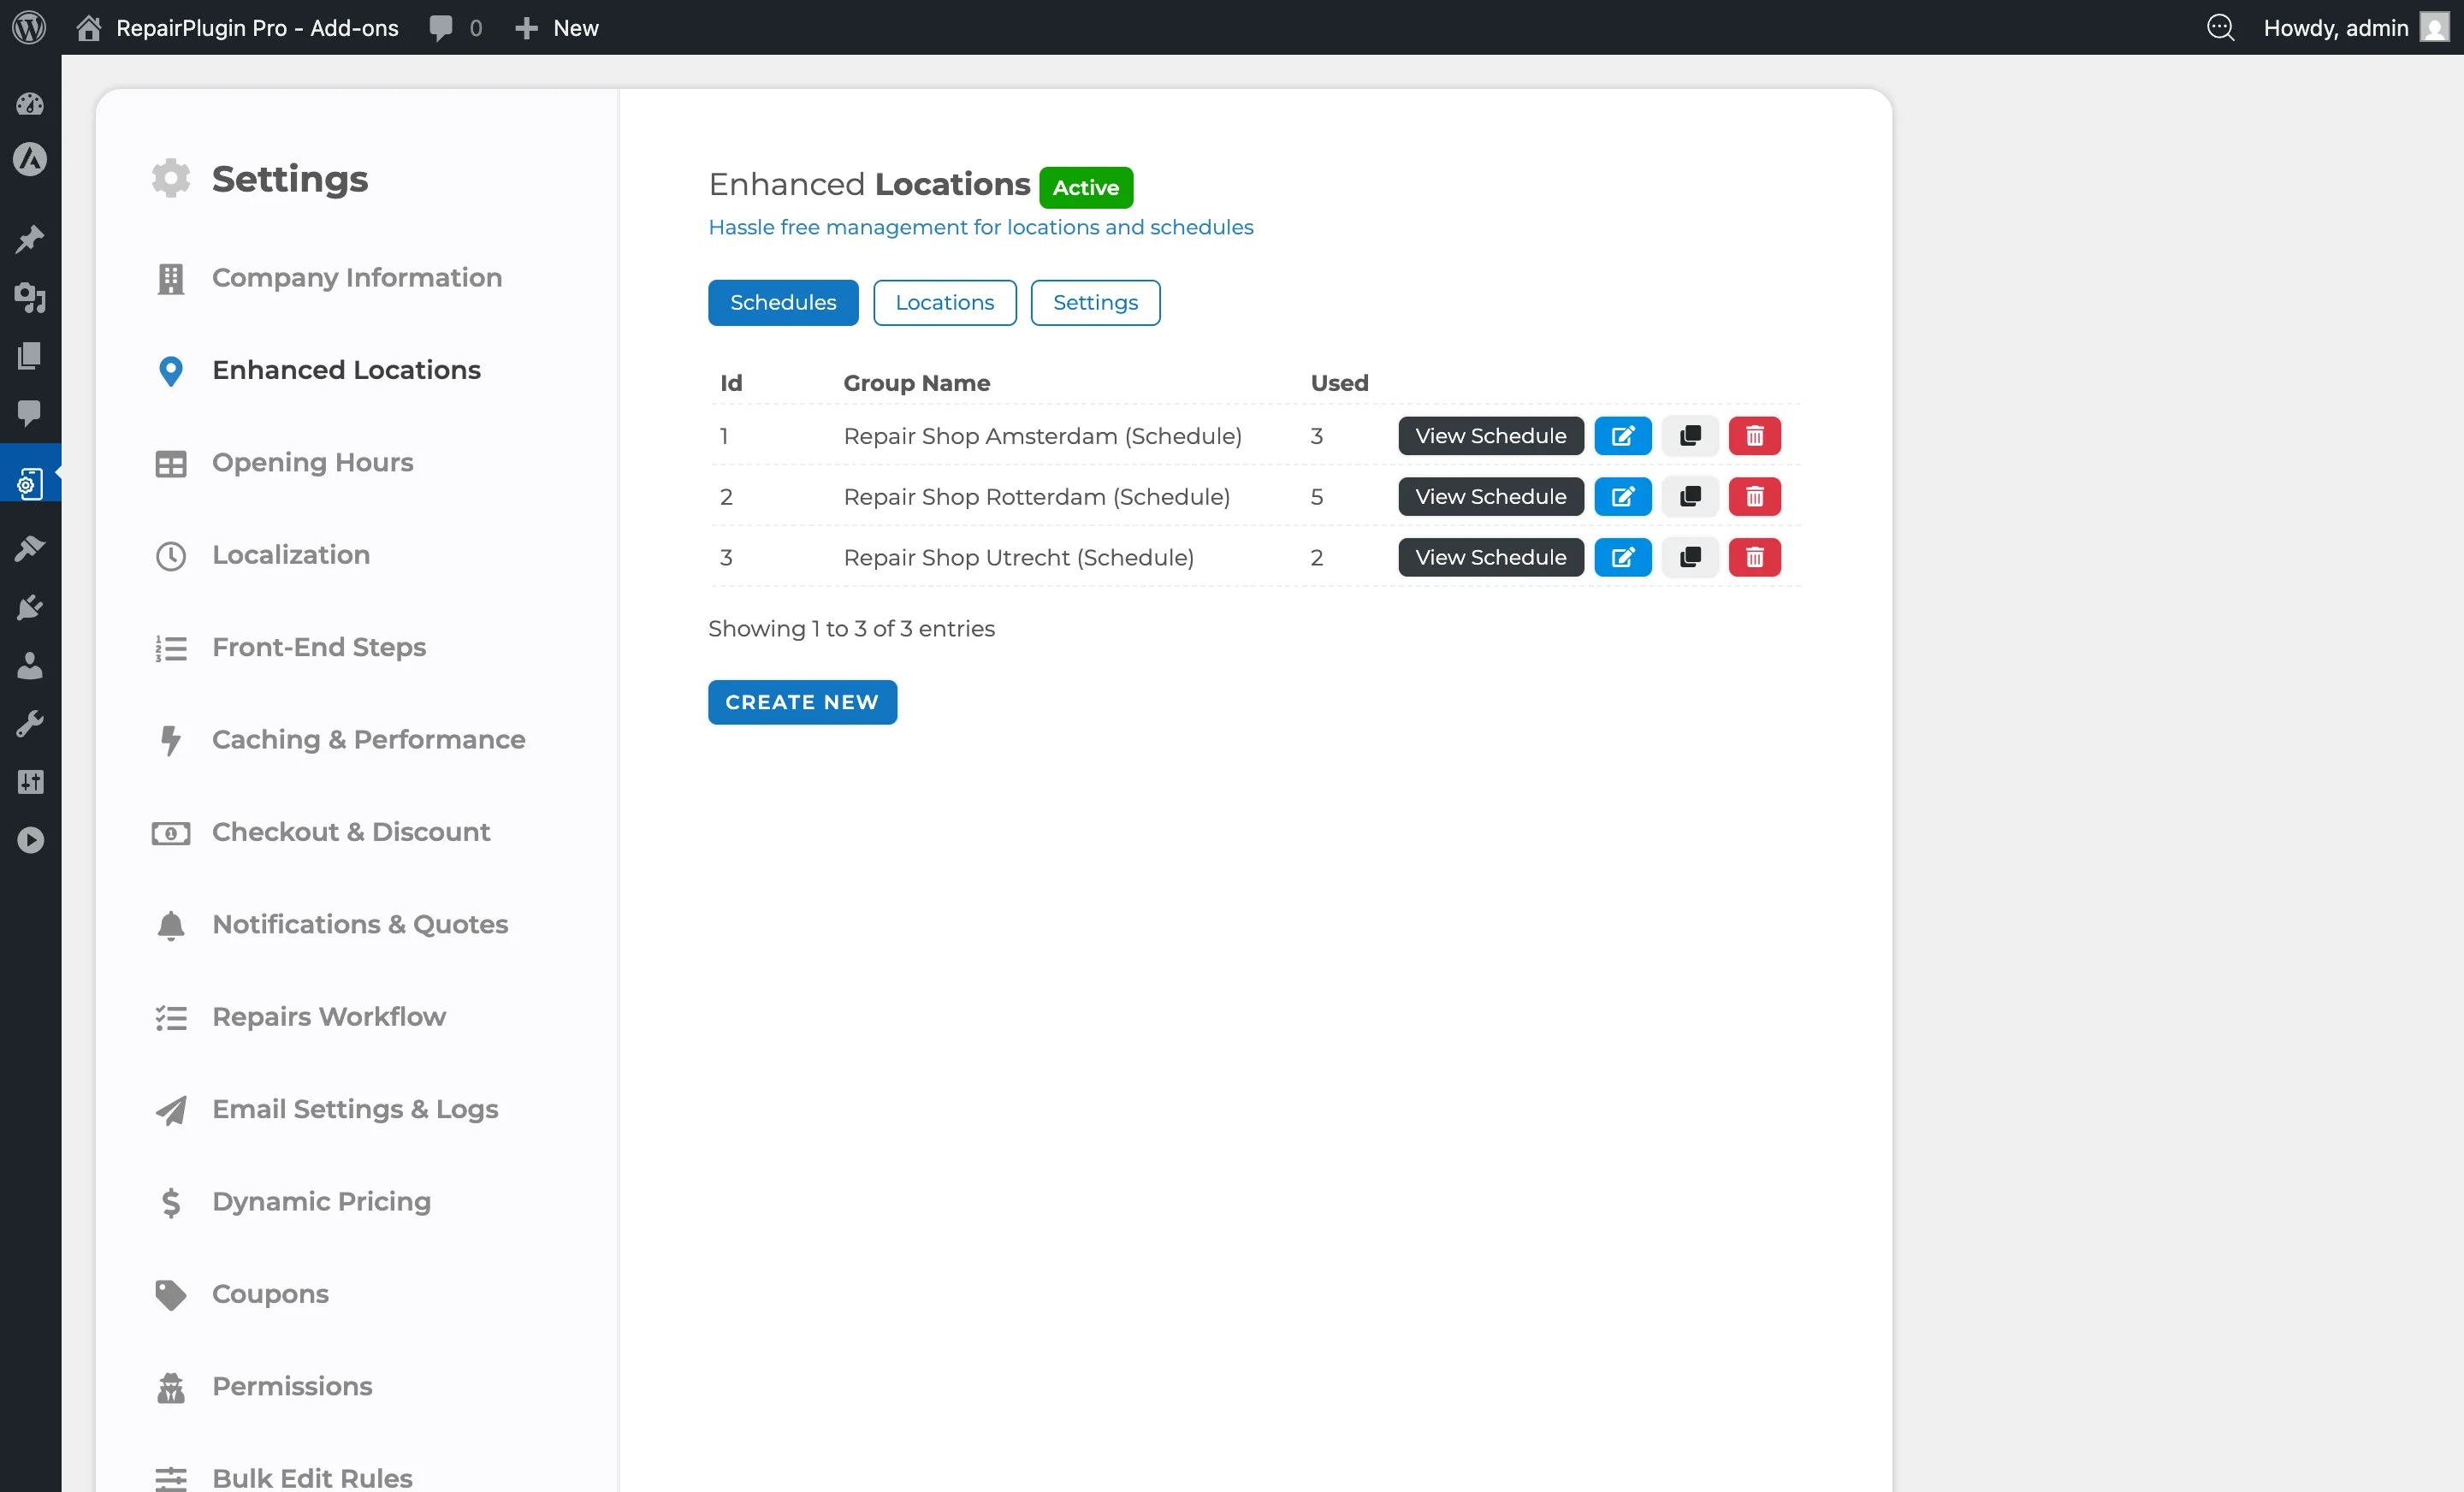
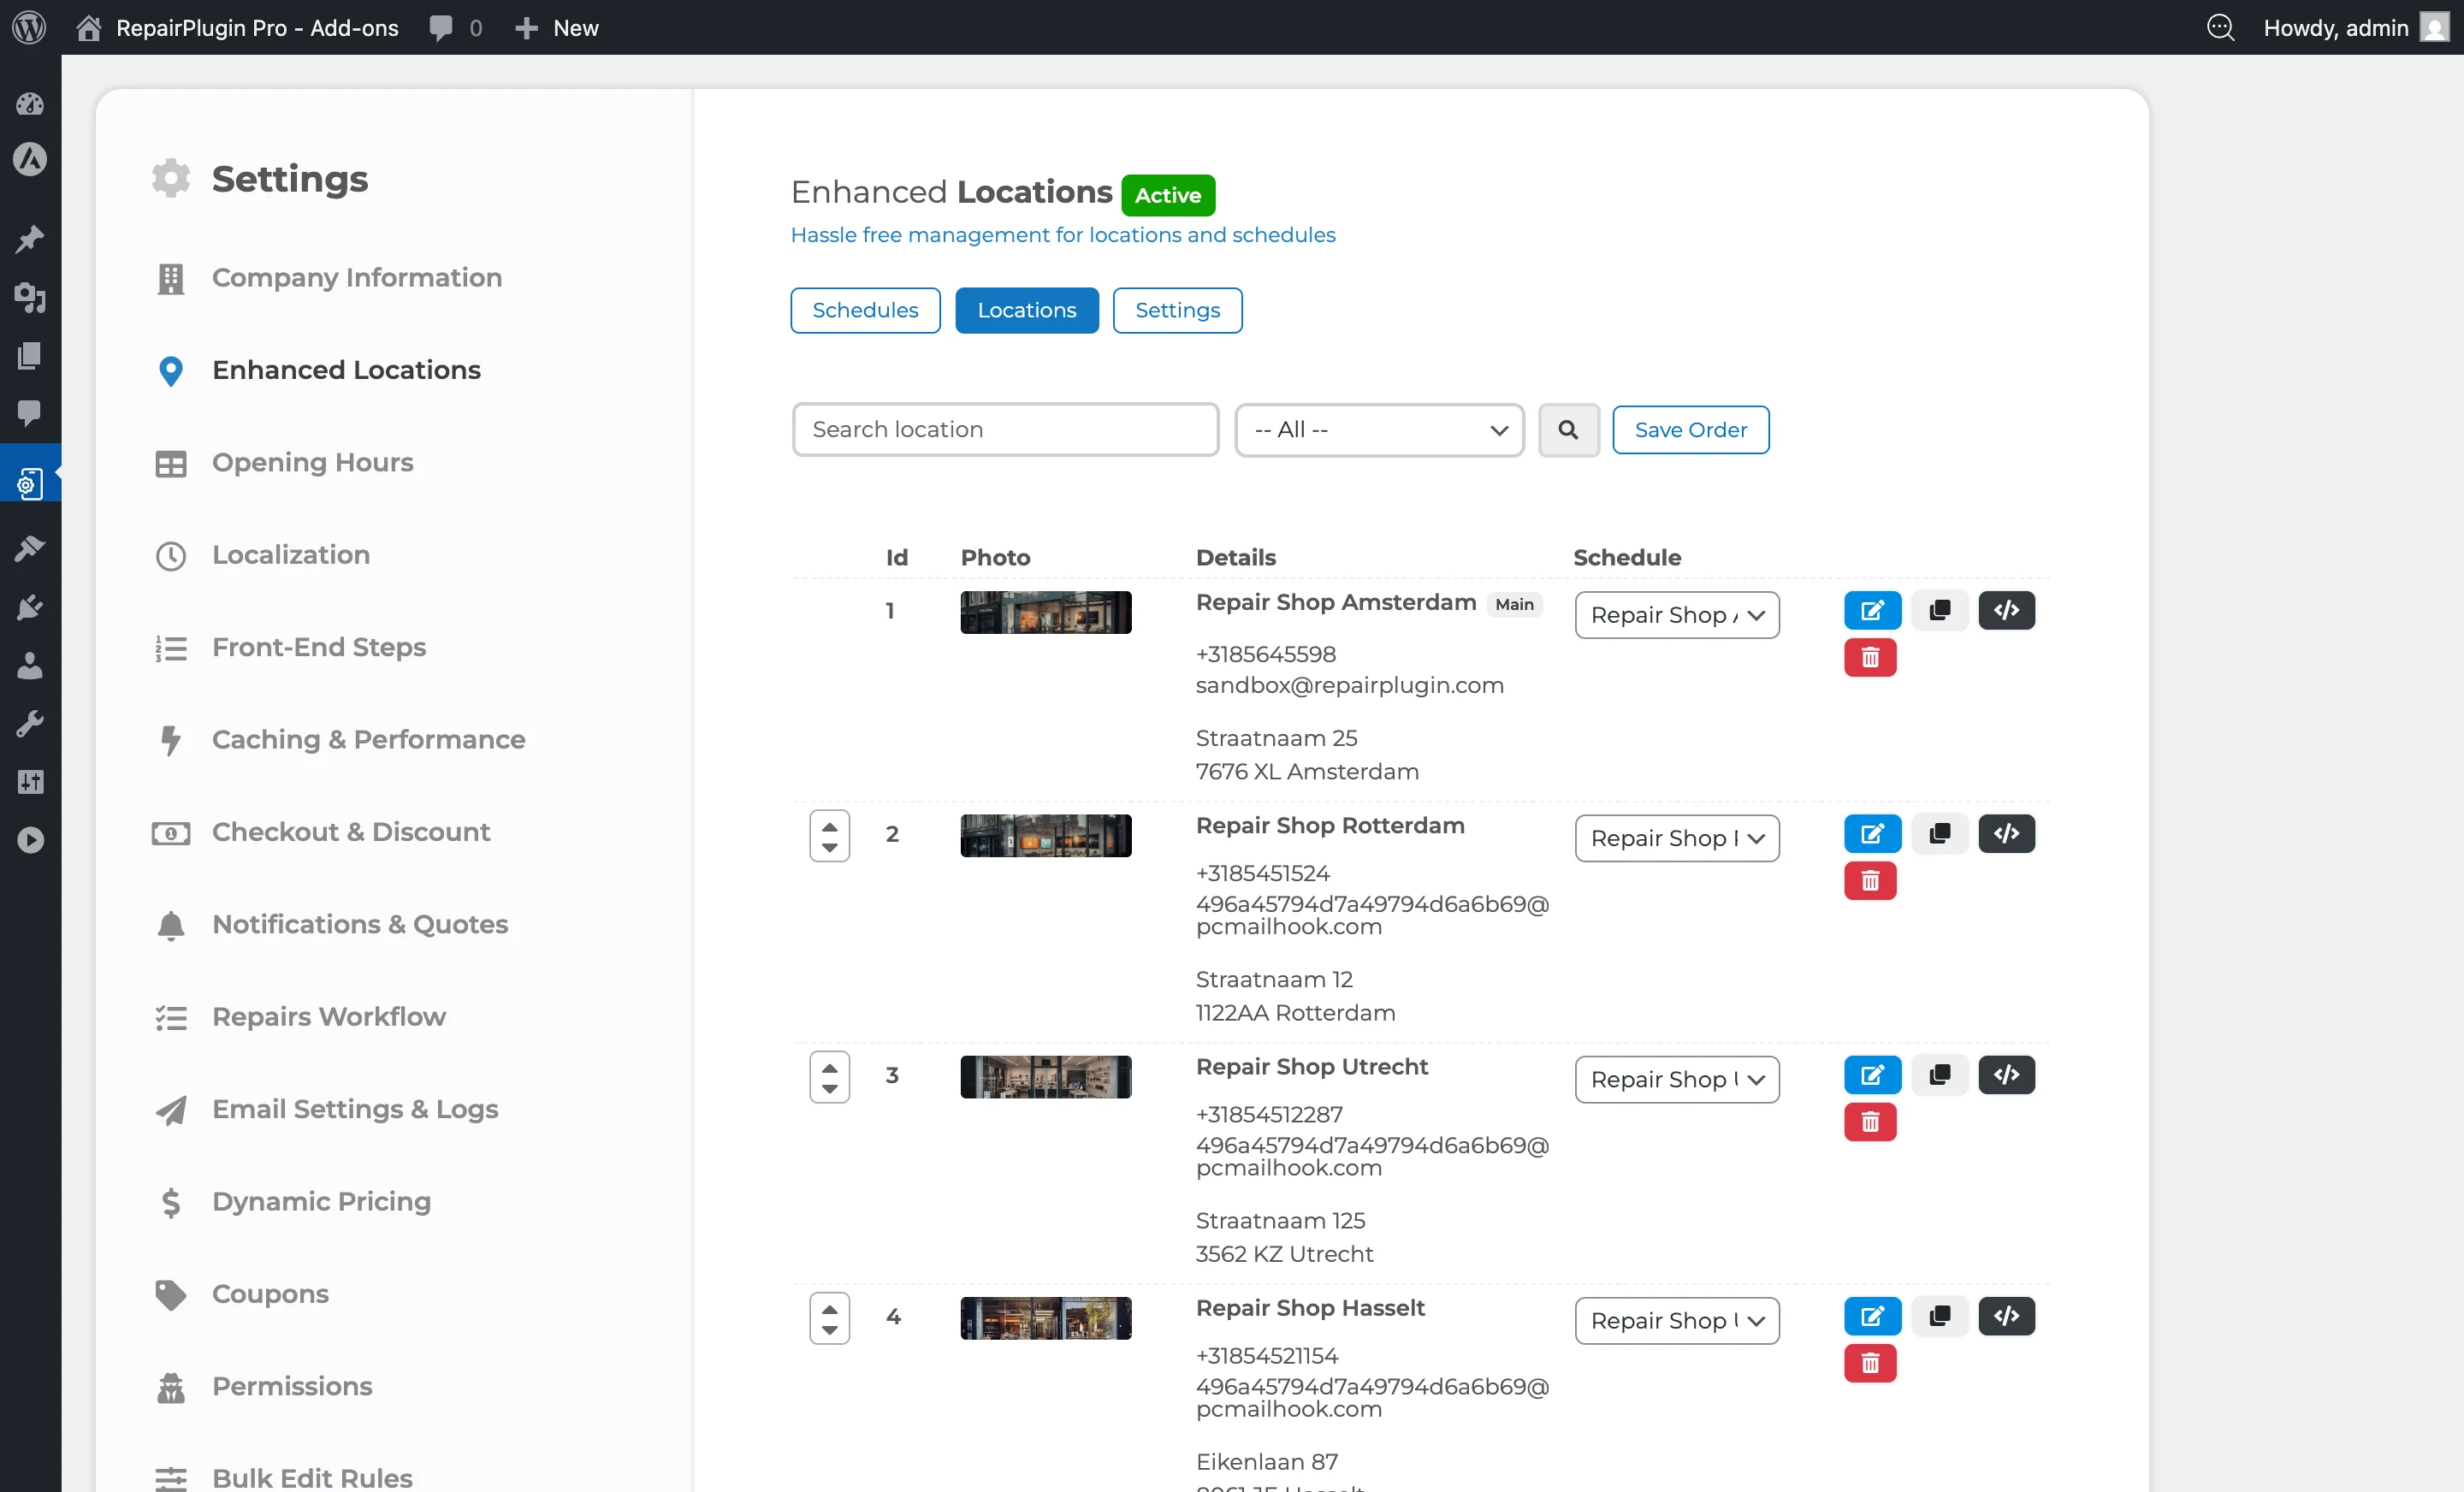
- You'll see three main tabs:
- Schedules -- create and manage opening hour templates
- Locations -- add, edit, duplicate, reorder, and delete individual stores
- Settings -- configure global behavior (Google Maps, pricing, distance, display)
- A fourth tab, License, is available for license activation and deactivation.
How to set it up
Activate Enhanced Locations
- Go to
RepairPlugin > Settings > Enhanced Locations > License. - Enter your license key and click Activate.
- The system validates the key against your Scale plan.
- Once activated, the Schedules, Locations, and Settings tabs become fully functional.
Create a schedule

- Go to
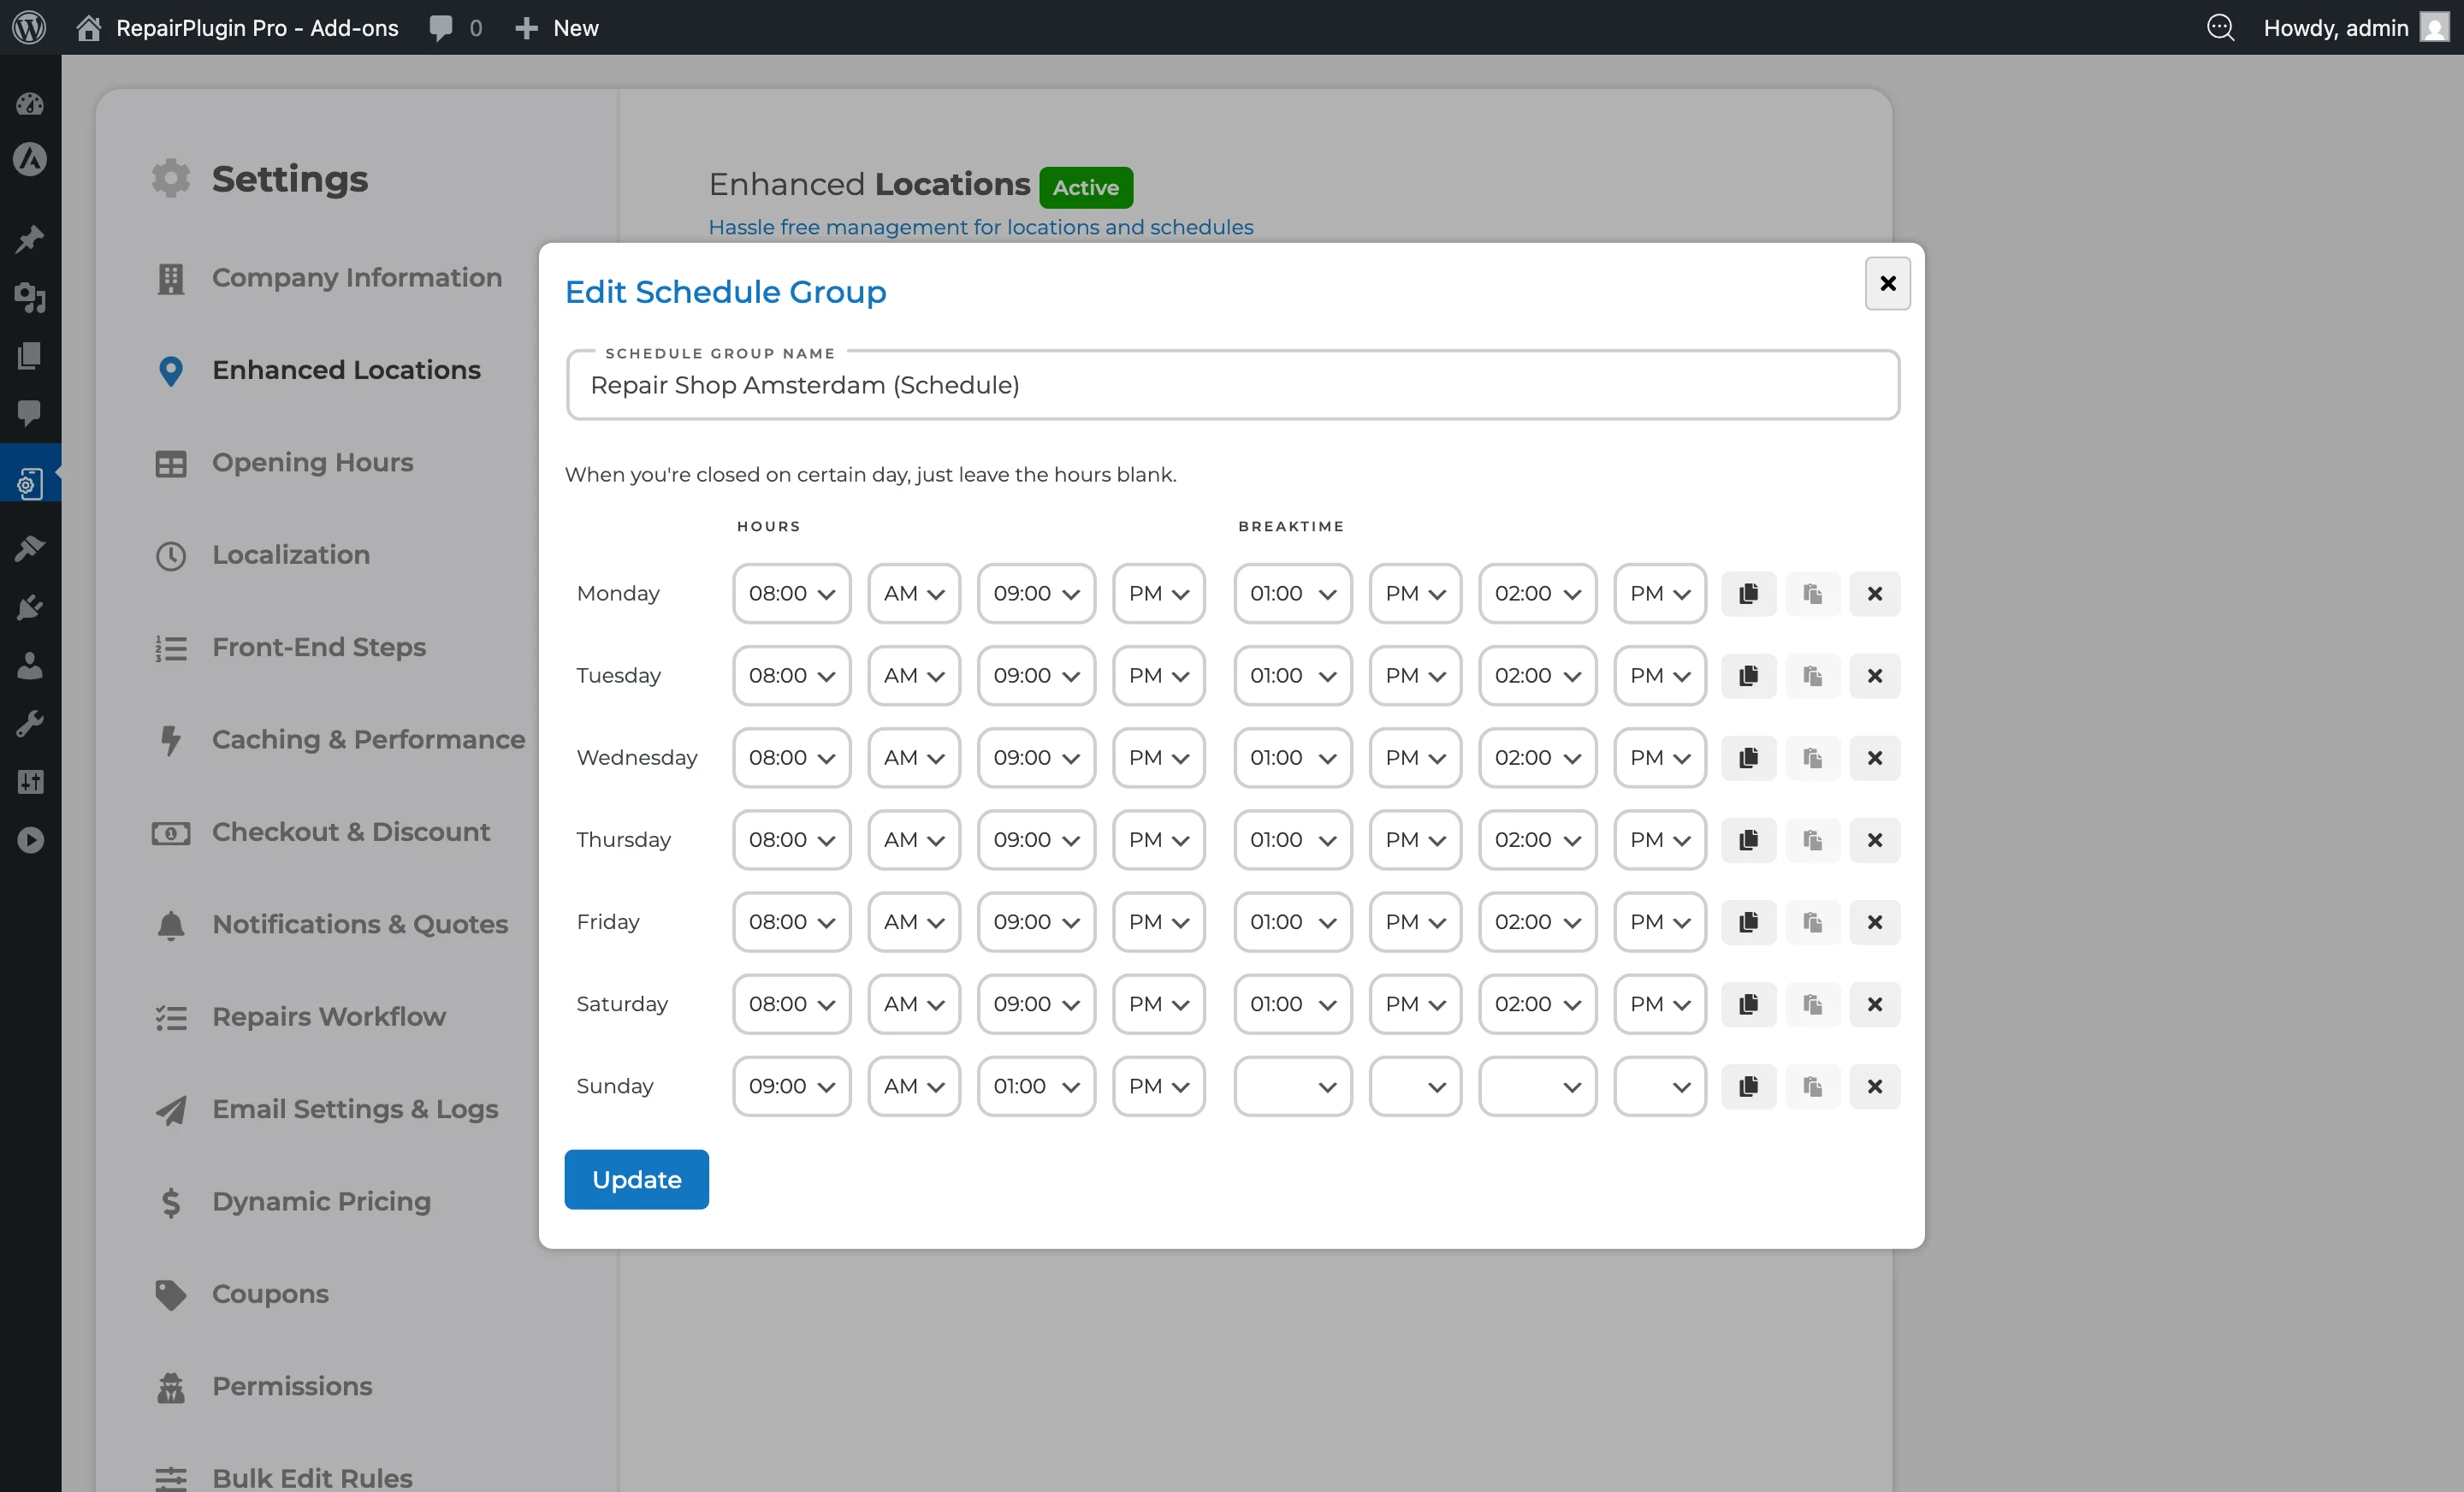
Enhanced Locations > Schedules. - Click Create New or edit an existing schedule.
- Enter a Schedule Group Name (e.g., "Standard Hours" or "Weekend Schedule").
- For each day (Monday through Sunday), set:
- Start time and End time (e.g., 09:00 AM to 06:00 PM).
- Break time (optional) -- a period when bookings are blocked (e.g., 13:00 to 14:00 for lunch).
- Leave hours blank for days the location is closed.
- Click Update to save.
- You can assign a single schedule to multiple locations that share the same operating hours.
Create a location
- Go to
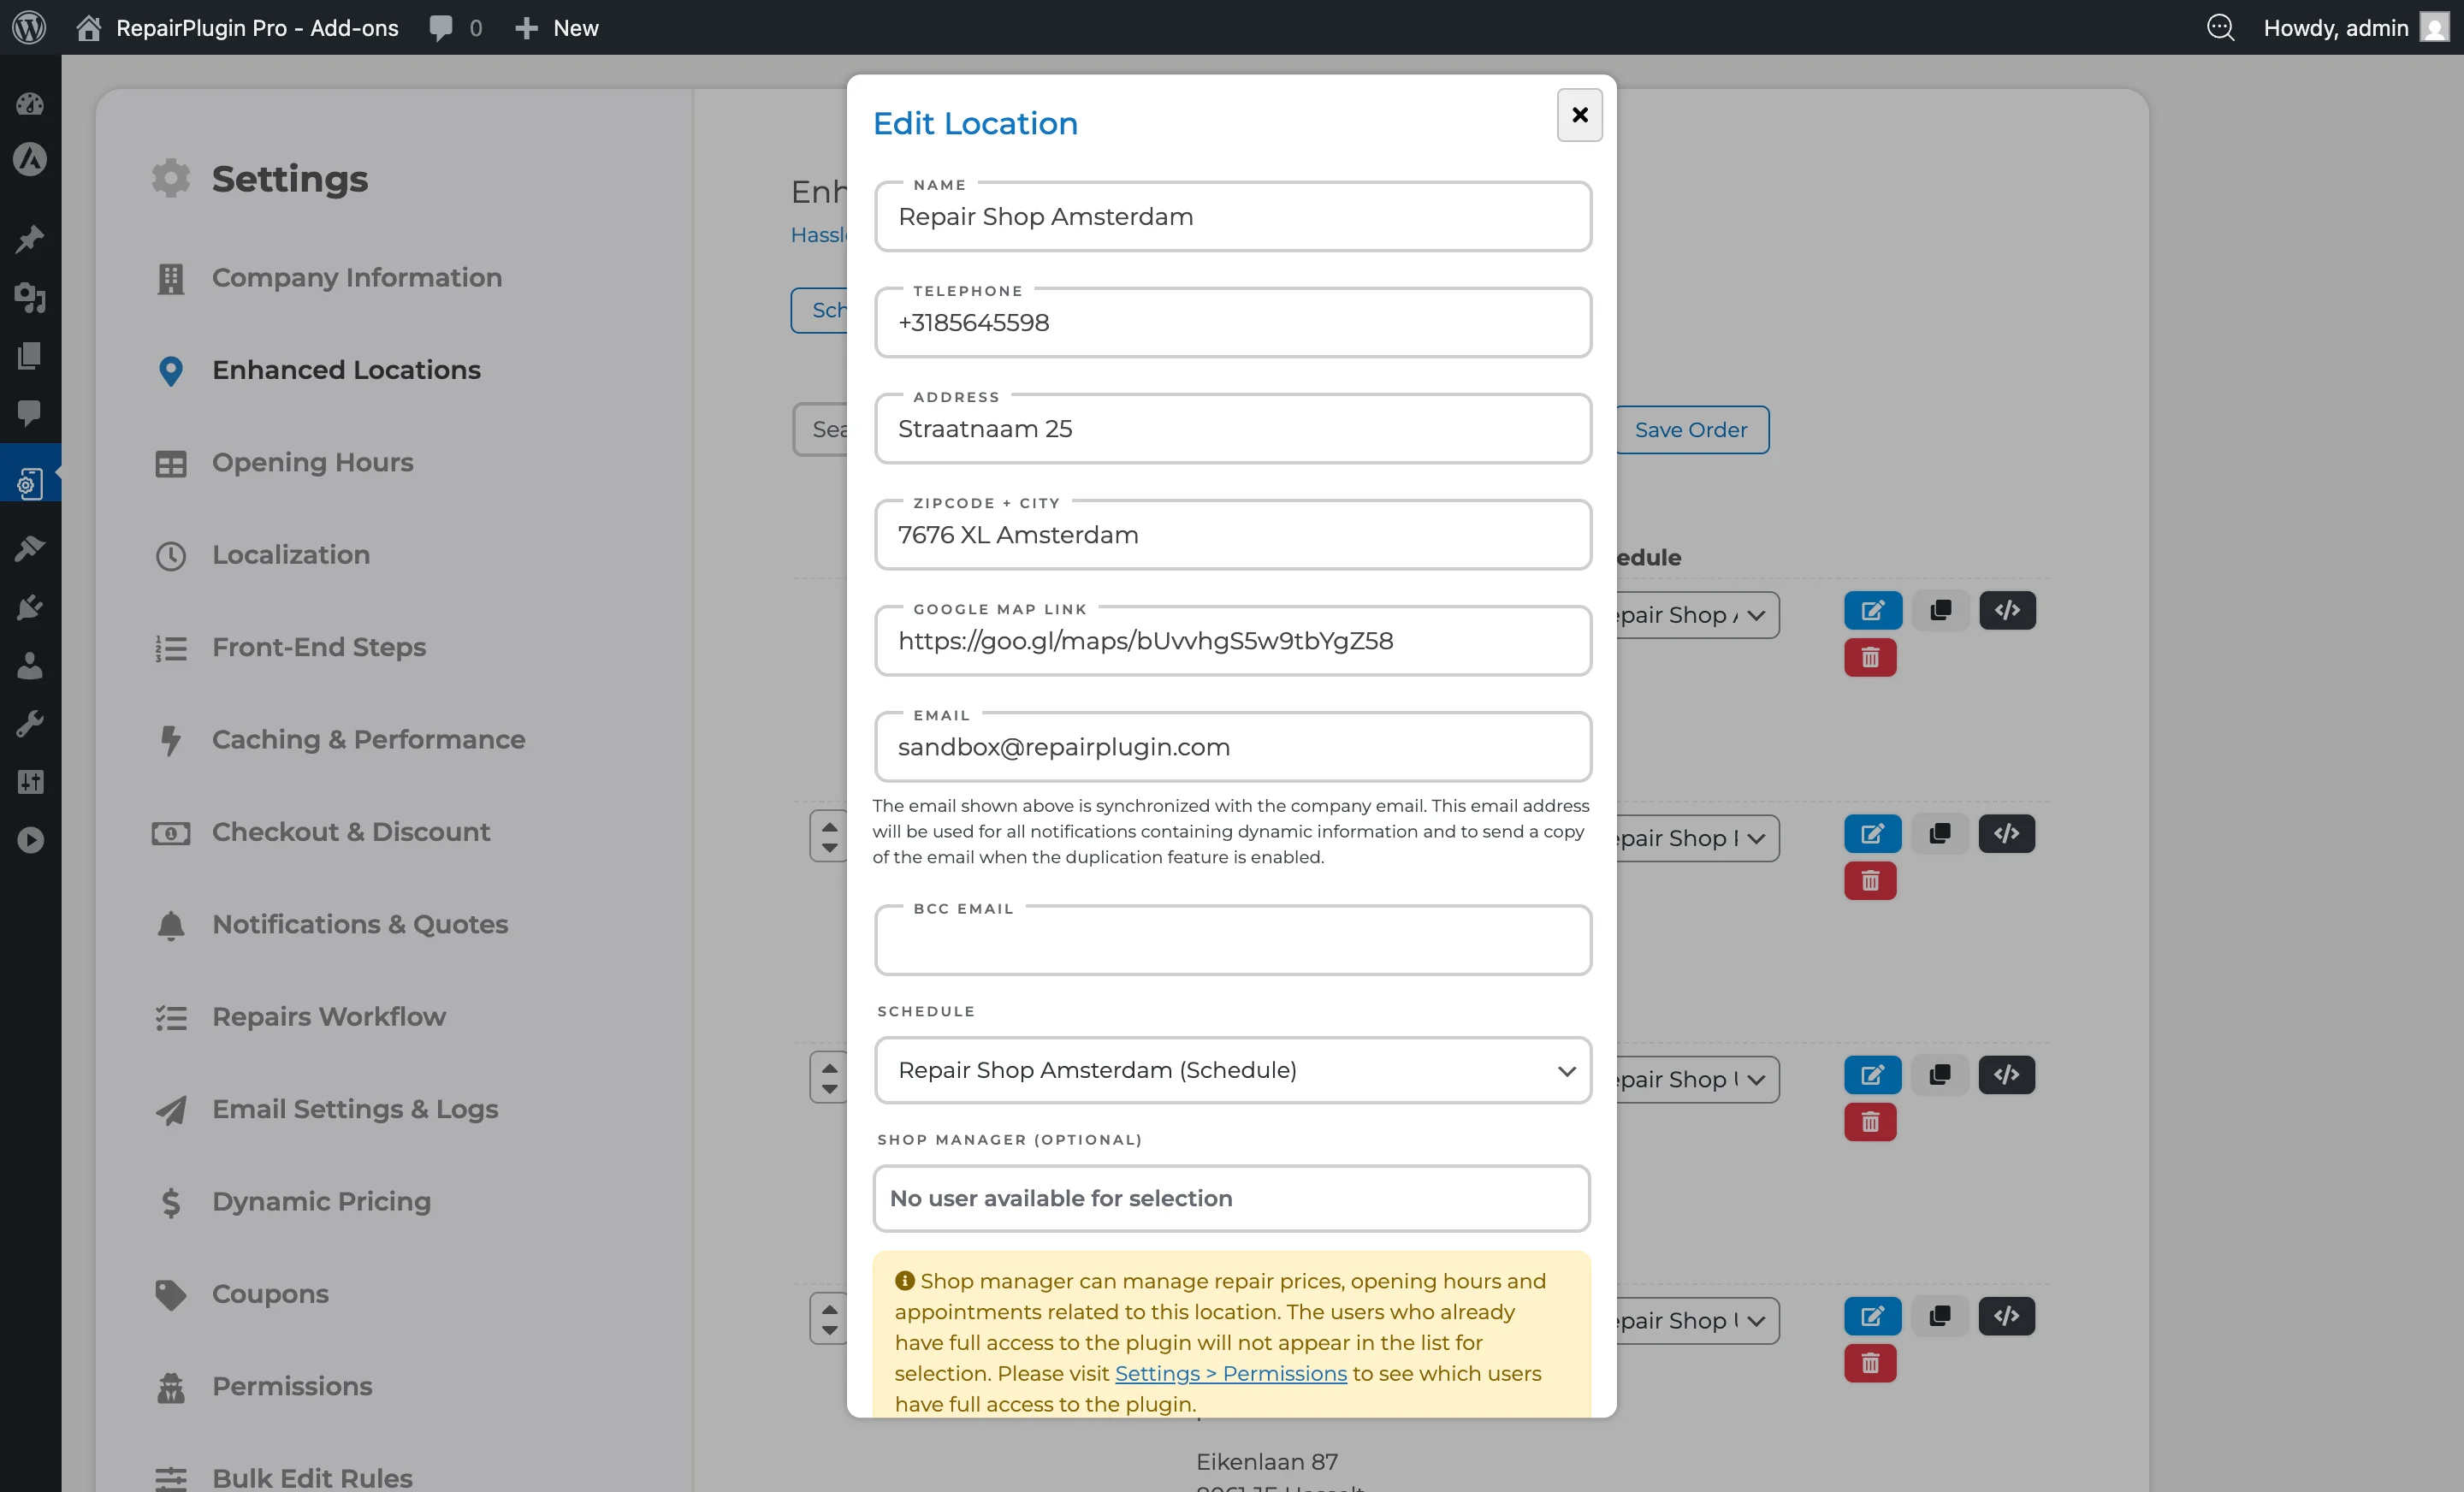
Enhanced Locations > Locations. - Click Add New to create a location, or click an existing location to edit it.
- Fill in the required fields (see Settings reference below for all fields).
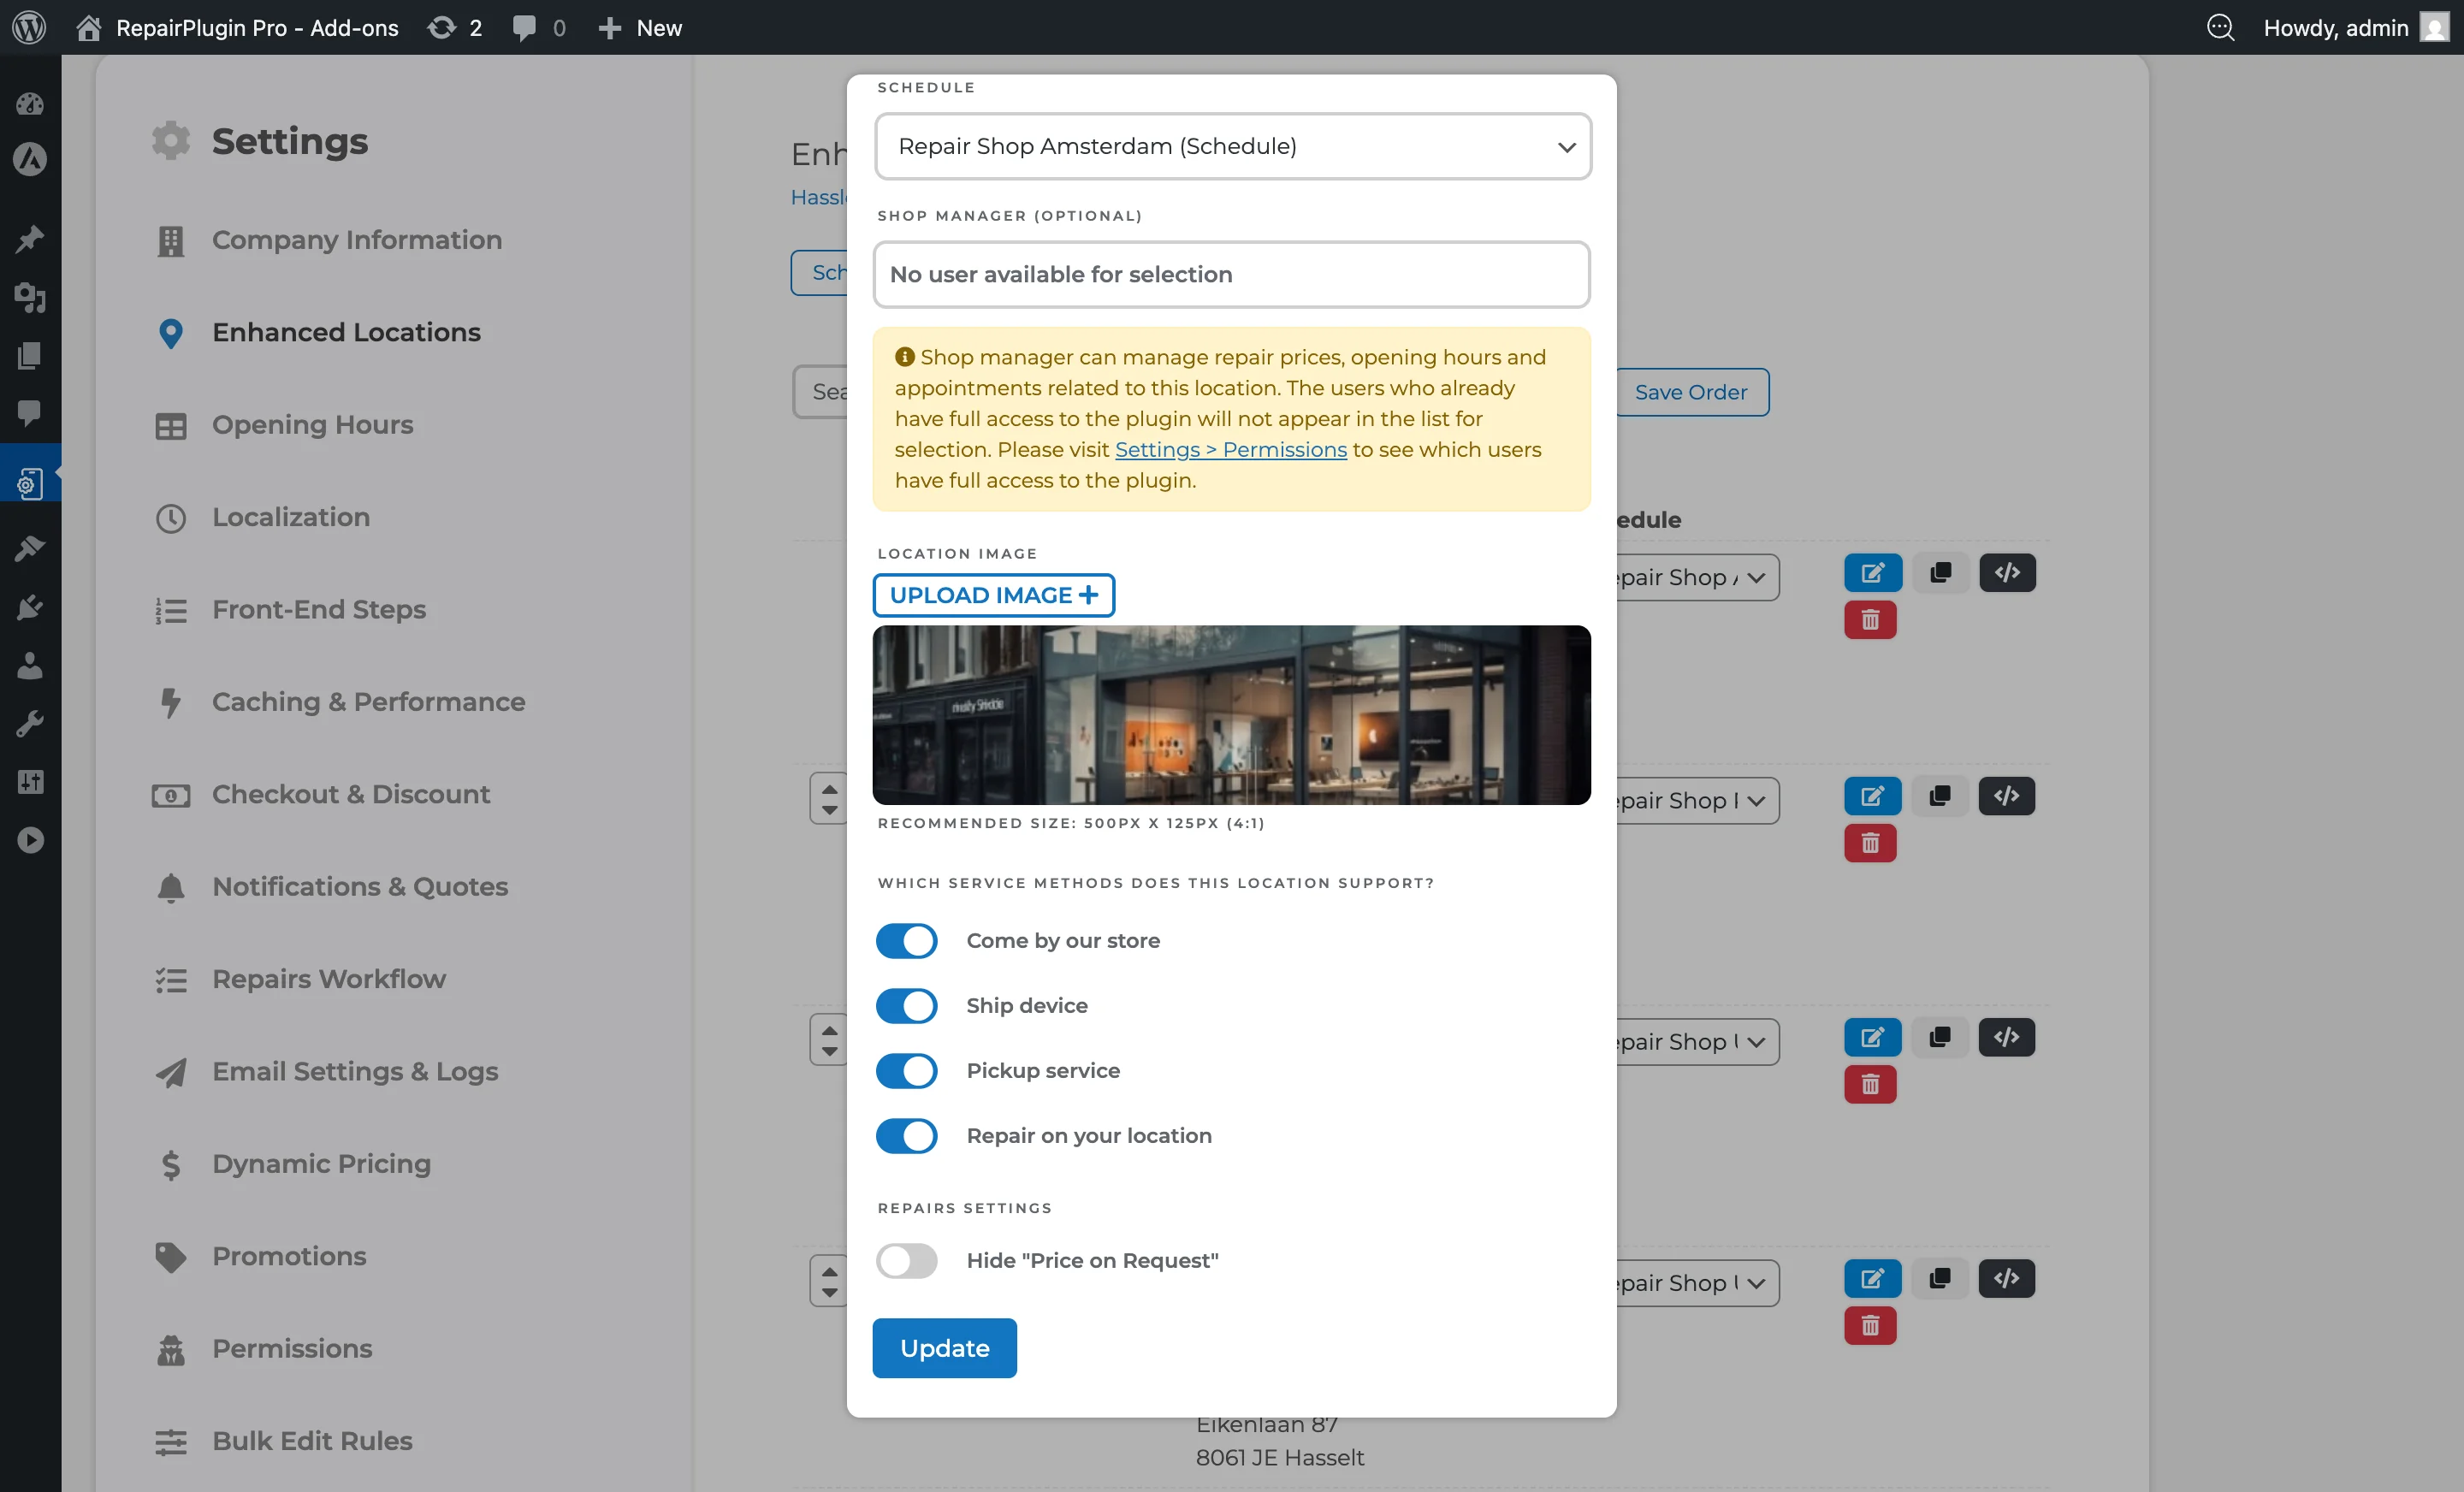
- Assign a Schedule Group to set opening hours.
- Turn service methods on or off per location (Come by our store, Ship device, Pickup service, Repair on your location).
- Optionally assign Shop Managers (WordPress users with the RepairPlugin role).
- Click Update to save.
Set up a virtual location
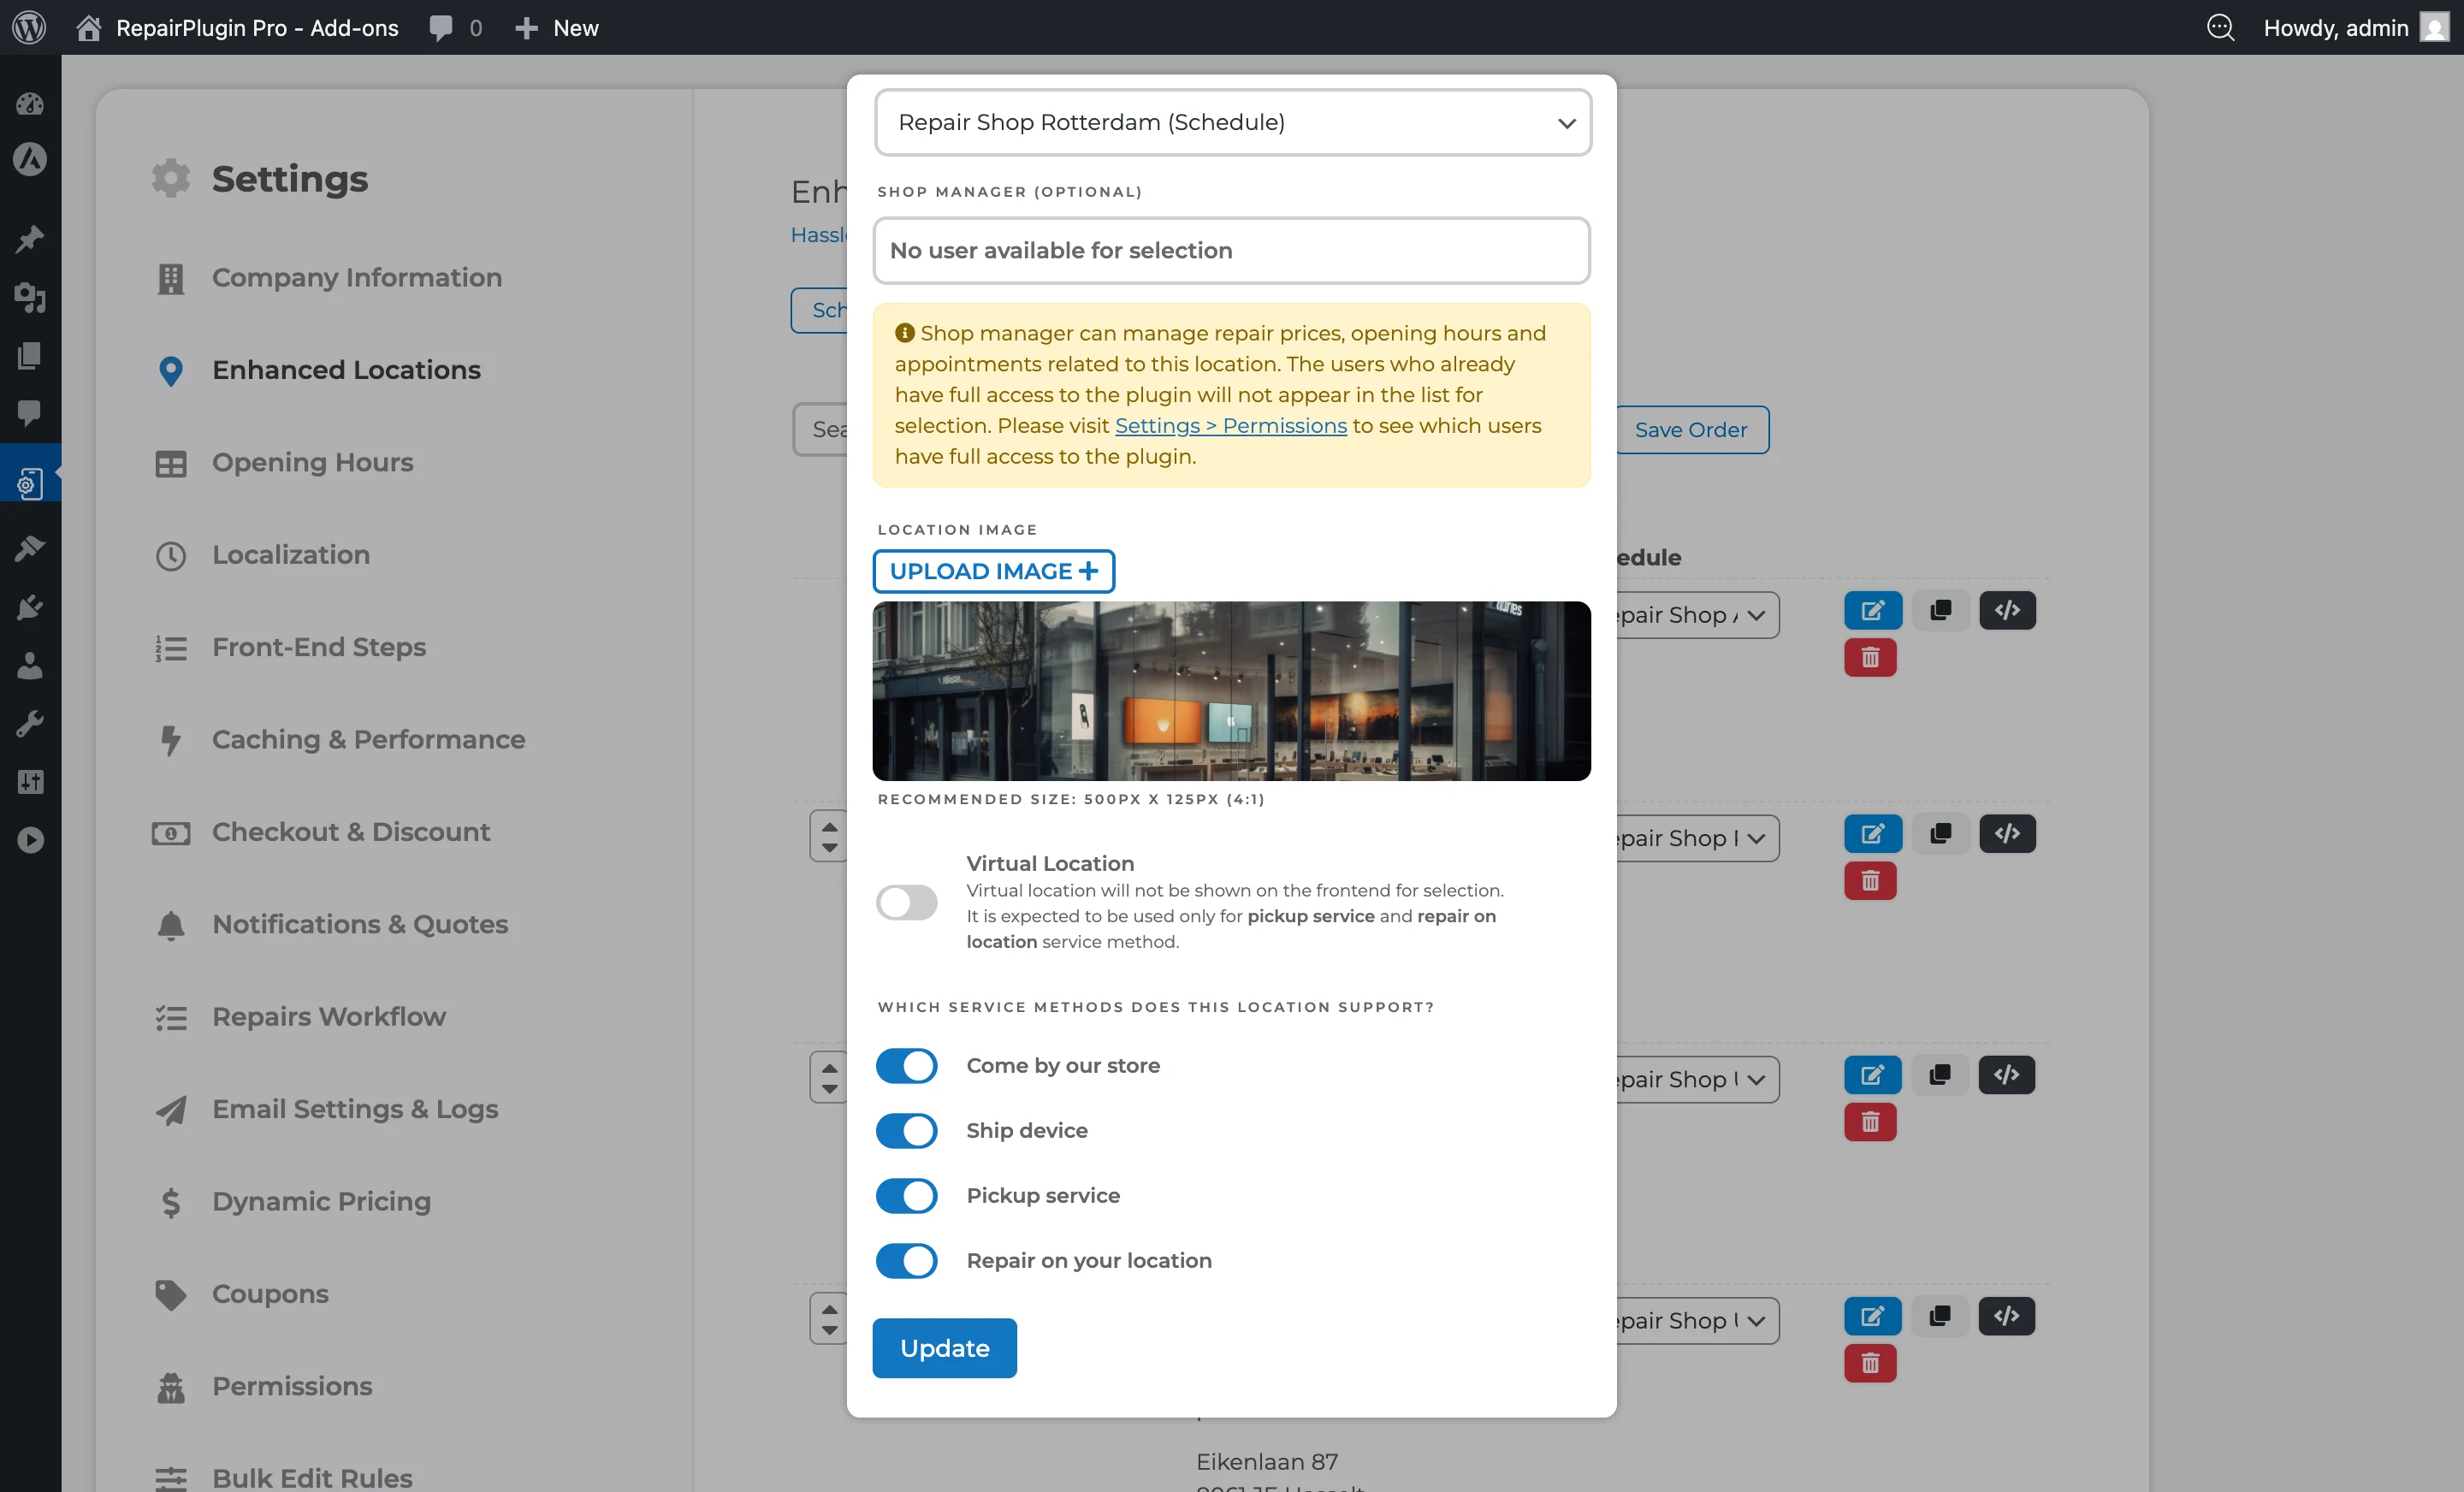
- When creating or editing a location, switch Virtual Location to ON.
- This automatically disables "Come by our store" and "Ship device" service methods.
- Only "Pickup service" and "Repair on your location" remain available.
- The location won't appear as a selectable storefront for your customers.
- Virtual locations are labeled "Virtual" in the Locations overview.
Share a schedule across locations
A single schedule group can be assigned to multiple locations that have the same operating hours:
- Go to
Enhanced Locations > Schedules. - Create a schedule (e.g., "Standard Hours").
- Go to
Enhanced Locations > Locations. - Open each location that shares these hours and set the Schedule Group to the same schedule.
When you update that schedule group, all assigned locations change at once.
Convert a schedule group to individual schedules
If a location head needs to manage their own schedule independently (without affecting other locations that share the same schedule group), they can convert it:
- Go to
Enhanced Locations > Schedules. - Click the schedule group assigned to your location(s).
- Click Convert to Individual Schedule.
- The shared schedule is duplicated into separate schedules -- one per location that was using it. Each location gets its own independent copy that can be edited without affecting the others.
Note: Only location heads (not full-access admins) can perform this conversion. It's designed for situations where a branch needs to deviate from the shared schedule.
Duplicate a location
- Go to
Enhanced Locations > Locations. - Click the clone icon on the location row you want to duplicate.
- A new location form opens with all fields pre-filled from the original -- the name has (Copy) appended.
- Edit any fields you want to change (name, address, email, etc.).
- Click Update to save the new location.
The duplicate includes the schedule, address, contact details, service methods, virtual status, and location image. If location-based pricing is enabled, all pricing is also copied. Shop managers are not copied -- you'll need to assign them separately.
Delete a location
- Go to
Enhanced Locations > Locations. - Click the trash icon on the location row you want to remove.
- Confirm the deletion in the popup dialog.
You must keep at least one location -- the system won't let you delete your last remaining location. Only full-access admins can delete locations. Deleting a location permanently removes its schedules and location-based pricing.
Reorder locations
The order in which locations appear to customers during booking can be customized:
- Go to
Enhanced Locations > Locations. - Drag locations into the desired order using the handle on each row.
- Click Save Order.
The main location always appears first and can't be moved. Only full-access admins can reorder locations.
Enable location-based pricing
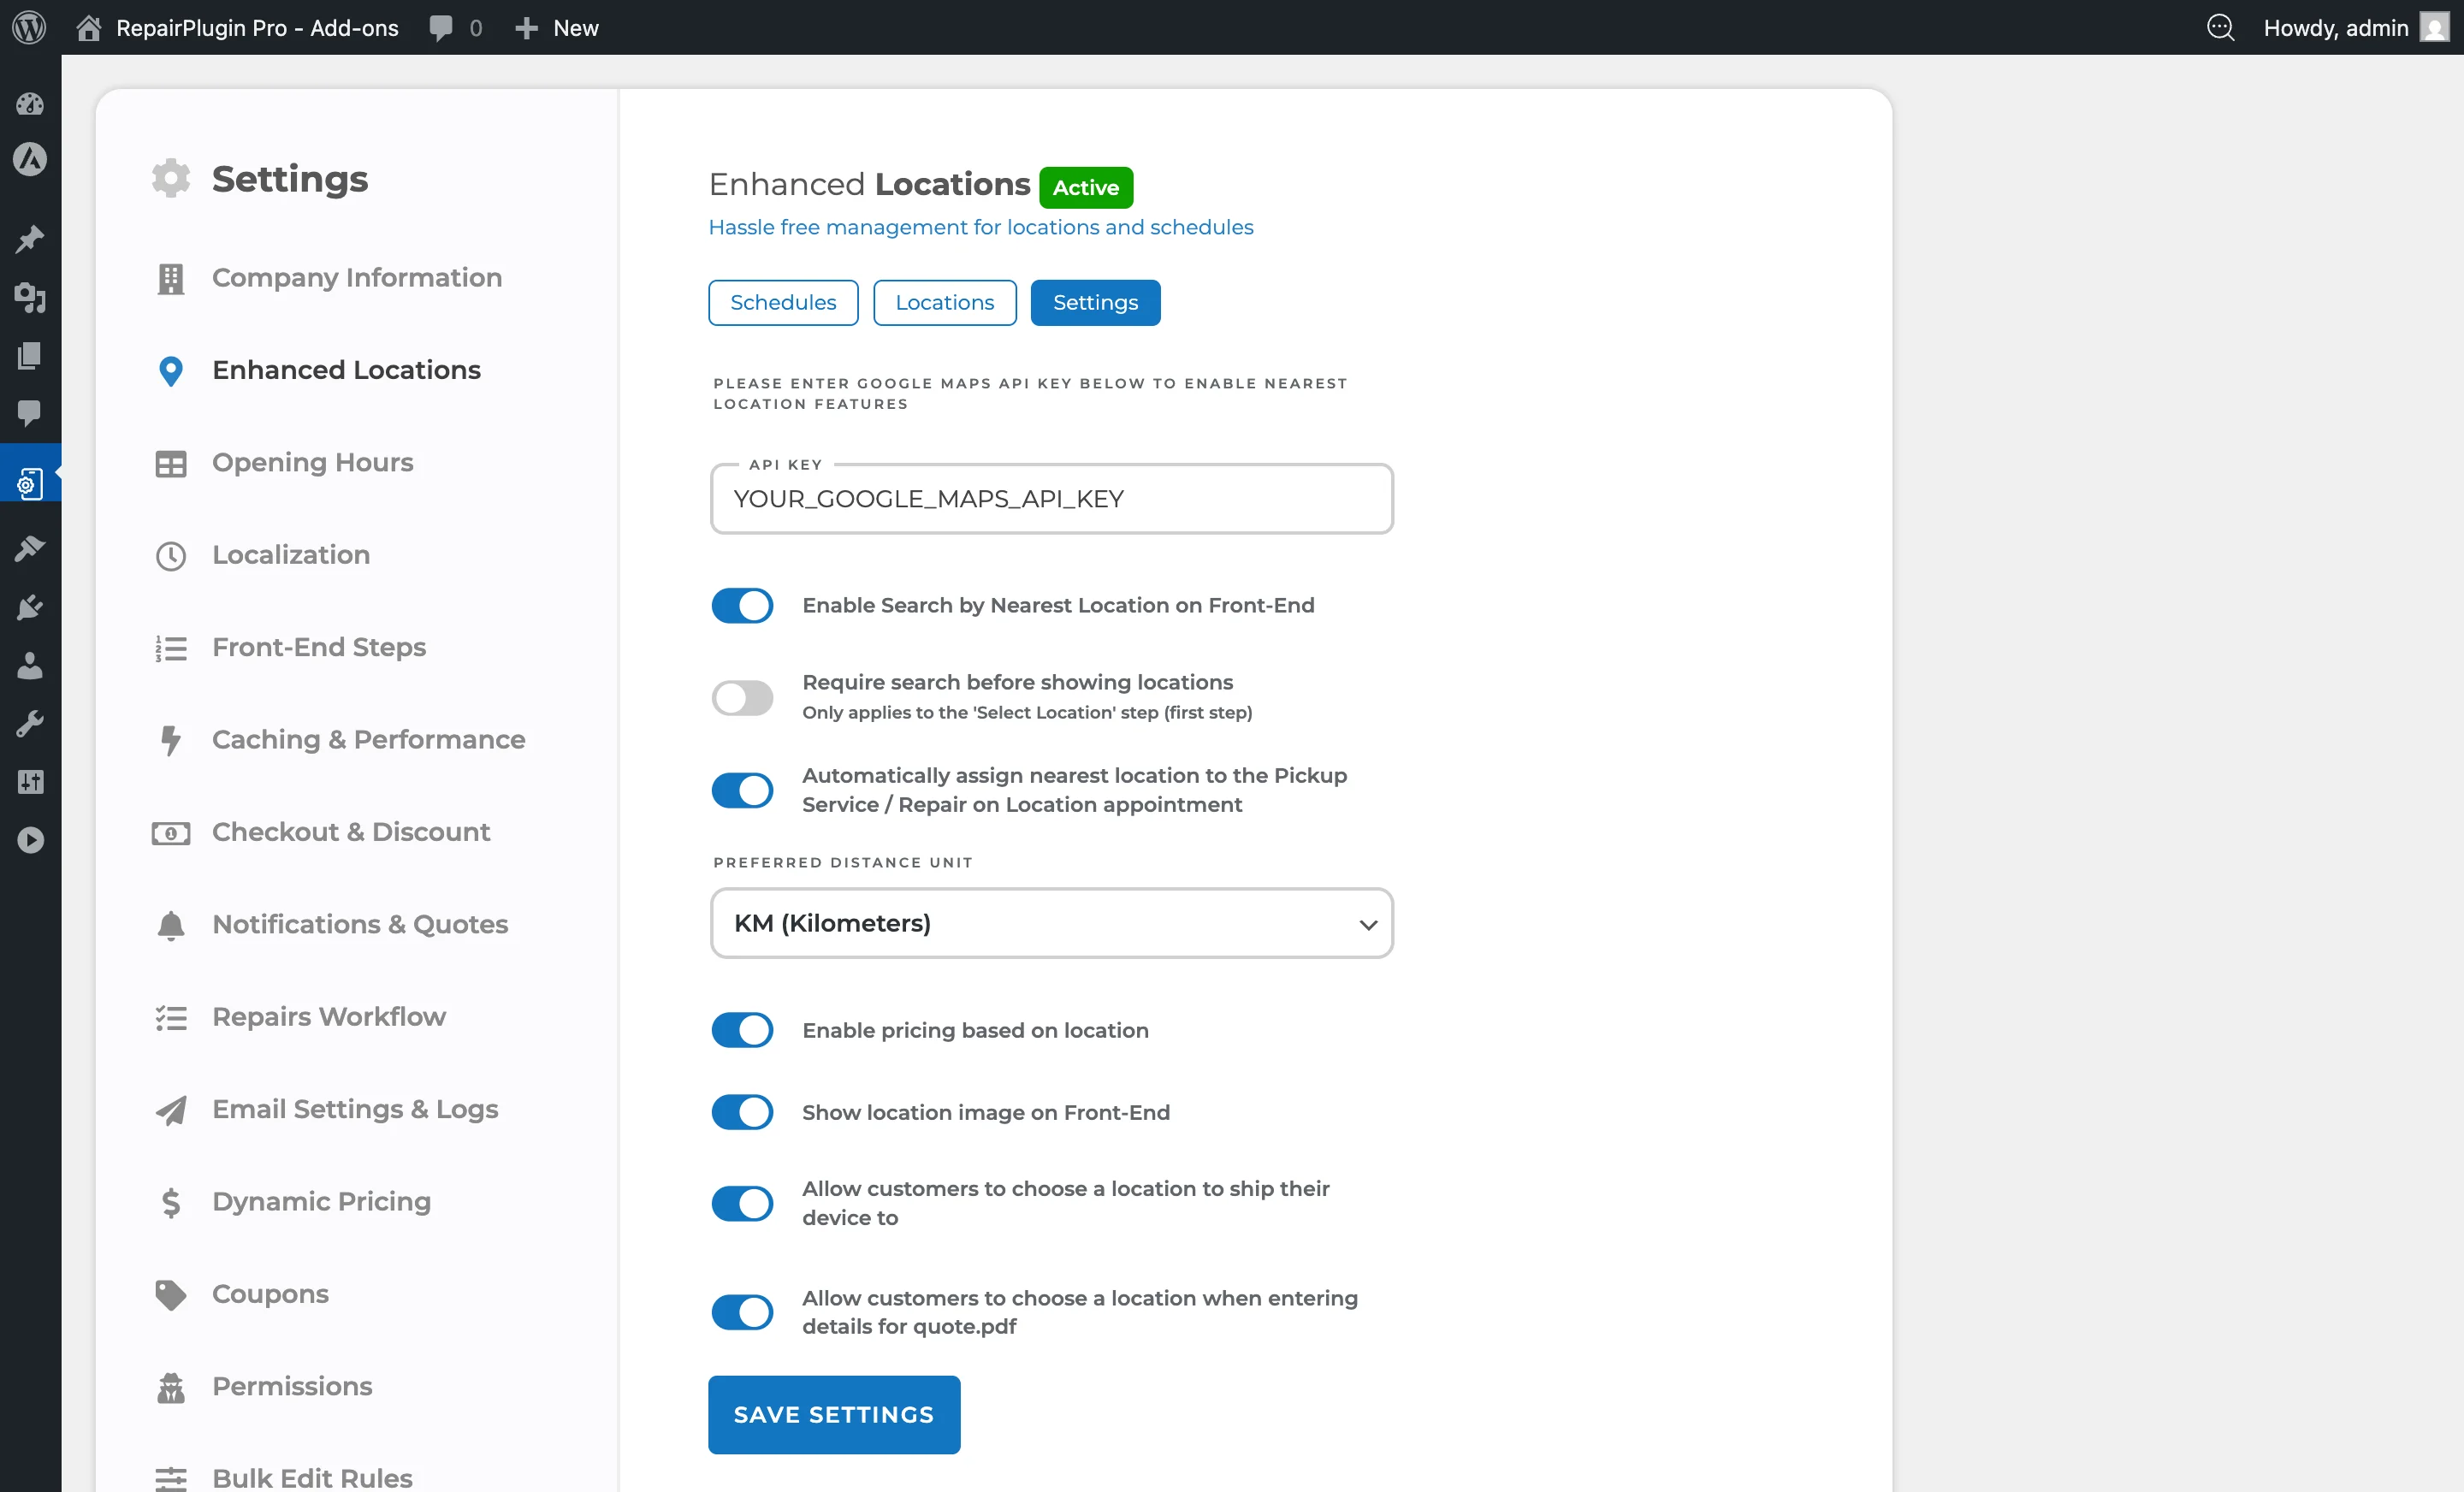
- Go to
Enhanced Locations > Settings. - Switch Enable Pricing Based on Location to ON.
- A "Selected Location" dropdown now appears on the Models & Repairs and Default Repairs pages.
- Use the dropdown to switch between locations and configure different prices, durations, fallback values, and margins per location.
- Your customers must select a location before proceeding. All pricing, time slots, and service methods are locked to the selected location for the entire booking.
Assign shop managers
- Create a WordPress user with the RepairPlugin role under
WordPress > Users. - Go to
Enhanced Locations > Locationsand select a location. - Assign the user to the location.
- The shop manager can view and adjust prices for their location, access only their location's appointments, and receive duplicate notification emails.
- To give a user full access to all locations, add them to
RepairPlugin > Settings > Permissionsinstead.
Settings reference
Schedules tab
| Setting | Description | Default | Customers see |
|---|---|---|---|
| Schedule Group Name | Names the schedule template so you can identify it when assigning it to locations | empty | Nothing directly -- this is for your own organization. |
| Opening Hours (per day) | Sets when the location is open and available for bookings for each day of the week | empty (closed) | Only the time slots within these hours are available when they select this location. |
| Break Time (per day) | Blocks a period within the working day from bookings (e.g., a lunch break from 13:00 to 14:00) | empty (no break) | No time slots are available during break periods. |
Locations tab
| Setting | Description | Default | Customers see |
|---|---|---|---|
| Name | Sets the display name for the location | empty | This name appears in the location selection step during booking. |
| Telephone | Stores the contact phone number for the location | empty | The phone number may appear in location details and communications. |
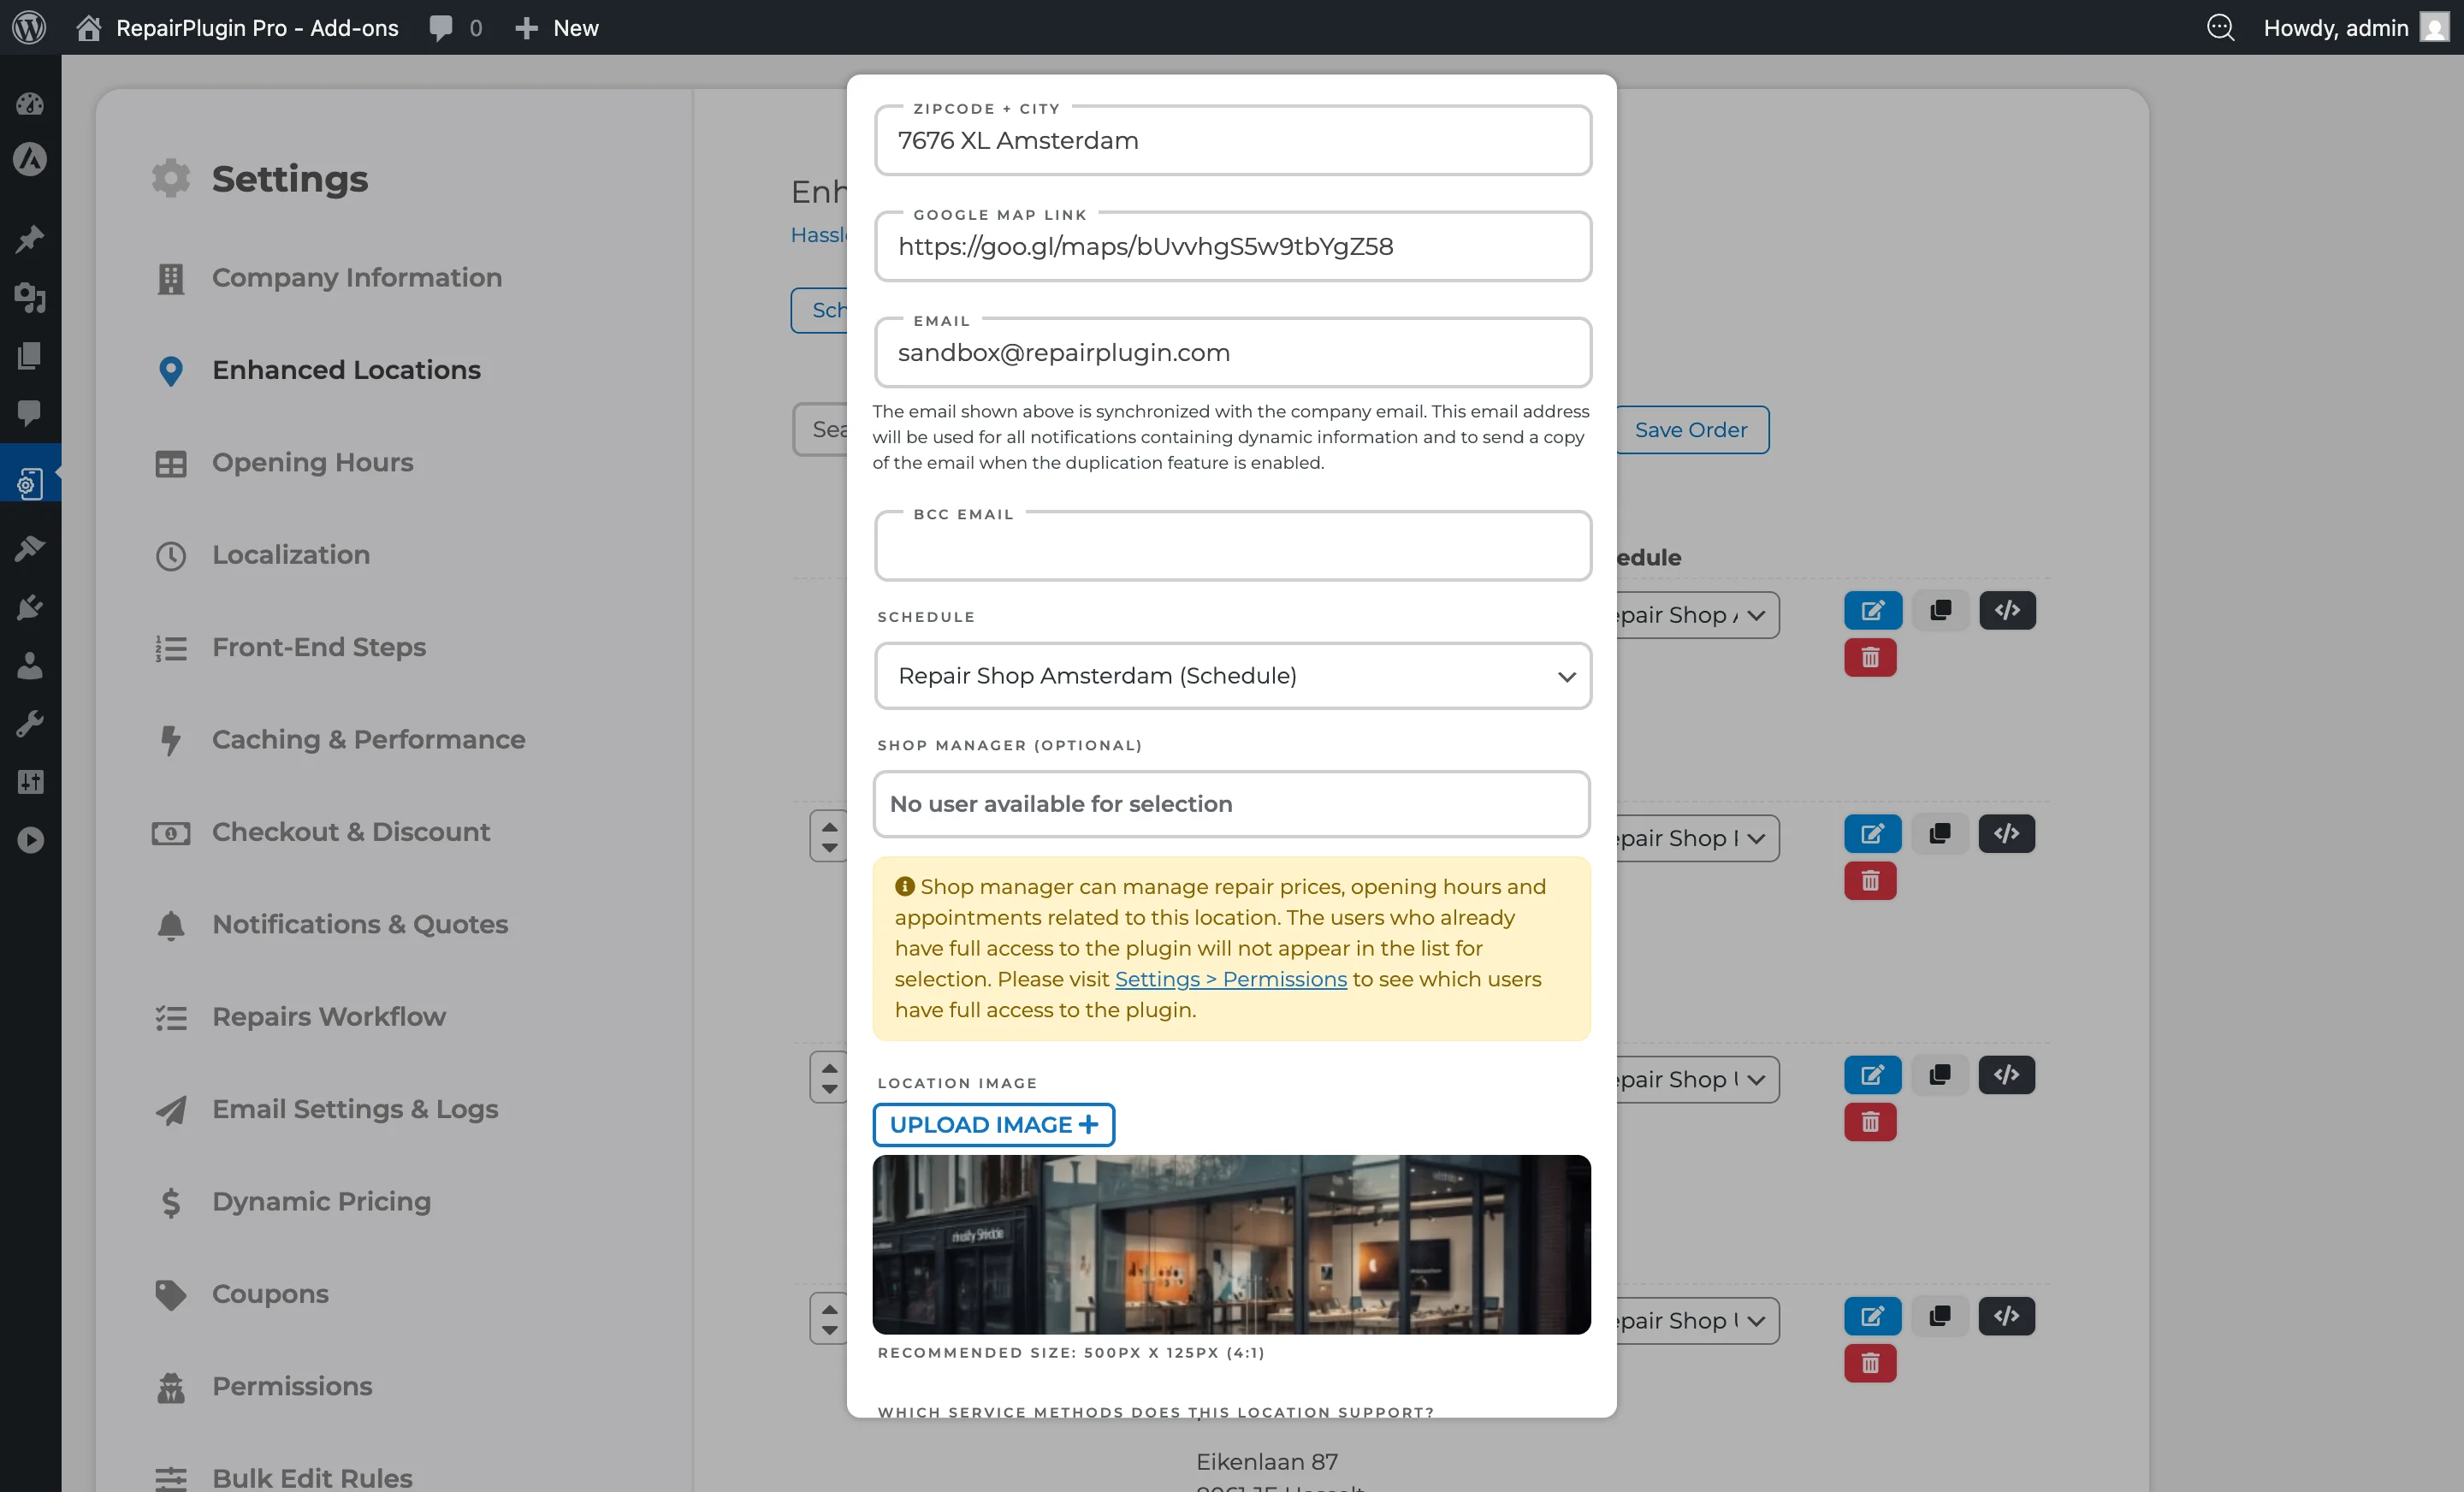
| Address, Zipcode, City | Sets the physical address, used for display and Google Maps integration | empty | The address appears during location selection and is used for nearest-location calculations. |
| Google Maps Link | Links to the Google Maps page for the location | empty | A direct maps link they can use for navigation. |
| Sets the email address that receives booking notifications for this location | empty | Nothing directly -- this controls where notifications are sent. | |
| BCC Email | Adds an extra email address that receives a blind copy of all location notifications | empty | Nothing -- this is for internal use only. |
| Schedule Group | Links the location to a specific schedule, setting its opening hours and break times | none | Only the time slots from the assigned schedule are available when they select this location. |
| Shop Managers | Assigns WordPress users as managers for this location. They can only access this location's data (prices and appointments) | none | Nothing directly -- this controls who manages the location behind the scenes. |
| Location Image | Uploads a photo or image for the location | none. Recommended size: 500px x 125px (4:1 ratio) | The image appears during location selection if "Show Location Image on Frontend" is turned on in Settings. |
| Virtual Location | Marks the location as virtual, which disables "Come by our store" and "Ship device." Only pickup and on-location repair remain available | off | Virtual locations don't appear in the location selection. They work as behind-the-scenes routing hubs for pickup and on-site services. |
| Service Methods (per location) | Controls which service methods are available at this specific location | all enabled | Only the service methods you've enabled for their selected location. |
| Hide Price on Request Repairs | When enabled, repairs with a price of 0 (price on request) are hidden from the frontend for this location. Only visible when "Enable Pricing Based on Location" is turned on in the Settings tab. Tip: Use this when a location doesn't offer certain repairs and you don't want customers to see "Price on Request" for services that aren't available at that branch. | off | Repairs that would show "Price on Request" are completely hidden from the repair selection page for this location. |
| Location Shortcode | Generates a shortcode that shows the repair booking flow filtered to this specific location. Format: [Repair_All location=X] (where X is the location ID) | — | When you place this shortcode on a WordPress page, it shows only this location's repair flow -- useful for dedicated store pages. |
Settings tab
| Setting | Description | Default | Customers see |
|---|---|---|---|
| Google Maps API Key | Enables Google Maps integration for nearest-location search and auto-assignment. You'll need the Maps JavaScript API, Places API, and Geocoding API enabled in Google Cloud Console | empty | Address-based location search and automatic nearest-store assignment (when other Google Maps settings are turned on). |
| Enable Search by Nearest Location on Frontend | Lets customers find the closest store based on their address. Requires a Google Maps API key | on | An address search field appears in the location selection step that sorts or highlights the nearest store. |
| Automatically Assign Nearest Location | Automatically assigns the nearest store for Pickup Service and Repair on Location service methods, removing the manual location selection step from those flows. Requires a Google Maps API key | on | When using pickup or on-location repair, they're automatically routed to the closest store without having to choose manually. |
| Require Search Before Showing Locations | Hides the full location list until the customer enters a search query (address or zipcode) | off | They must search before seeing available locations -- useful if you have many branches. |
| Preferred Distance Unit | Sets the unit used for distance calculations and display | KM | Distances shown in the location selection use the unit you've chosen. |
| Enable Pricing Based on Location | Makes pricing fully location-specific. Adds a "Selected Location" dropdown to Models & Repairs and Default Repairs pages. Each location maintains independent prices, durations, and margins. This is also required for shop manager access restrictions | off | A mandatory location selection step appears as the first step in the booking flow. All pricing and availability are locked to the selected location. |
| Show Location Image on Frontend | Shows the uploaded location image during the booking process location selection step | on | Store images appear alongside location names, making it easier to recognize each branch. |
| Allow Customers to Choose Location for Shipping | Lets customers select which store they want to ship their device to when using the "Ship Device" service method | on | A location selection option appears during the Ship Device booking flow. |
| Allow Customers to Choose Location for Quote PDF | Lets customers choose a specific location when generating a quote PDF | on | A location selection option appears in the quote/PDF generation process. |
Frequently asked questions
Is there a maximum number of locations?
No. With the Scale plan (which includes Enhanced Locations), you can create an unlimited number of locations. You always need at least one location.
How does automatic nearest location assignment work?
When a customer enters their address, RepairPlugin calculates the straight-line distance to each of your locations using the Haversine formula (via Google Maps). The nearest location is then automatically assigned to the booking. A Google Maps API key is required.
What happens to existing appointments if I delete a location?
Existing appointments are not deleted or changed. When you delete a location, its schedules and location-specific prices are removed, but all appointments that were linked to that location stay in the system. You always need to keep at least one location.
Can Location Managers edit global settings?
No. Location Managers can only access data for their assigned locations. Global settings, license management, permissions, import/export, and data reset are only available to Full Access and Top Level users.
Related articles
- Opening Hours
- Delivery Methods
- Shortcodes
- Managing Appointments
- Permissions & Roles
- Analytics Dashboard
- Analytics Email Report
- My RepairPlugin Account
- Google Business Profile
- Google Maps
- Location Settings
- Repairs Workflow
- Special Opening Times
- Webhooks
- Plans & Pricing
- Opening Hours Display
- Price on Request