Managing Appointments
Discover how to manage repair appointments in RepairPlugin — filter, edit, change status, export to CSV, and create bookings from the admin panel.
What can you do with this?
- Browse, search, and filter all appointments by date, status, delivery method, location, or keyword
- Change appointment status (Pending, Quoted, Approved, Canceled, Completed) and trigger automatic notifications
- Edit any appointment detail: repairs, pricing, date/time, customer info, and delivery method
- Export your appointment data to CSV for reporting or bookkeeping
- Mark all incomplete appointments as completed in one click
- Create new appointments manually from the admin panel
Where to find it
- In the WordPress admin, go to RepairPlugin in the left sidebar.
- Click Appointments.
The Appointments page loads directly showing all bookings in reverse chronological order. No additional sub-navigation is required.
How to set it up
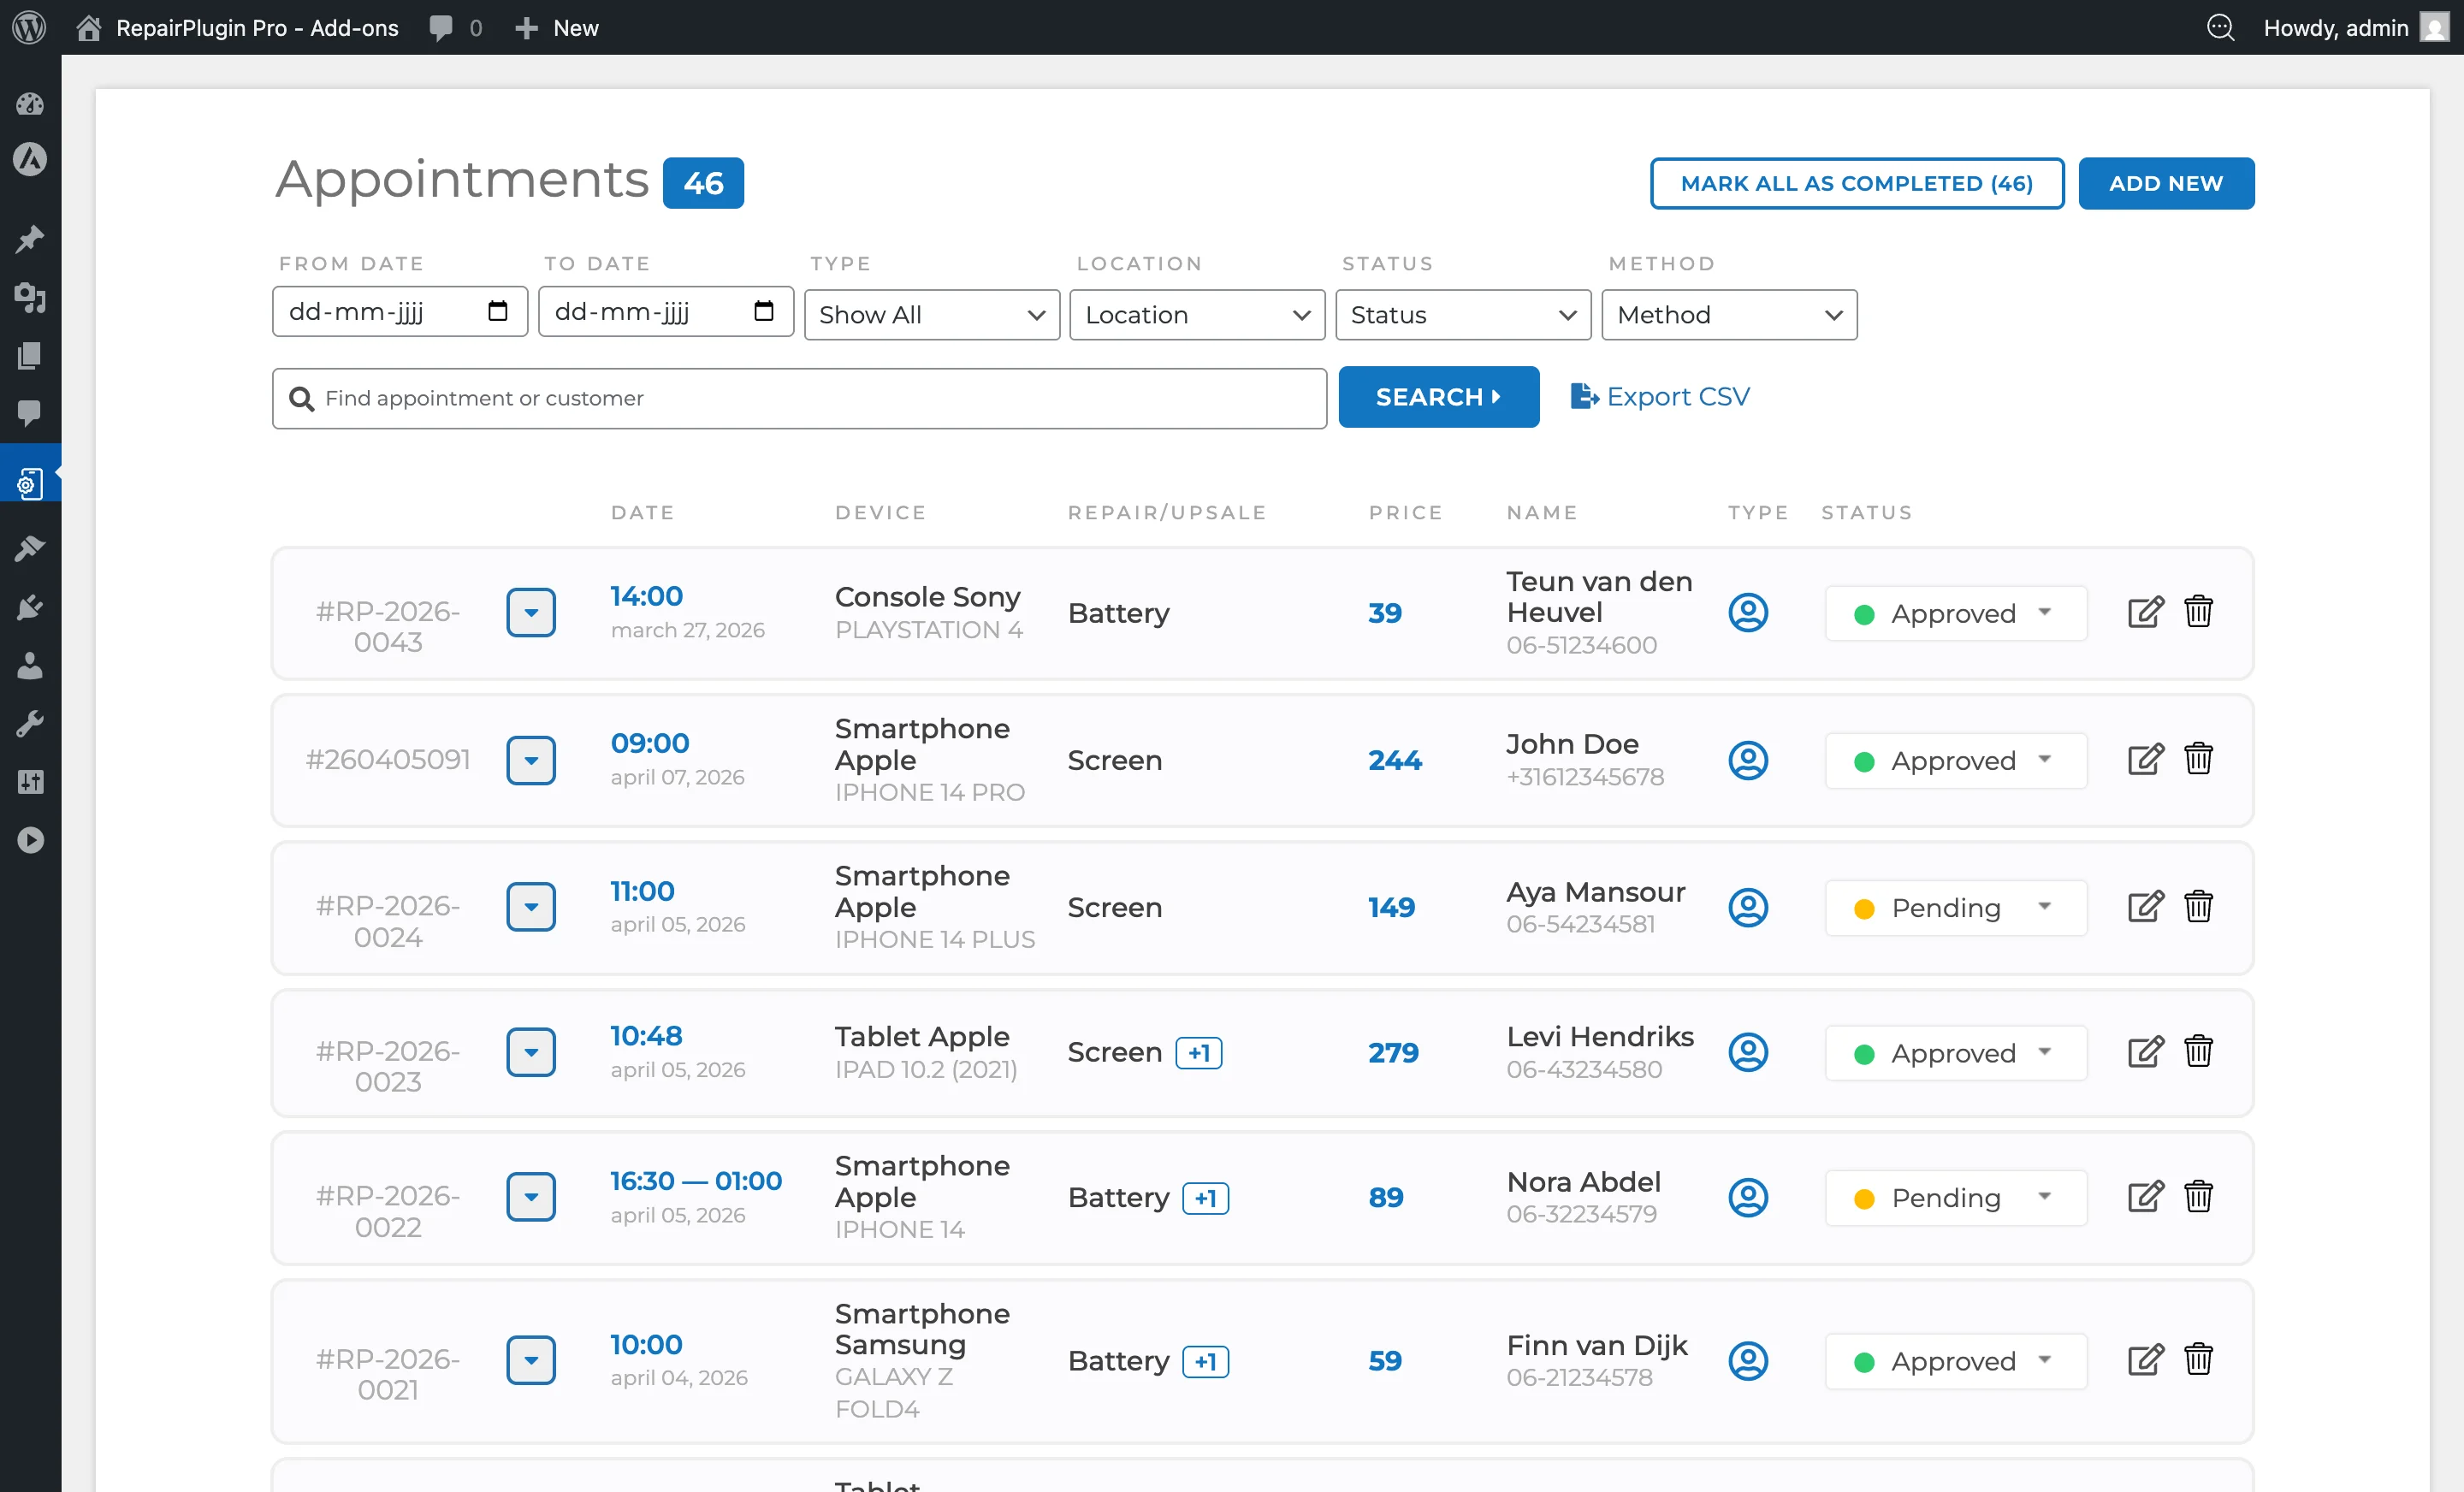
Viewing Appointments
Each row in the appointment list shows a summary including:
- Appointment Number -- A unique reference number (e.g., #1042).
- Device -- Category, brand, and model (e.g., Smartphones > Apple > iPhone 15 Pro).
- Repairs -- The selected repair(s) and price. For repairs priced through Dynamic Pricing (Growth or Scale plan), a small info icon appears next to the repair name. Click it to see the full pricing breakdown: supplier, SKU, purchase price, currency conversion, custom price rules, margin, tax, and rounding. This lets you trace exactly how the final price was calculated. A View More Details button in the tooltip opens even more information.
- Customer -- Name, phone, email. Business name if applicable.
- Delivery Method -- Come by our store, Ship device, Pickup service, or Repair on your location.
- Date & Time -- The scheduled appointment date and time.
- Location -- The store location assigned to the booking.
- Status -- The current status of the appointment.
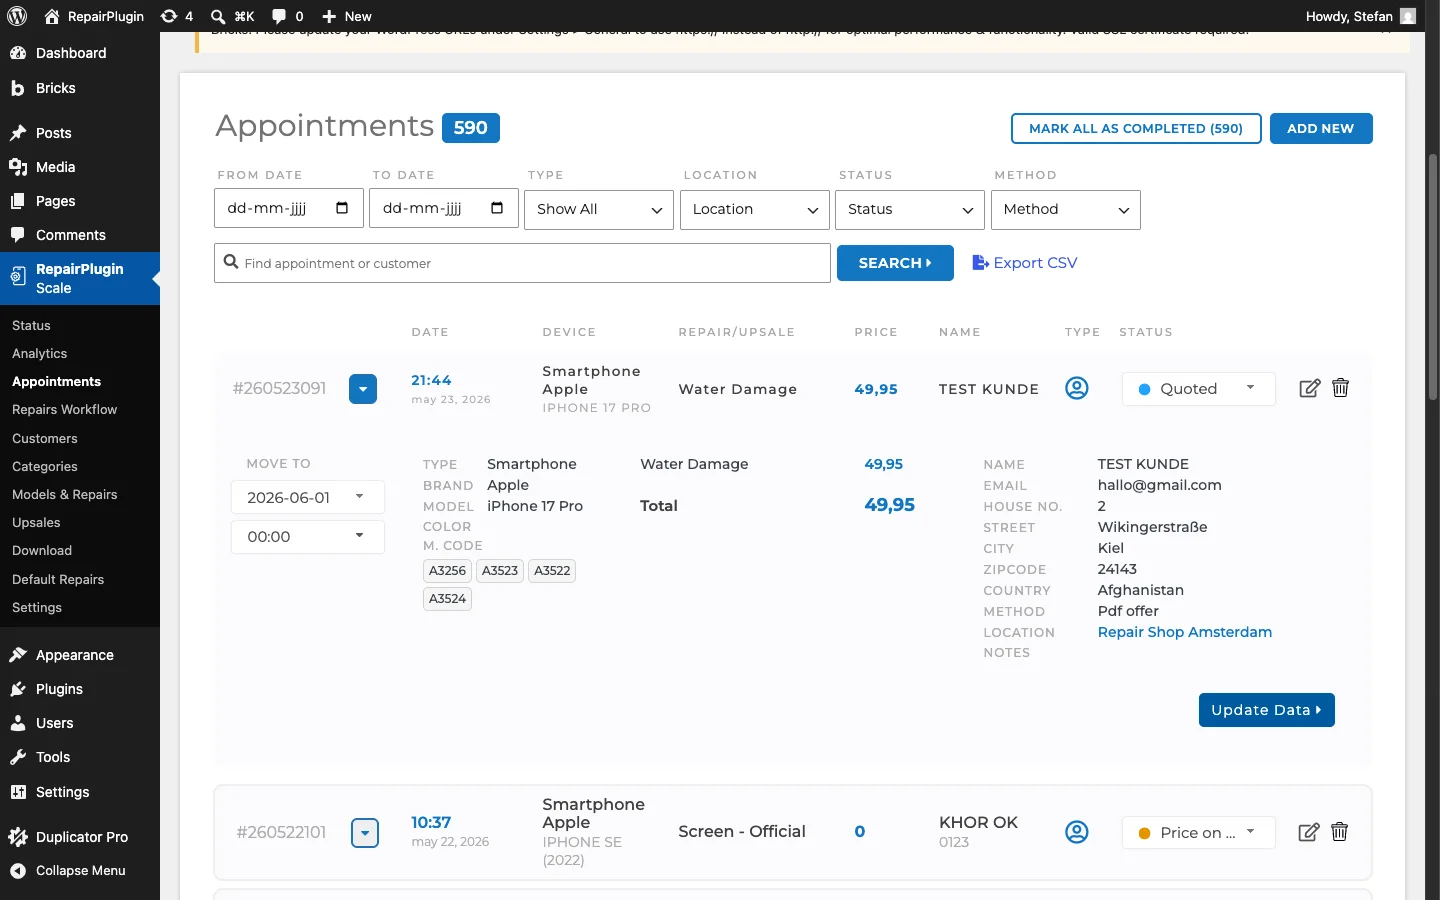
Click on an appointment row to expand and view full details. The expanded view also shows the device's model code(s) under M. CODE -- short identifiers like A3256 or A3523 taken from the model record in the Device Catalog. Useful for warehouse pickers, parts ordering, or matching the customer's device against a specific part SKU.

Filtering Appointments
Use the filter bar at the top of the page to narrow down results:
- Search -- Free-text search across appointment number, device, repairs, customer name, phone, email, price, user type, and status.
- From Date / To Date -- Filter appointments within a specific date range.
- User Type -- Filter by Personal or Business customers.
- Location -- Filter by store location.
- Status -- Filter by Pending, Quoted, Approved, Canceled, Price on Request, or Completed.
- Delivery Method -- Filter by the service method chosen by the customer.
- Session Start URI -- Filter by the page from which the customer started their booking session (or "Untracked" for unknown).
Click the Search button to apply filters. Filters can be combined.
Changing Appointment Status
Each appointment has a status that you can change:
- Expand the appointment by clicking its row.
- Click the Update Status button.
- Select the new status from the dropdown.
- Confirm the change.
The available statuses are:
| Status ID | Status Name | Meaning |
|---|---|---|
| 1 | Pending | Booking received, awaiting review or approval. |
| 2 | Quoted | A quote/offer has been sent to the customer. |
| 3 | Approved | The appointment has been confirmed. |
| 4 | Canceled | The appointment was canceled. |
| 5 | Price on Request | One or more repairs have no set price; price must be provided. |
| 11 | Completed | The repair has been finished and the appointment is closed. |
Changing a status may trigger automatic email notifications to the customer, depending on your notification settings (see Email Notifications).
Automatically Approving Bookings
Instead of manually changing each appointment from Pending to Approved, you can turn on automatic approval per delivery method:
- Go to RepairPlugin > Settings > Checkout & Discount.
- Expand a service method (e.g., Come By Our Store).
- Switch Automatically Approve Bookings on.
When enabled, new bookings using that delivery method skip the Pending state and go directly to Approved. The customer receives the approval confirmation instead of the pending message.
Editing an Appointment
Click the Edit icon on an appointment row to open the edit popup. You can modify:

- Customer details -- Name, phone, email, business name.
- Repairs -- Add, remove, or change selected repairs and their prices.
- Upsales -- Add or remove upsale items.
- Date & Time -- Reschedule the appointment.
- Delivery Method -- Change the service method.
- Location -- Reassign to a different store location.
- Notes -- View or update customer notes.
- Custom Fields -- View responses to custom checkout fields.
Click Update Appointment to save changes.
Setting Prices for "Price on Request" Repairs
If an appointment contains repairs marked as "Price on Request":
- Expand the appointment.
- Click the Set Price button (yellow).
- Enter the price for the repair.
- Save the price.
The appointment's "Price on Request" badge updates accordingly. You can configure whether appointments with POR repairs are allowed at all under Settings > Checkout & Discount > Price on Request.
Marking All as Completed
To mark all currently incomplete appointments as completed in bulk:
- Click the Mark All As Completed button at the top of the page.
- Confirm the action.
This changes the status of all appointments with Pending, Approved, or Price on Request status to Completed. Appointments filtered by the current search/filter criteria are affected.
Exporting Appointments
To export appointment data as a CSV file:
- Click the Export CSV button at the top of the page.
- The browser downloads a CSV file named
appointments-YYYY-MM-DD_HH-MM-SS.csv.
The export includes all appointment details: appointment number, date, time, device, repairs, customer info, delivery method, location, status, and pricing.
Creating a New Appointment Manually
You can create appointments directly from the admin panel without going through the frontend booking form. This is useful for phone orders, walk-in customers, or bookings that need special handling.
- Click the Add New Appointment button at the top of the Appointments page.
- A popup appears with two sections: Customer Details and Order Details.

Customer Details:
- Enter the customer's Email and click the Find button. If a matching customer is found, the remaining fields are filled automatically.
- Fill in First Name, Last Name, and Phone.
- Optionally fill in address fields: House No., Street, City, Zipcode, and Country.
- Select the Customer Type (Private or Business). When set to Business, a Business Name field appears.
- Choose the Language for the customer's notifications.
- Add any Notes or fill in custom checkout fields (if configured in Checkout Field Editor).
Order Details:
- Select a Delivery Method (Come By Our Store, Ship Device, Pickup Service, or Repair on Location).
- Select a Location (the store that will handle the repair).
- Set the Date and Time for the appointment (only shown for service methods that require scheduling).
- Select the Model from the dropdown (search by name).
- Select the Color of the device.
- Choose an initial Status (Pending, Approved, Price on Request, Completed, or Canceled).
- Under Repairs, click Add Repair to select one or more repairs. Each repair shows a price field that you can adjust.
- Under Upsales, click Add Upsale to add optional extras.
- Optionally add a Service Method Cost, Priority Cost / Discount, Combo Discount, Coupon Discount, or Payment Method Cost / Discount.
Saving:
- Click Add Appointment to save without notifying the customer, or Add & Notify to save and send a confirmation email.
Settings reference
| Setting | Description | Default | Customers see |
|---|---|---|---|
| Automatically Approve Bookings | When enabled, new bookings using that delivery method are automatically set to Approved status instead of Pending Tip: Turn this on for "Ship Device" if you don't need to review shipments before confirming them. | off | They receive an approval confirmation message and email instead of a "pending review" message. |
| Setting | Description | Default | Customers see |
| --- | --- | --- | --- |
| Allow appointment booking with price on request repair | When enabled, customers can complete a booking even if one or more repairs have no set price (marked as "Price on Request") | off | A "Price on Request" label appears instead of a price, and they can still submit their booking. |
| Accept online payments even when appointment contains any price on request repair | When enabled alongside the POR setting, online payment methods stay available at checkout even when the order contains price-on-request repairs | off | The payment step is shown at checkout regardless of whether all repair prices are known. |
| Action when appointment contains any price on request repair | Determines how the admin handles new appointments that contain price-on-request repairs -- either requiring the price to be set first, or allowing the appointment to be created immediately. Options: "Set the Price before creating the appointment" / "Create the appointment" | Set the Price before creating the appointment | No direct change -- this affects your admin workflow for processing these appointments. |
| Incomplete Appointments Counter | Shows the number of appointments with Pending, Approved, or Price on Request status. When filters are active, the count reflects the filtered results | N/A | Nothing -- this is only visible in the admin panel. |
Frequently asked questions
What happens when I change an appointment's status?
Depending on your notification settings, RepairPlugin can automatically send the customer an email when the status changes. For example, changing from Pending to Approved can trigger a confirmation email. Configure this under Settings > Notifications & Quotes (see Email Notifications).
Can I undo a "Mark All As Completed" action?
No. This action is permanent and changes all matching appointments to Completed status. You can still manually change individual appointments back to another status if needed.