Repairs Workflow
Configure Repairs Workflow in RepairPlugin to track every repair from intake to completion with custom statuses, due dates, and notifications.
What can you do with this?
- Track repairs step by step -- create a workflow for each booking and move it through stages like "In Diagnosis," "Waiting for Parts," and "Completed."
- Send automatic status updates -- customers receive email notifications whenever their repair reaches a new stage.
- Use different workflows per service method -- each service method (Come By Our Store, Ship Device, Pickup Service, Repair on Your Location) has its own independent set of statuses.
- Set due dates with visual indicators -- color-coded dates help you spot overdue repairs at a glance.
- Keep a full activity log -- every status change and notification is recorded for audit traceability.
Repairs Workflow is included in the Growth and Scale plans. It requires an active RepairPlugin installation.
Where to find it
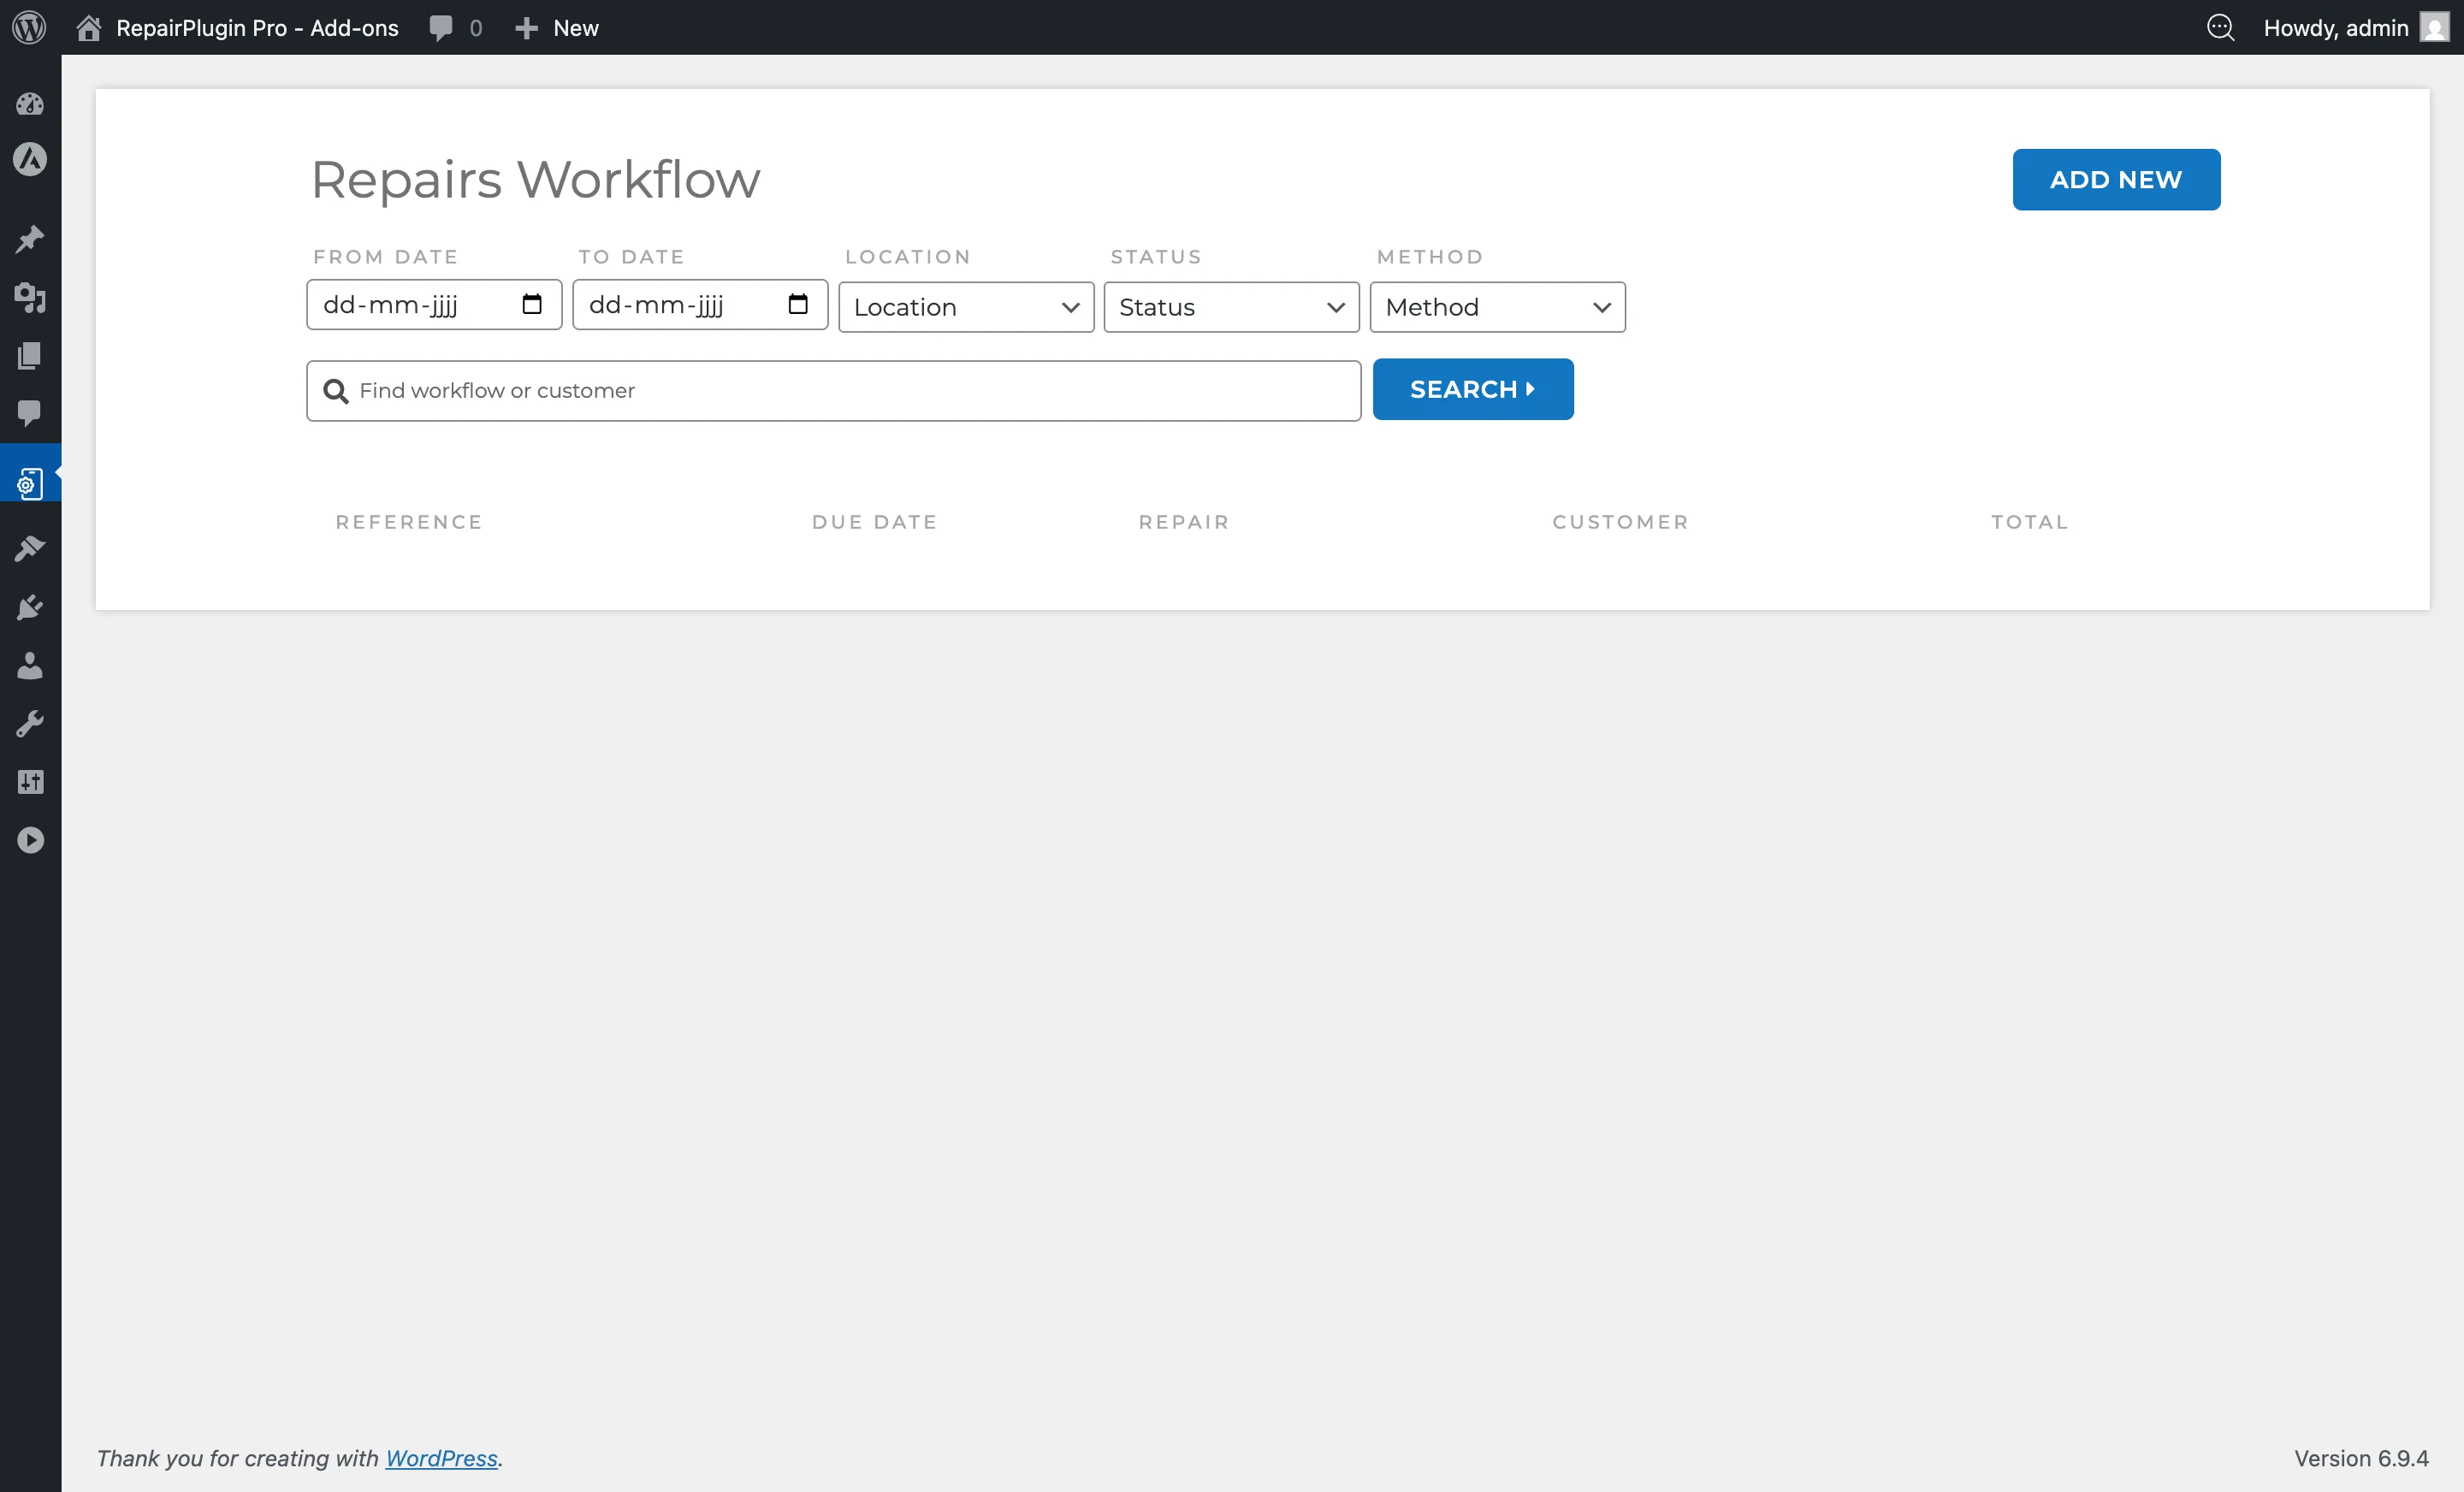
Repairs Workflow is accessed from two locations:
Workflow management page
- In your WordPress admin, go to RepairPlugin in the left sidebar.
- Click Repairs Workflow from the submenu.
- This page shows all repair workflows with filtering and management tools.
Workflow settings page
- In your WordPress admin, go to RepairPlugin in the left sidebar.
- Click Settings from the submenu.
- In the settings sidebar on the left, click Repairs Workflow.
- This page shows all configurable statuses organized by service method.
How to set it up
Activate Repairs Workflow
Repairs Workflow activates automatically when a valid Growth or Scale plan is detected. If your plan doesn't include Repairs Workflow, a license activation page appears instead of the workflow interface.
Create a repair workflow
- Go to
RepairPlugin > Repairs Workflow. - Click Add New.
- Select an existing appointment from the dropdown, or choose Create New to create a workflow with a new order.
- Set the due date for the expected completion.
- Select an initial repair status from the available statuses for that appointment's service method.
- Choose the customer notification preference (Email, SMS, Phone Call, or None).
- Click Add Selected to save without notifying, or Add & Notify to save and send a notification to the customer.
Respect the customer's own notification choice
Customers with a Customer Portal account pick their preferred channel for repair updates themselves (Email, SMS, Phone Call, or None). The workflow uses that choice automatically:
- The customer's preferred channel is pre-selected when you add or edit their workflow.
- Pick a different channel and a warning appears -- for example: "This customer prefers Email notifications, but you've selected SMS." You can still continue; it's a heads-up, not a block.
- If the customer opted out (None), the warning tells you they don't want repair updates.

Update a repair workflow
- Go to
RepairPlugin > Repairs Workflow. - Click on the repair you want to update to open its management view.
- Change the status using the status dropdown (filtered by the repair's service method).
- Update the due date or notification preference as needed.
- Save the changes. If notifications are enabled for the selected status and the customer's preference is Email, they'll receive an automated notification.
Add notes
Within a repair workflow's management view, you can add notes to track communication and observations:
- Open a repair workflow.
- Scroll to the Notes section.
- Type your note in the text area.
- Under Related to, choose whether the note is about the overall booking ("General Booking") or a specific repair within the order.
- Under Type, select:
- Internal -- visible to staff only. Customers never see this note.
- External -- visible to the customer. A notification is sent based on the customer's notification preference.
- Click Add Note.
Each note shows who added it, the timestamp, the related repair, and whether it's internal or external. You can delete a note by clicking the trash icon.
Mark a workflow as completed or incomplete
When all repairs are finished, you can close the workflow:
- Open the repair workflow.
- Click Mark As Completed at the bottom of the workflow card.
- Confirm the action.
If a completed workflow needs to be reopened (e.g., a customer returns with an issue), click Mark As Incomplete to set it back to an active state.
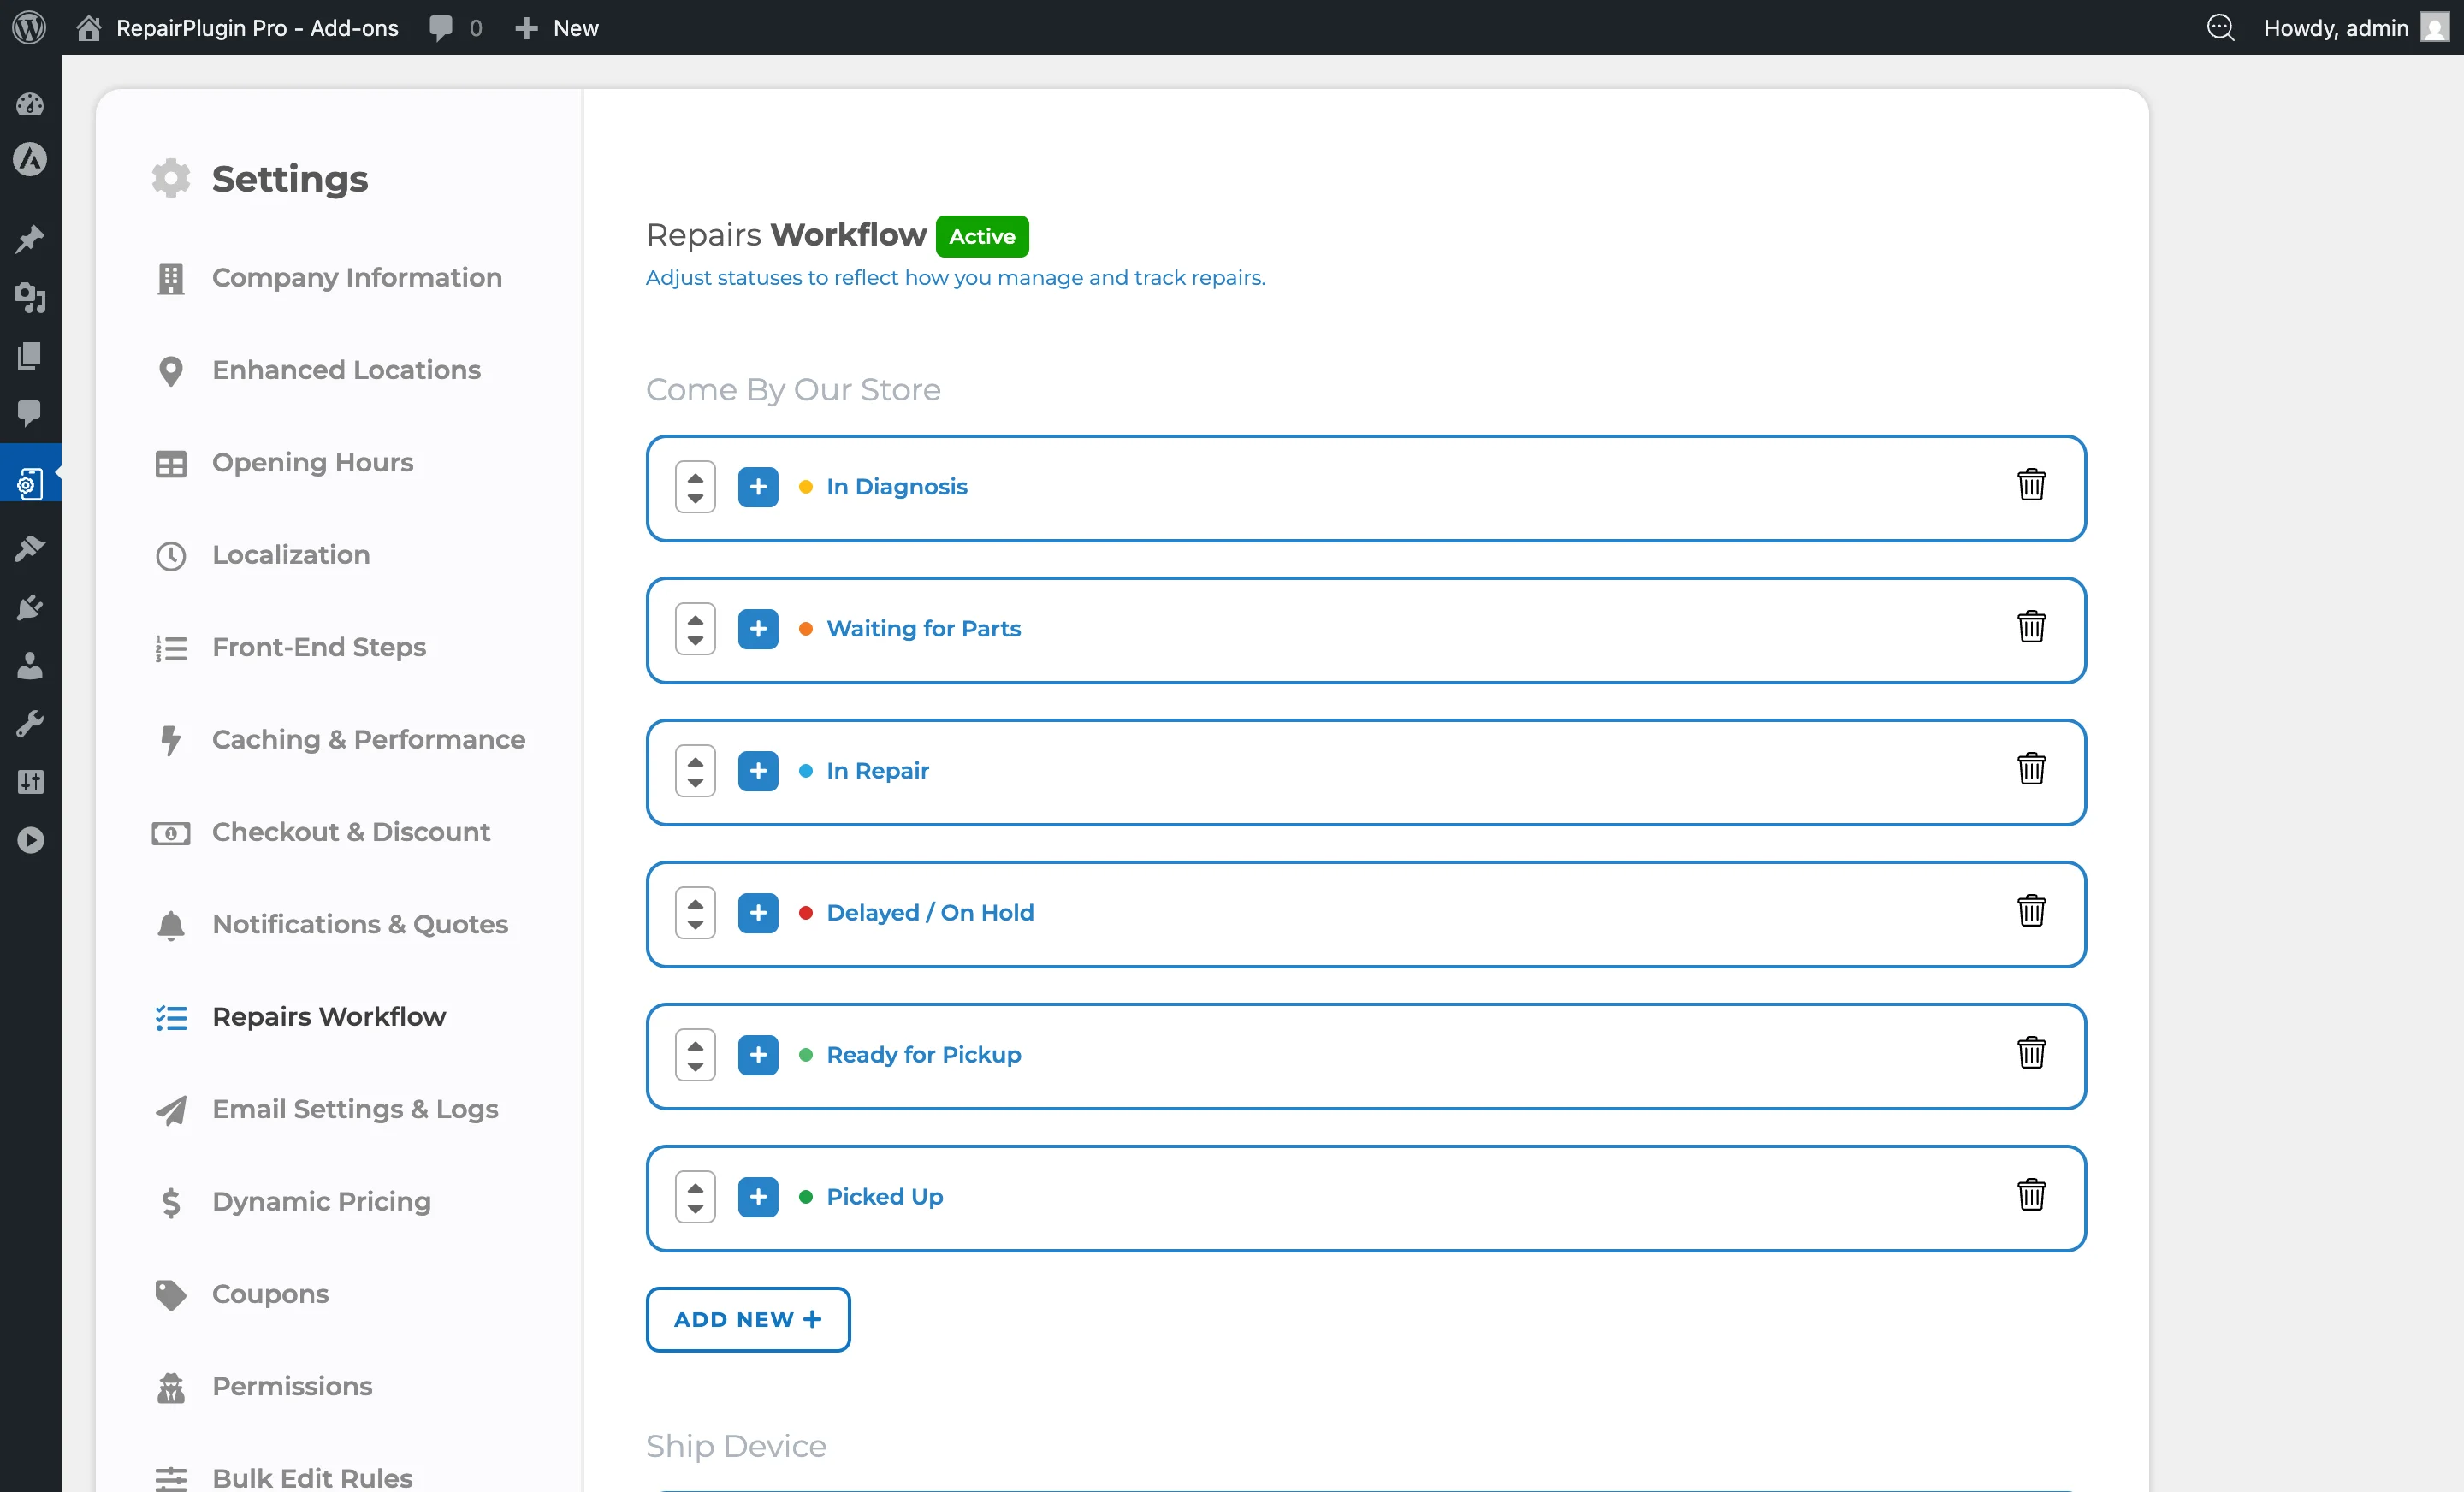
Configure statuses
- Go to
RepairPlugin > Settings > Repairs Workflow. - Statuses are organized under four service method sections:
- Come By Our Store
- Ship Device
- Pickup Service
- Repair on Your Location
- Each section shows its list of statuses in the configured order.
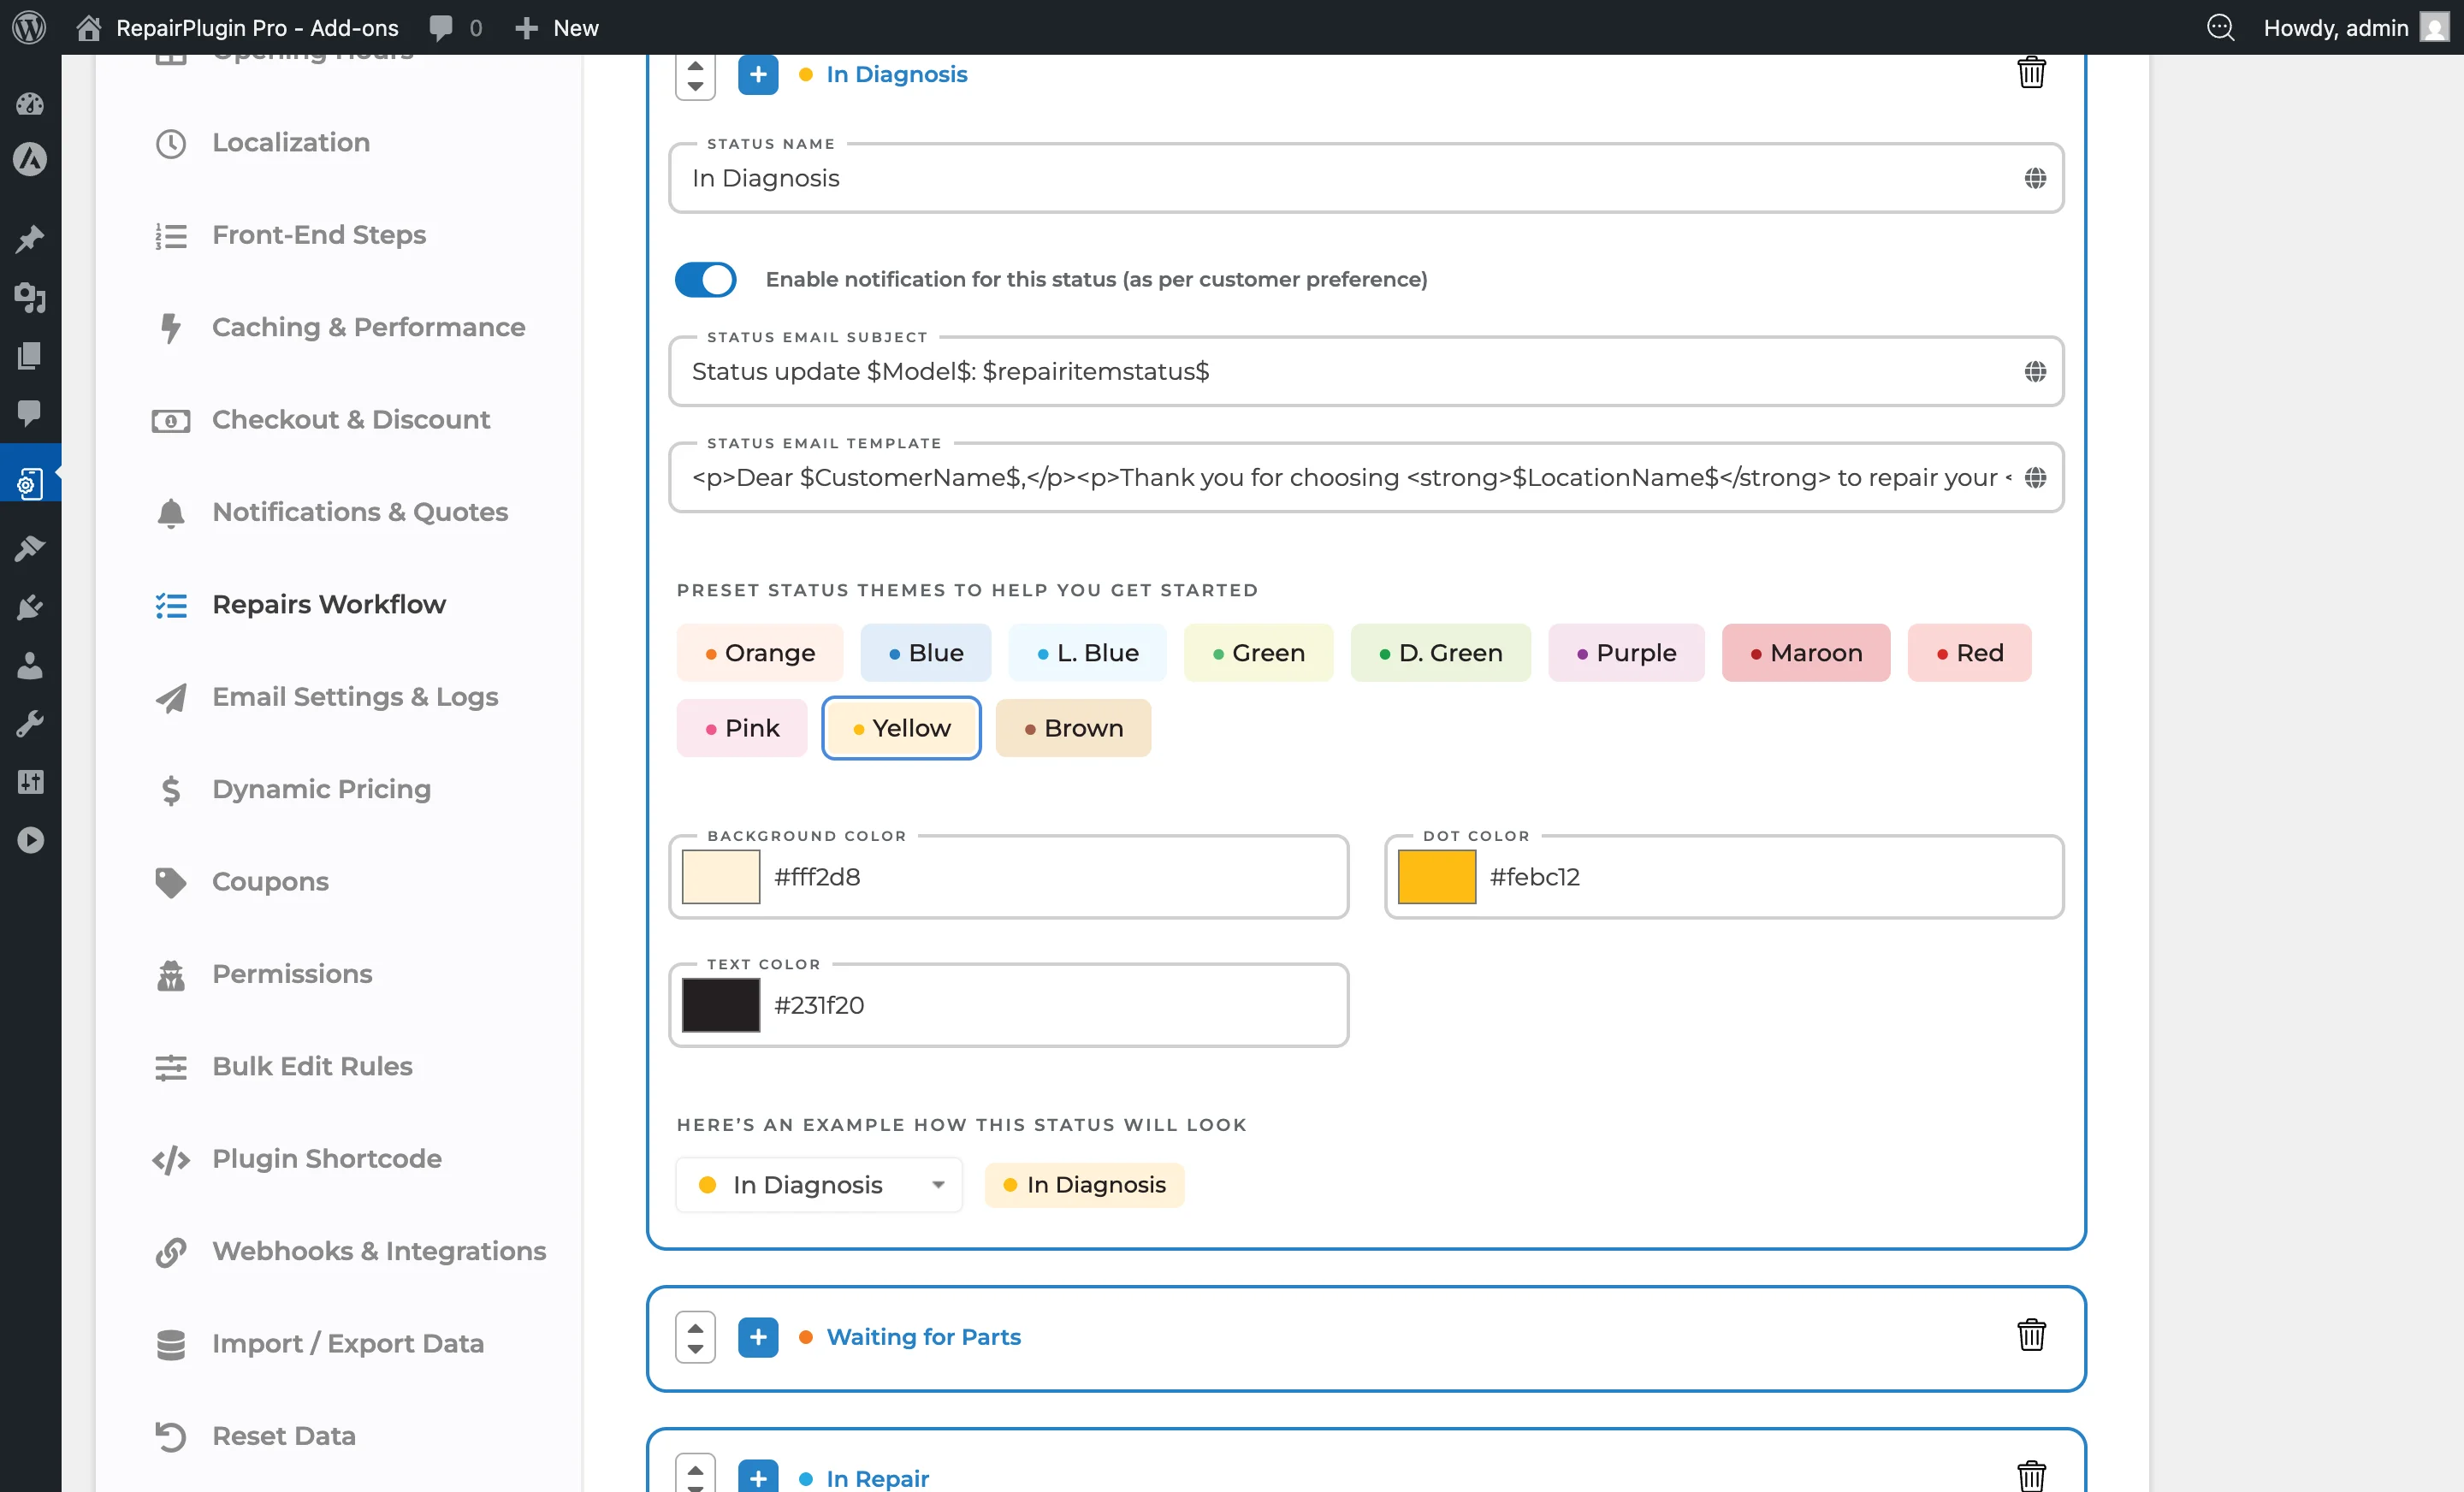
- Click the + icon on any status to expand and edit it.
- Use the up/down arrows to reorder statuses within a service method.
- Click Add New at the bottom of a service method section to create a new status.
- Click Save Settings to save all changes.
Configure autocreation rules
Autocreation rules let RepairPlugin automatically create a workflow when an appointment matches specific conditions. This saves time when you always create workflows for certain appointment types.
- Go to
RepairPlugin > Settings > Repairs Workflow. - Scroll down to the Autocreation Rules section below the status configuration.
- Click Add New Rule.
- In the modal, configure:
- Appointment Status -- select which appointment status triggers the rule (Pending, Approved, Price on Request, Completed, or Canceled).
- Delivery Method -- select which delivery method triggers the rule (Come by our store, Ship device, Pickup service, or Repair on location).
- Workflow Status -- select the initial workflow status to assign when the rule triggers.
- Click Add to save the rule.
- Click Save Settings to activate all rules.
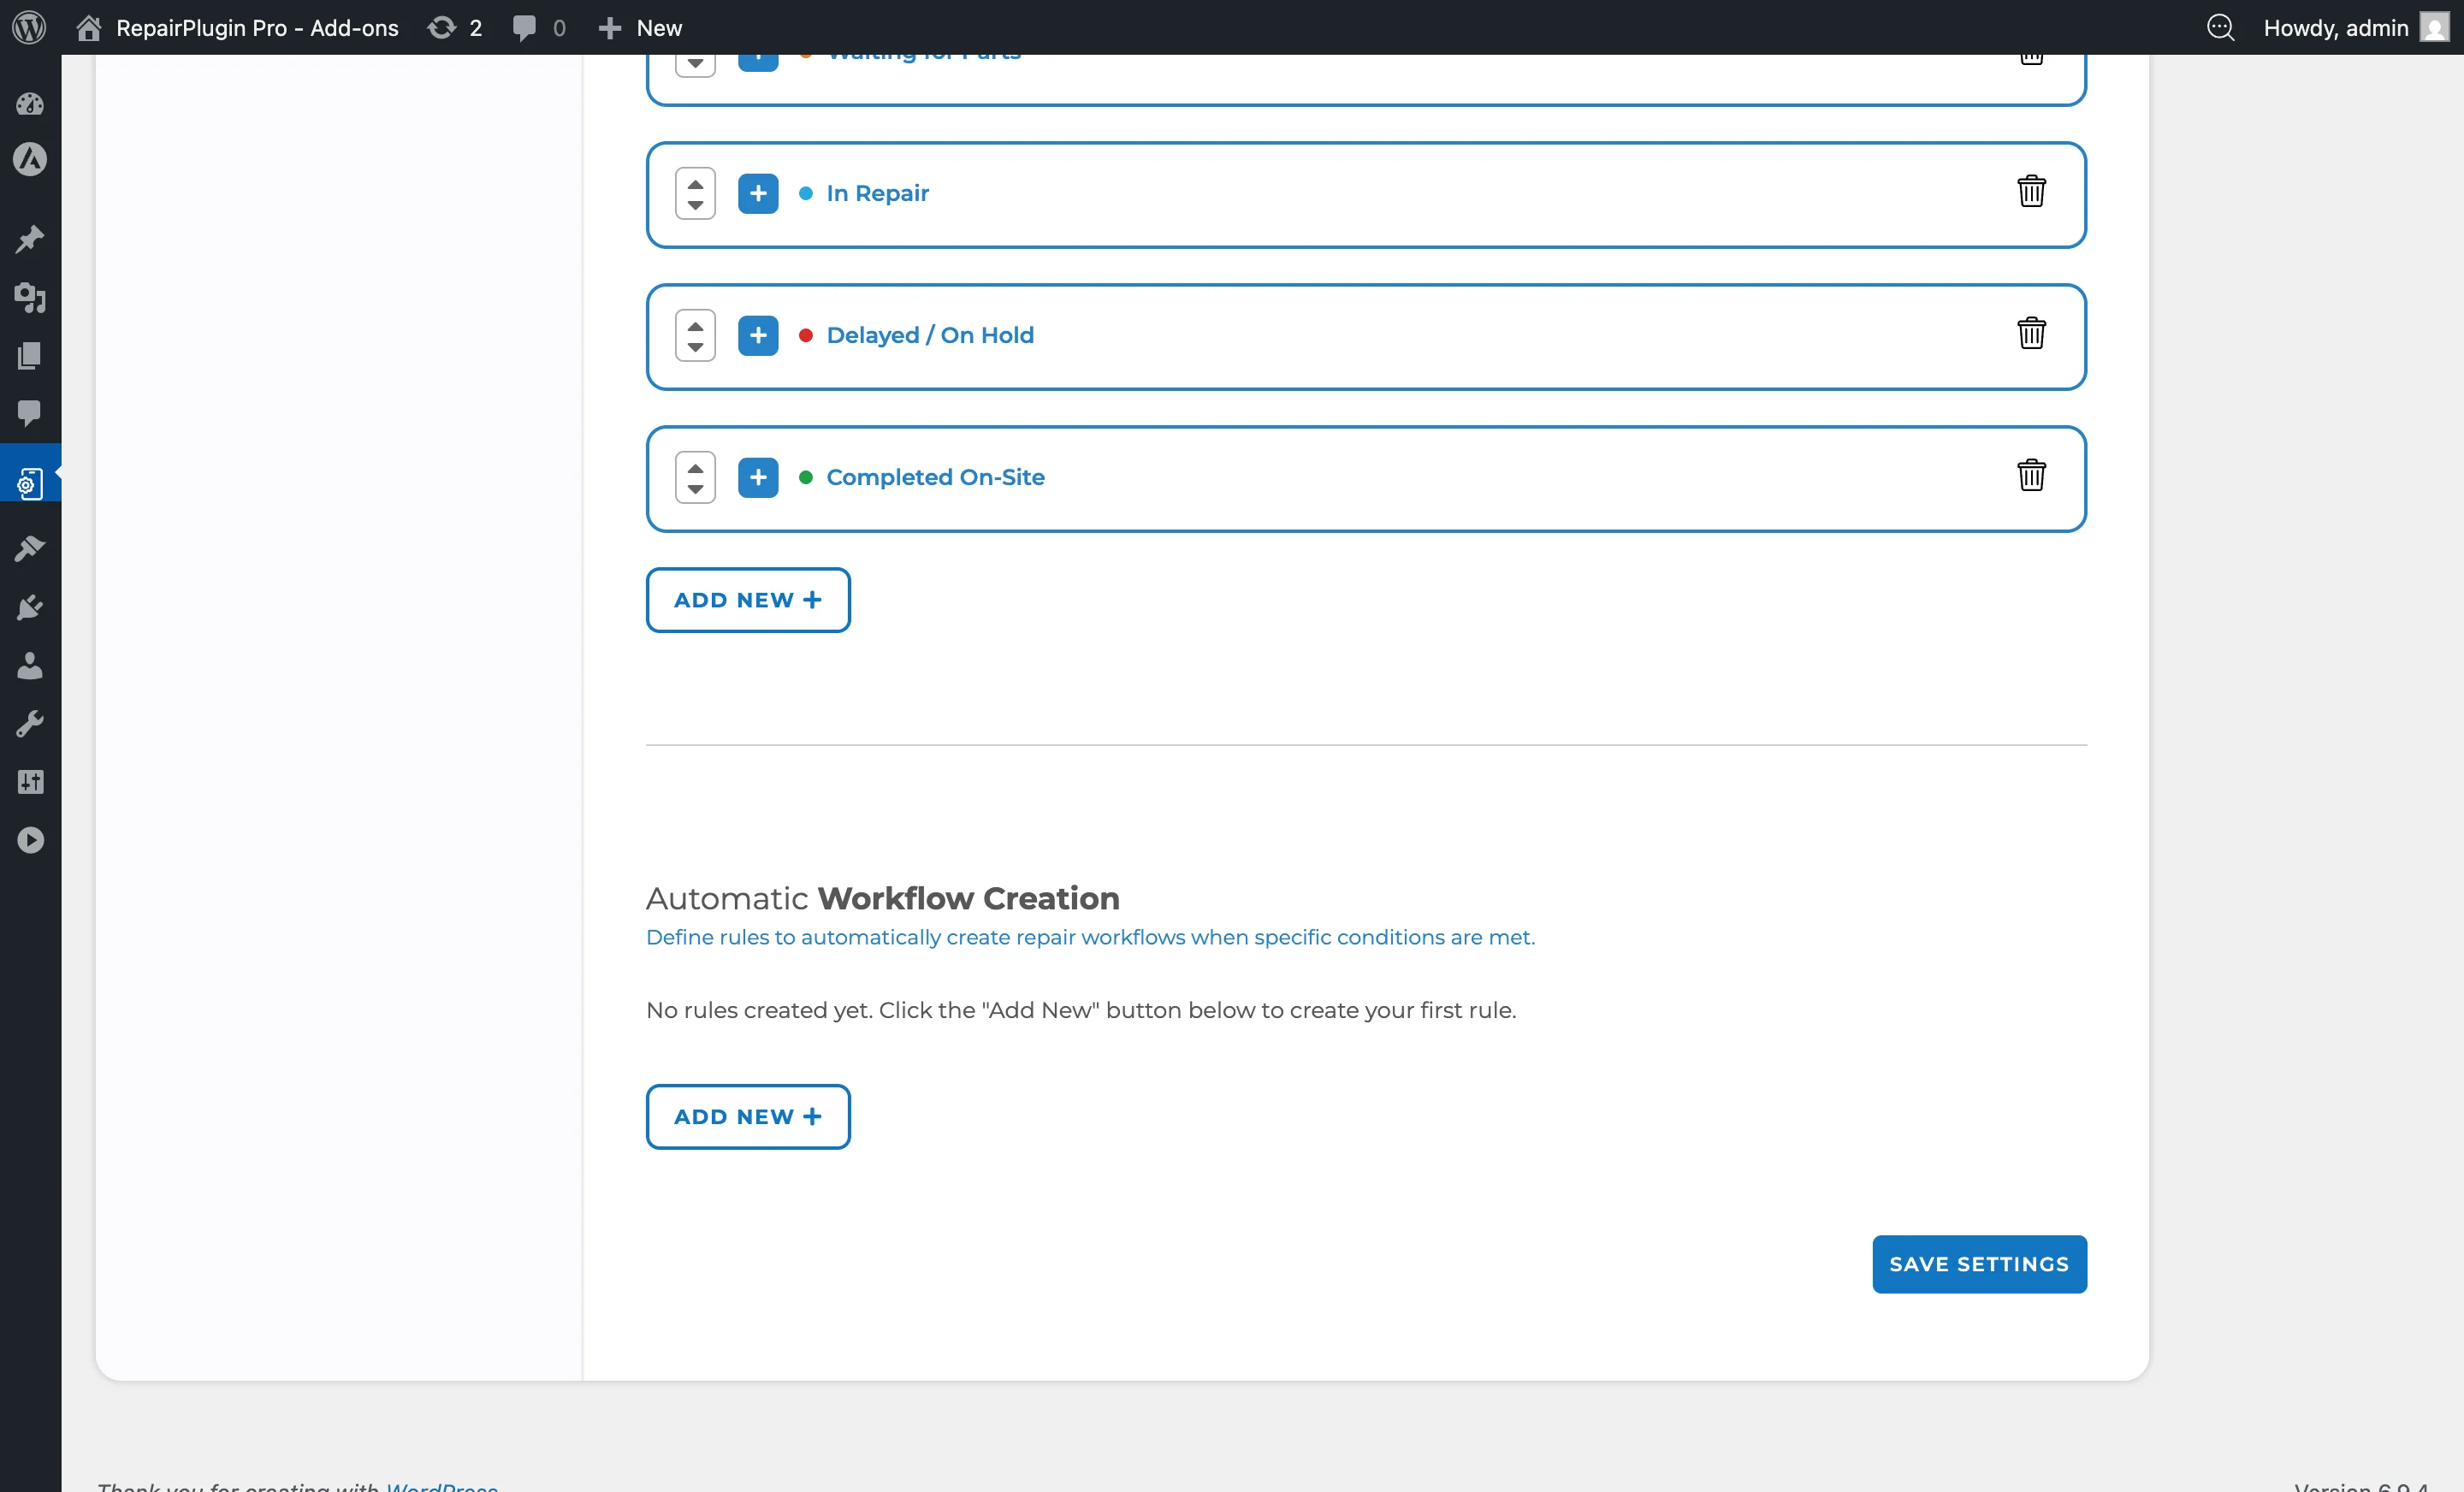
When a new appointment is created or its status changes and it matches a rule's conditions, a workflow is automatically created with the configured initial status. Rules also apply during bulk status changes.
To delete a rule, click the trash icon next to it in the rules list.
Delete a status
- Expand the status you want to remove.
- Click the trash icon on the right side.
- Note: the built-in "Completed" status can't be deleted.
Settings reference
Workflow management page
| Setting | Description | Default | Customers see |
|---|---|---|---|
| Filters | Narrows the displayed workflows to match your selected criteria | — | Nothing -- this is for your own management use. |
| Due Date | Sets the expected completion date for the repair. The system uses color-coded indicators: blue for future dates, orange for today (upcoming), red for today (overdue) or past dates, and green for completed | empty | Nothing directly -- this is for your internal tracking and prioritization. |
| Repair Status | Shows the current stage of the repair. Changing the status can trigger a customer notification if notifications are enabled for that status | first status in the configured order | Customers receive email notifications when the status changes (if notifications are enabled for that status and the customer's preference is Email). |
| Notification Preference | Sets how the customer should be notified about status updates. Customers with a Customer Portal account choose this themselves; their choice is pre-selected here and you see a warning when you pick a different channel. Currently only Email is fully functional. SMS and Phone Call are visible but not yet implemented (planned for a future release) | none | Email notifications are sent when a status with active notifications is applied. Portal customers manage this preference in their portal's Notifications tab. |
| Workflow Activity Log | Records all actions taken on the workflow. Each entry includes a timestamp and the user who performed the action. Tracked activity types: workflow creation, status updates, and notifications sent | — | Nothing -- this is your internal audit trail. |
| Notes | Lets you add notes to a workflow, either related to the overall booking or to a specific repair. Notes can be Internal (staff-only) or External (visible to the customer, which triggers a notification). Each note shows who added it, when, and the related repair | no notes | External notes trigger a notification to the customer based on their notification preference. Internal notes are never visible to customers. |
Status settings (per service method)
Each status within a service method section has the following settings:
| Setting | Description | Default | Customers see |
|---|---|---|---|
| Status Name | Sets the name of the status as it appears in dropdowns and the workflow management page. You can translate it using the globe icon | varies by status (e.g., "In Diagnosis", "Waiting for Parts", "In Repair", "Completed") | The status name may appear in notification emails if you've included it in the email template. |
| Enable Notification for This Status | When turned on, changing a repair to this status triggers a notification to the customer (respecting their notification preference). When turned off, no notification is sent for this status change | on | An email notification when their repair enters this stage (if enabled). |
| Status Email Subject | Sets the subject line of the notification email sent when this status is applied. Supports dynamic variables and translations | varies by status | This text appears as the email subject line. |
| Status Email Template | Sets the body content of the notification email. Supports dynamic variables and translations via the globe icon | varies by status | This content is the email body they receive. |
| Preset Status Themes | Applies a predefined color scheme (background, dot, and text colors) to the status badge for easy visual identification | Orange theme | Nothing -- this only affects how the status looks in your admin area. |
| Background Color / Dot Color / Text Color | Fine-tunes the colors of the status badge shown in the workflow management page | varies by preset | Nothing -- this is for your admin view only. |
| Load Default Statuses | Resets the statuses for a service method back to the default set. Useful when starting fresh or after heavy customization that you want to undo | — | — |
Autocreation rules
| Setting | Description | Default | Customers see |
|---|---|---|---|
| Appointment Status | The appointment status that triggers automatic workflow creation. Options: Pending, Approved, Price on Request, Completed, Canceled | — | Nothing -- workflows are created behind the scenes. |
| Delivery Method | The delivery method that must match for the rule to trigger. Options: Come by our store, Ship device, Pickup service, Repair on location | — | Nothing -- this is for internal automation. |
| Workflow Status | The initial status assigned to the automatically created workflow | — | Customers receive a notification if the assigned status has notifications enabled. |
Dynamic email variables
You can use these variables in email subjects and templates to personalize notifications: Customer information:
$CustomerName$-- Customer's full name$CustomerEmail$-- Customer's email address$CustomerPhone$-- Customer's phone number Appointment details:$AppointmentDate$-- Scheduled appointment date$AppointmentTime$-- Scheduled appointment time$AppointmentNumber$-- Unique appointment reference number$Brand$-- Device brand name$Model$-- Device model name$Color$-- Device color Repair and financial information:$RepairSummary$-- Summary of selected repairs$SubTotal$-- Subtotal before tax$TotalPrice$-- Total price including tax$TaxPrice$-- Tax amount$CouponCode$-- Applied coupon code (if any)
Default status examples
These are typical statuses available per service method (you can customize them):
- Pickup Scheduled
- Picked Up by Courier
- In Diagnosis
- Waiting for Parts
- In Repair
- Delayed / On Hold
- Ready for Pickup
- Ready for Return
- Delivered
- Completed
- Canceled Each service method has its own independent list of these statuses. You can add, remove, reorder, or rename them freely. The "Completed" status is a system status and can't be deleted.
Frequently asked questions
Can I change a repair's status back to an earlier stage?
Yes. There are no restrictions on status transitions. You can move a repair from any status to any other status -- for example, from "Ready for Pickup" back to "In Repair" if something needs to be redone.
When does the customer receive a notification?
Customers receive a notification in three situations: when a workflow is first created, when you change a status and check the "notify customer" option, and when you add an external note. Internal notes don't trigger notifications. The notification is sent via the channel you chose for the workflow (email, SMS, or phone call).
What's the difference between internal and external notes?
Internal notes are only visible to you and your team in the admin panel. External notes are also sent to the customer as a notification. Notes can be up to 5,000 characters long.
Can workflows be created automatically?
Yes. You can set up autocreation rules under Settings > Repairs Workflow. When an appointment's status and delivery method match a rule, RepairPlugin automatically creates a workflow with the configured initial status. This works for new appointments, manual status changes, and bulk status changes.