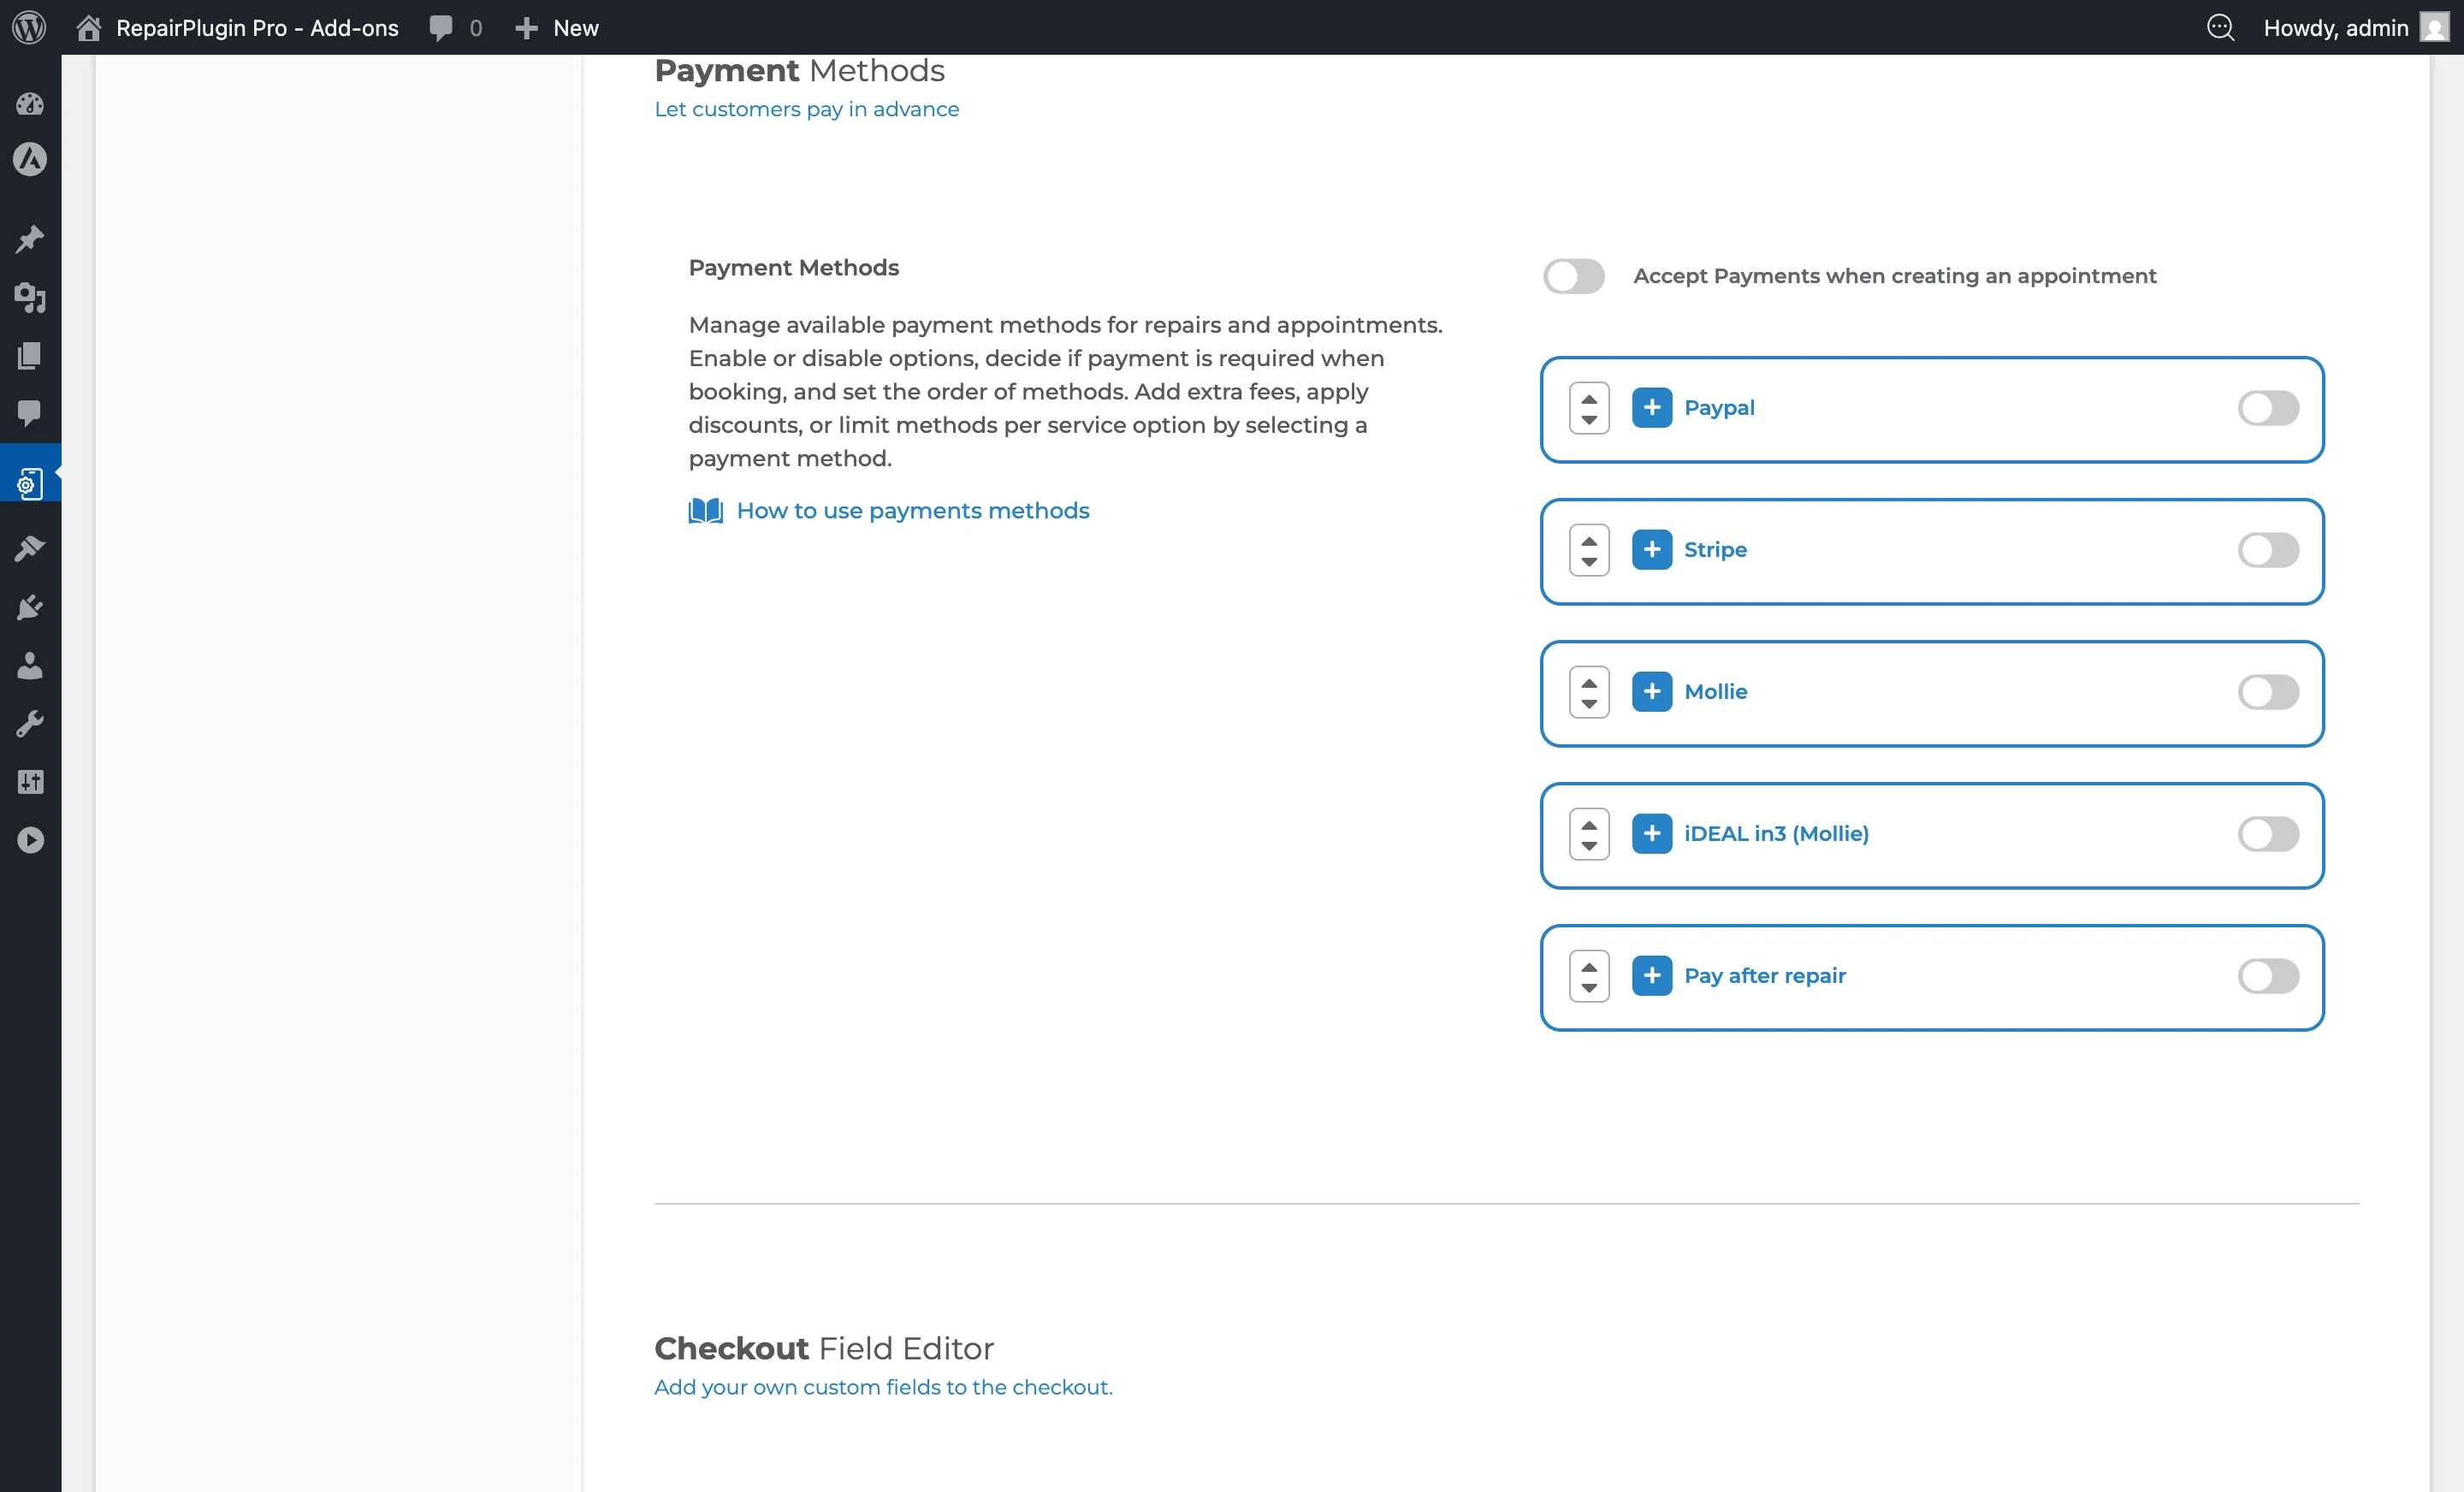
Payment Methods
Set up Stripe, PayPal, Mollie, iDEAL in3, and Pay after repair in RepairPlugin with step-by-step API key and configuration guides.
paymentsstripepaypalmollieideal-in3pay-after-repairconfiguration
What can you do with this?
- Accept online payments -- collect payments through Stripe, PayPal, or Mollie right when customers book a repair.
- Offer flexible pay-later options -- let walk-in customers choose "Pay after repair" so they pay when they pick up their device.
- Restrict methods by service type -- require online payment for shipped repairs, but allow in-store payment for walk-ins.
- Customize labels and order -- rename payment methods and arrange them in the order you prefer.
- Test before going live -- use sandbox mode to verify everything works before processing real transactions.
Where to find it
- Open RepairPlugin in the WordPress admin menu.
- Click Settings.
- Select Checkout & Discount in the sidebar.
- Scroll down past Service Methods to the Payment Methods section.
https://www.repairplugin.com/wp-admin/admin.php?page=wp_repair_settings§ion=planning_discount

How to set it up
Turn on payment collection
- Switch Accept Payments when creating an appointment to ON.
- This master switch must be on for any payment methods to appear during checkout.
Enable a payment method
- Find the payment method in the list (Stripe, PayPal, Mollie, iDEAL in3, or Pay after repair).
- Turn the switch next to its name to ON.
- Click the + icon to expand the method and fill in its settings.
- Click Save.
Disable a payment method
- Turn the switch next to the payment method name to OFF.
- Click Save. The method won't appear during checkout anymore.
Reorder payment methods
- Use the up/down arrow icons on the left side of each payment method to change the display order.
- Click Save. Customers see the methods in this order during checkout.
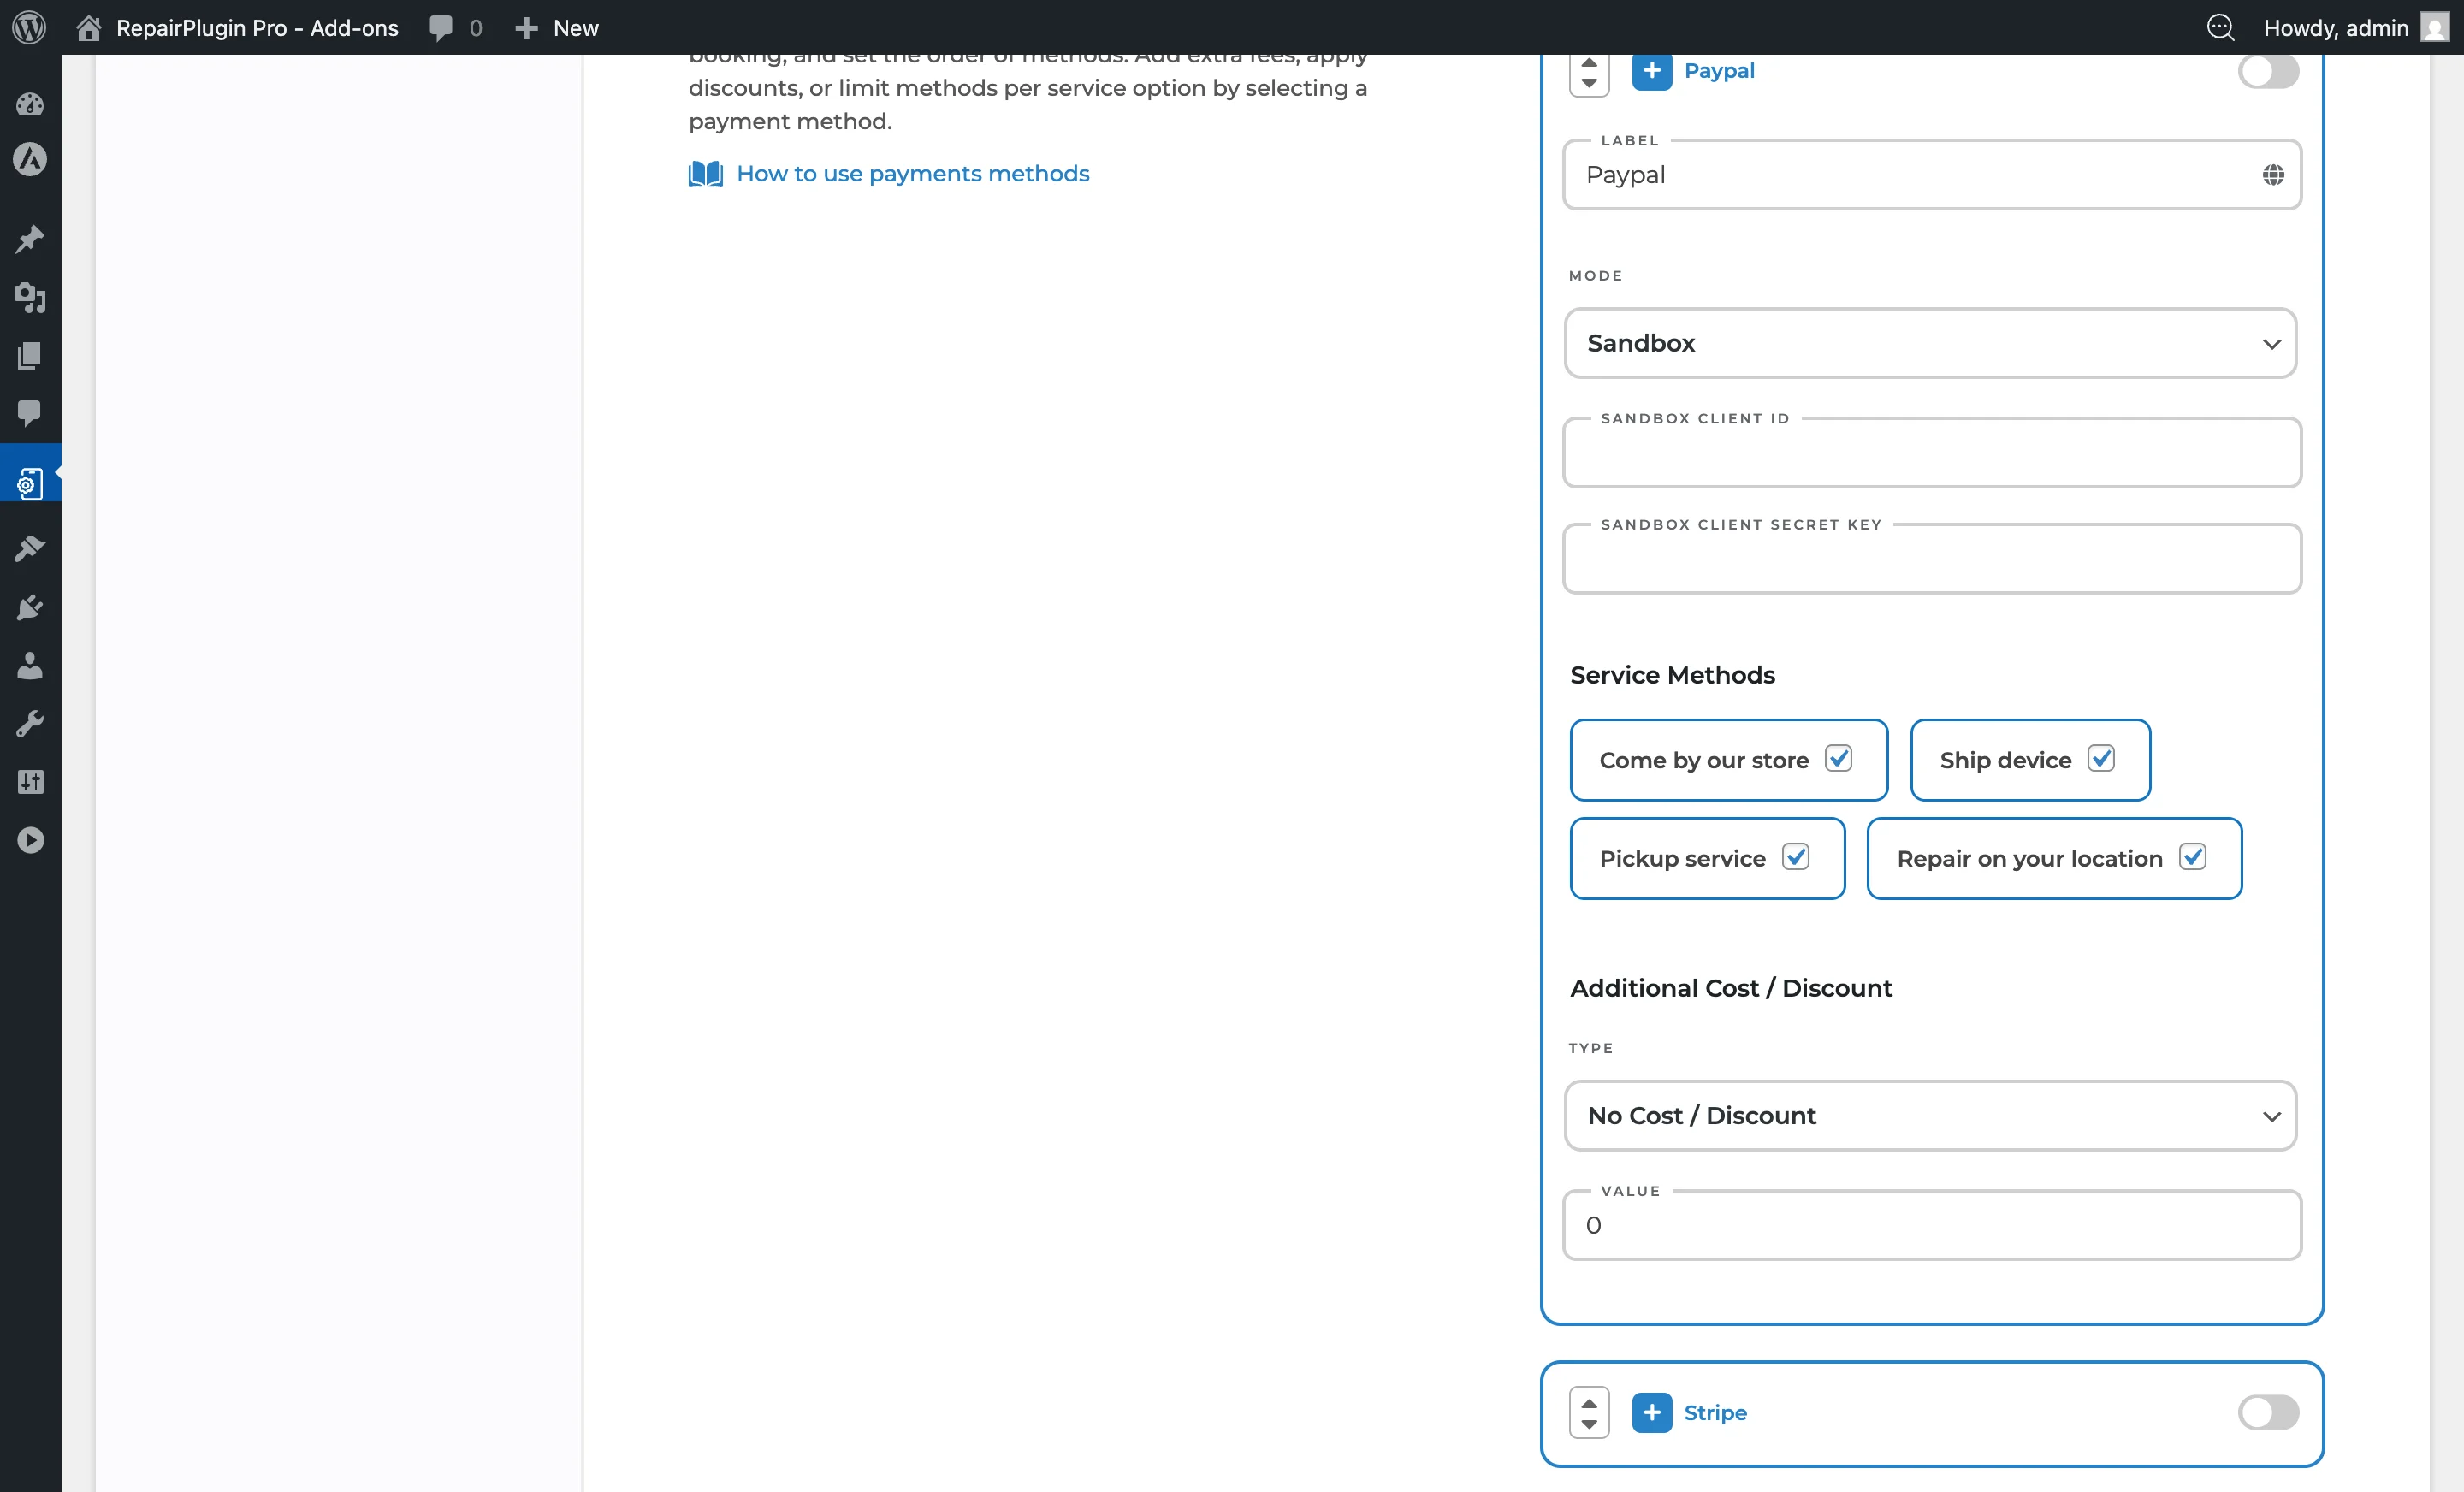
Configure Stripe
https://www.repairplugin.com/wp-admin/admin.php?page=wp_repair_settings§ion=planning_discount
- Expand the Stripe section by clicking the + icon.
- Set a custom Label (default: "Stripe"). Click the globe icon for translations.
- Choose the Mode: Sandbox or Live.
- Enter your API keys:
- Live mode: Enter your Live Secret key.
- Sandbox mode: Enter your Sandbox Secret key (starts with
sk_test_).
- Set the Service Methods this payment method is available for.
- Optionally add a surcharge or discount (see Surcharges & Status).
- Click Save.
How to get Stripe keys:
- Log in to your Stripe Dashboard with Administrator permissions.
- Go to Developers > API Keys.
- Copy the Secret key (not the Publishable key) for either Test or Live mode.
- For testing, use the test key (starts with
sk_test_). Switch to live when you're ready for real transactions.
Configure PayPal
https://www.repairplugin.com/wp-admin/admin.php?page=wp_repair_settings§ion=planning_discount
- Expand the PayPal section by clicking the + icon.
- Set a custom Label (default: "Paypal"). Click the globe icon for translations.
- Choose the Mode: Sandbox or Live.
- Enter your API credentials:
- Live mode: Enter your Live Client ID and Live Client Secret key.
- Sandbox mode: Enter your Sandbox Client ID and Sandbox Client Secret key.
- Set the Service Methods this payment method is available for.
- Optionally add a surcharge or discount.
- Click Save.
How to get PayPal keys:
- Log in to your PayPal account.
- In the top-right corner, select Developer.
- Go to My Apps & Credentials, set the environment to Live, then click Create App.
- Enter a name (e.g., "RepairPlugin") and select the Merchant category.
- Copy your Client ID and Client Secret.
- Make sure Apps & Credentials is set to Live on PayPal.com.
Configure Mollie
https://www.repairplugin.com/wp-admin/admin.php?page=wp_repair_settings§ion=planning_discount
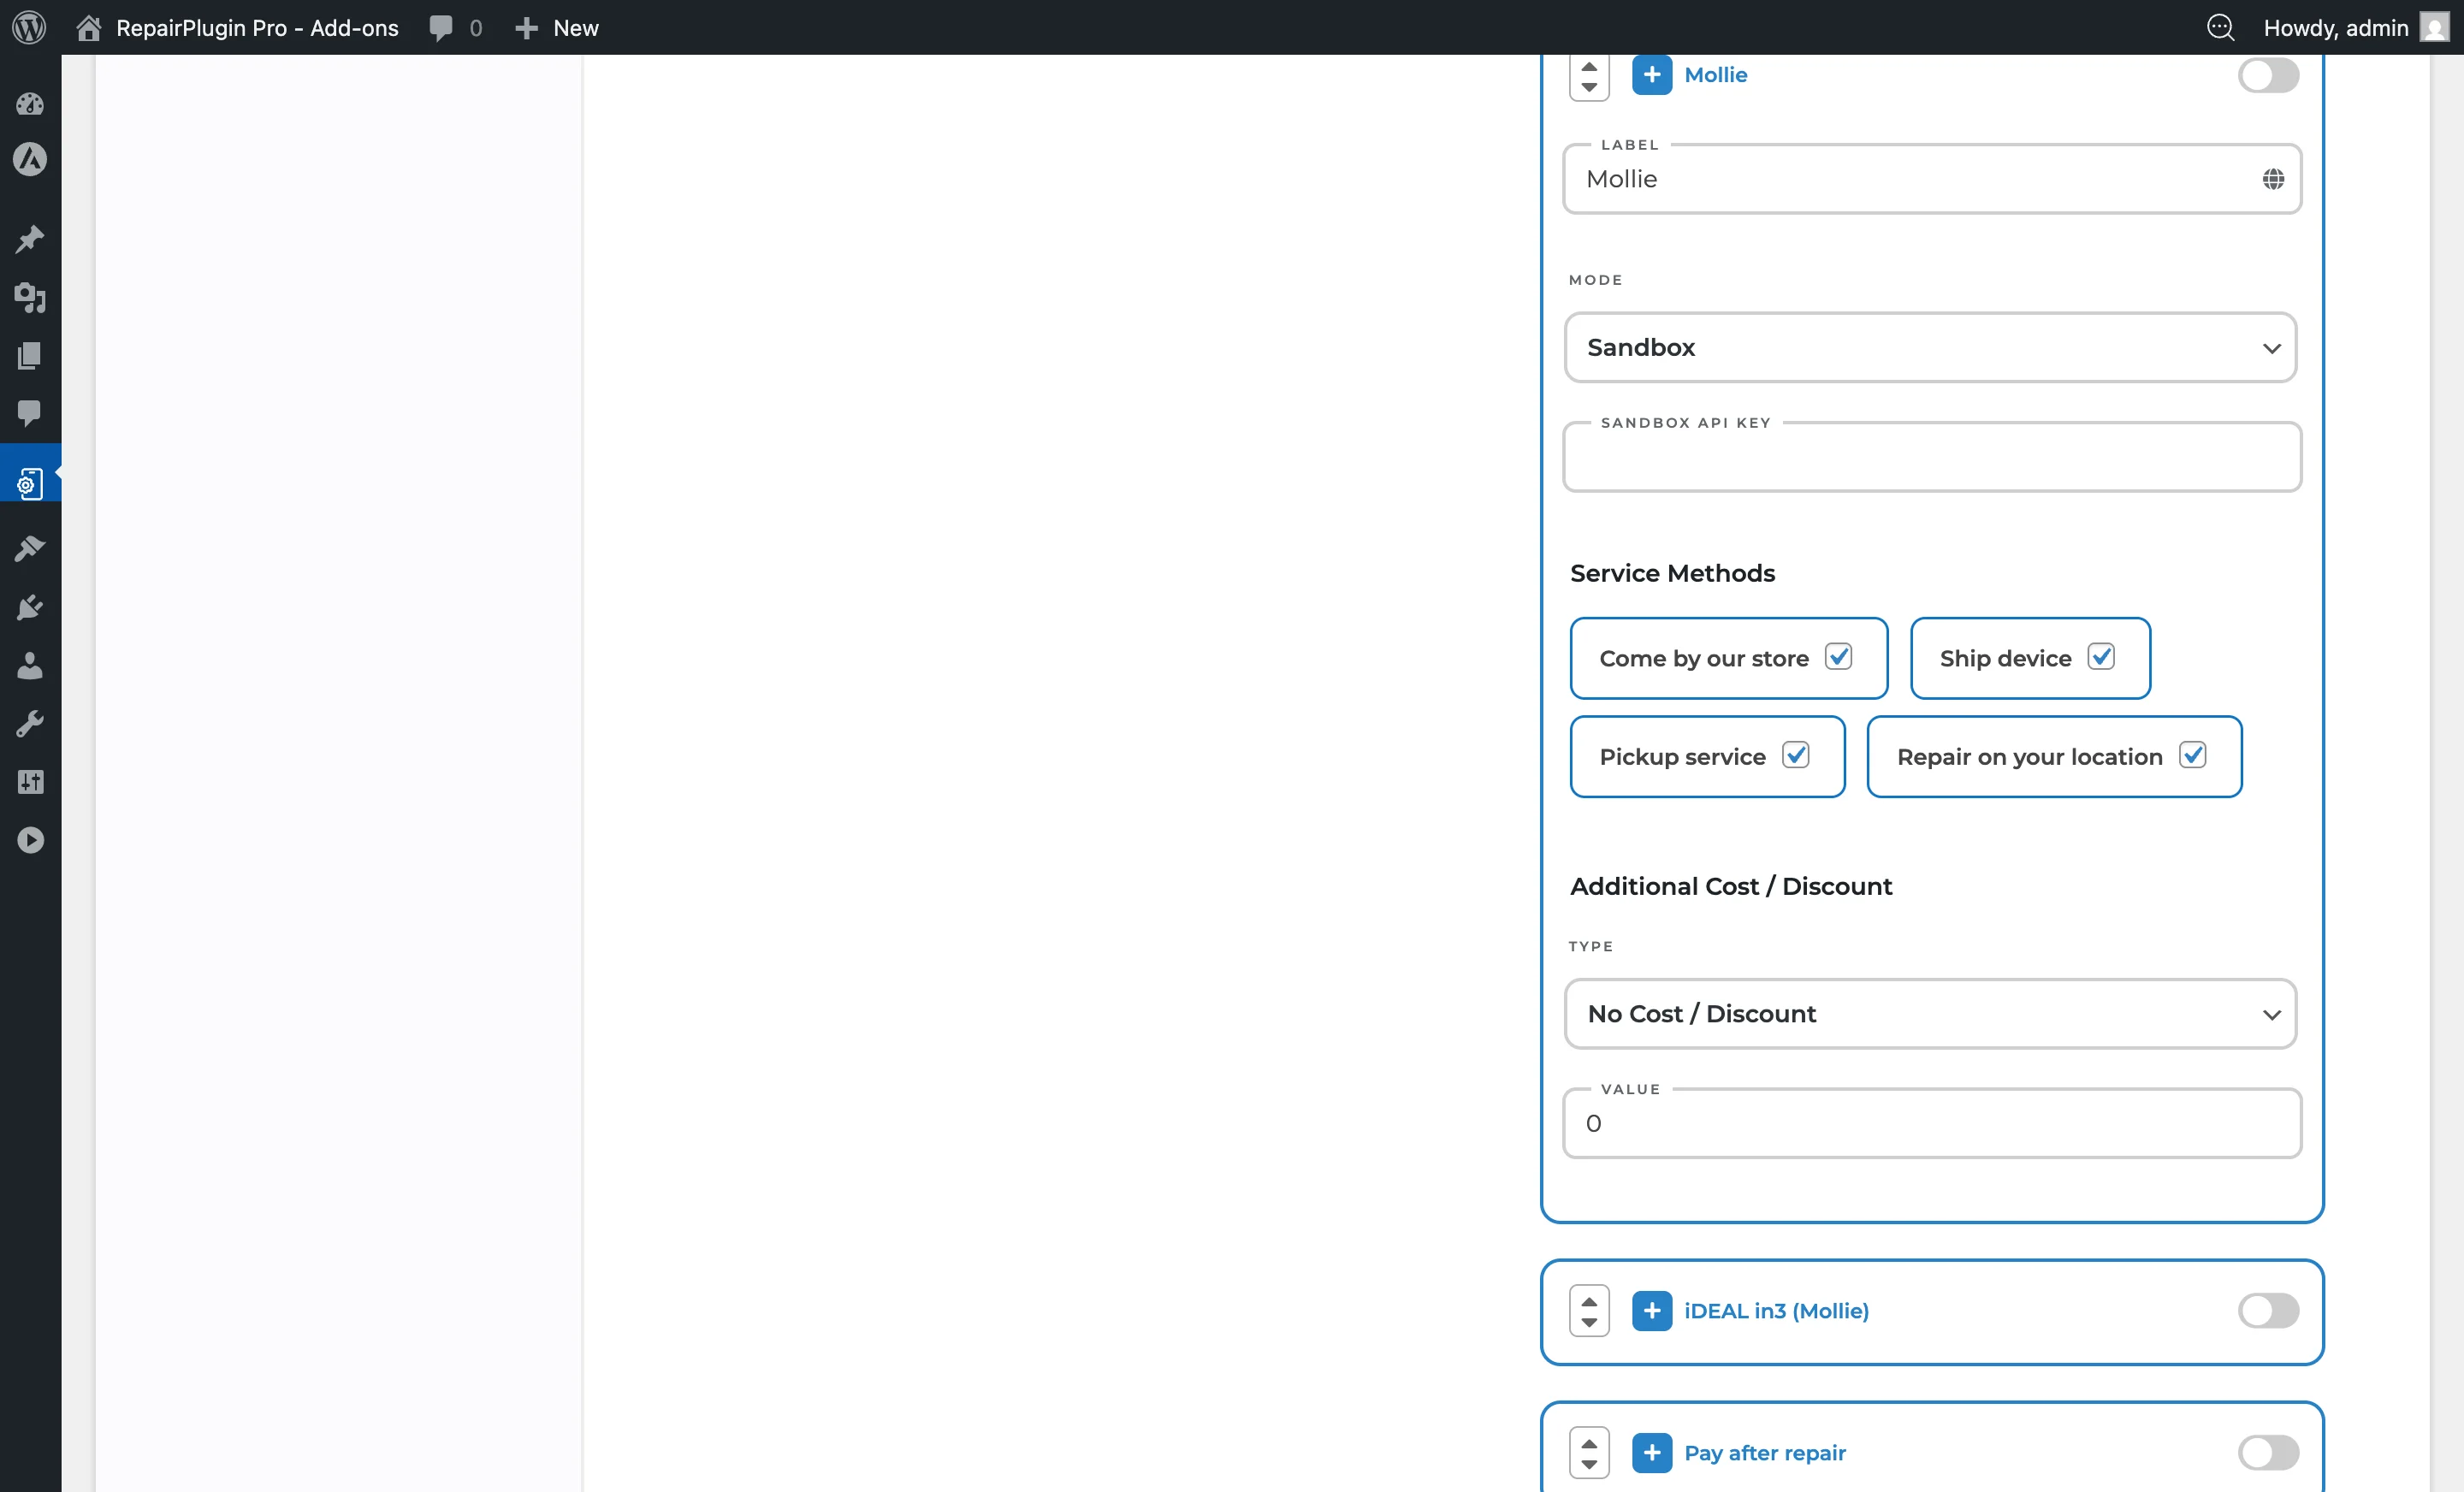
- Expand the Mollie section by clicking the + icon.
- Set a custom Label (default: "Mollie"). Click the globe icon for translations.
- Choose the Mode: Sandbox or Live.
- Enter your API key:
- Live mode: Enter your Live API key.
- Sandbox mode: Enter your Sandbox API key.
- Set the Service Methods this payment method is available for.
- Optionally add a surcharge or discount.
- Click Save.
How to get Mollie keys:
- Log in to your Mollie Dashboard.
- Go to Developers > API Keys.
- Copy the appropriate API key (Test or Live).
Configure iDEAL in3 (Mollie)
https://www.repairplugin.com/wp-admin/admin.php?page=wp_repair_settings§ion=planning_discount
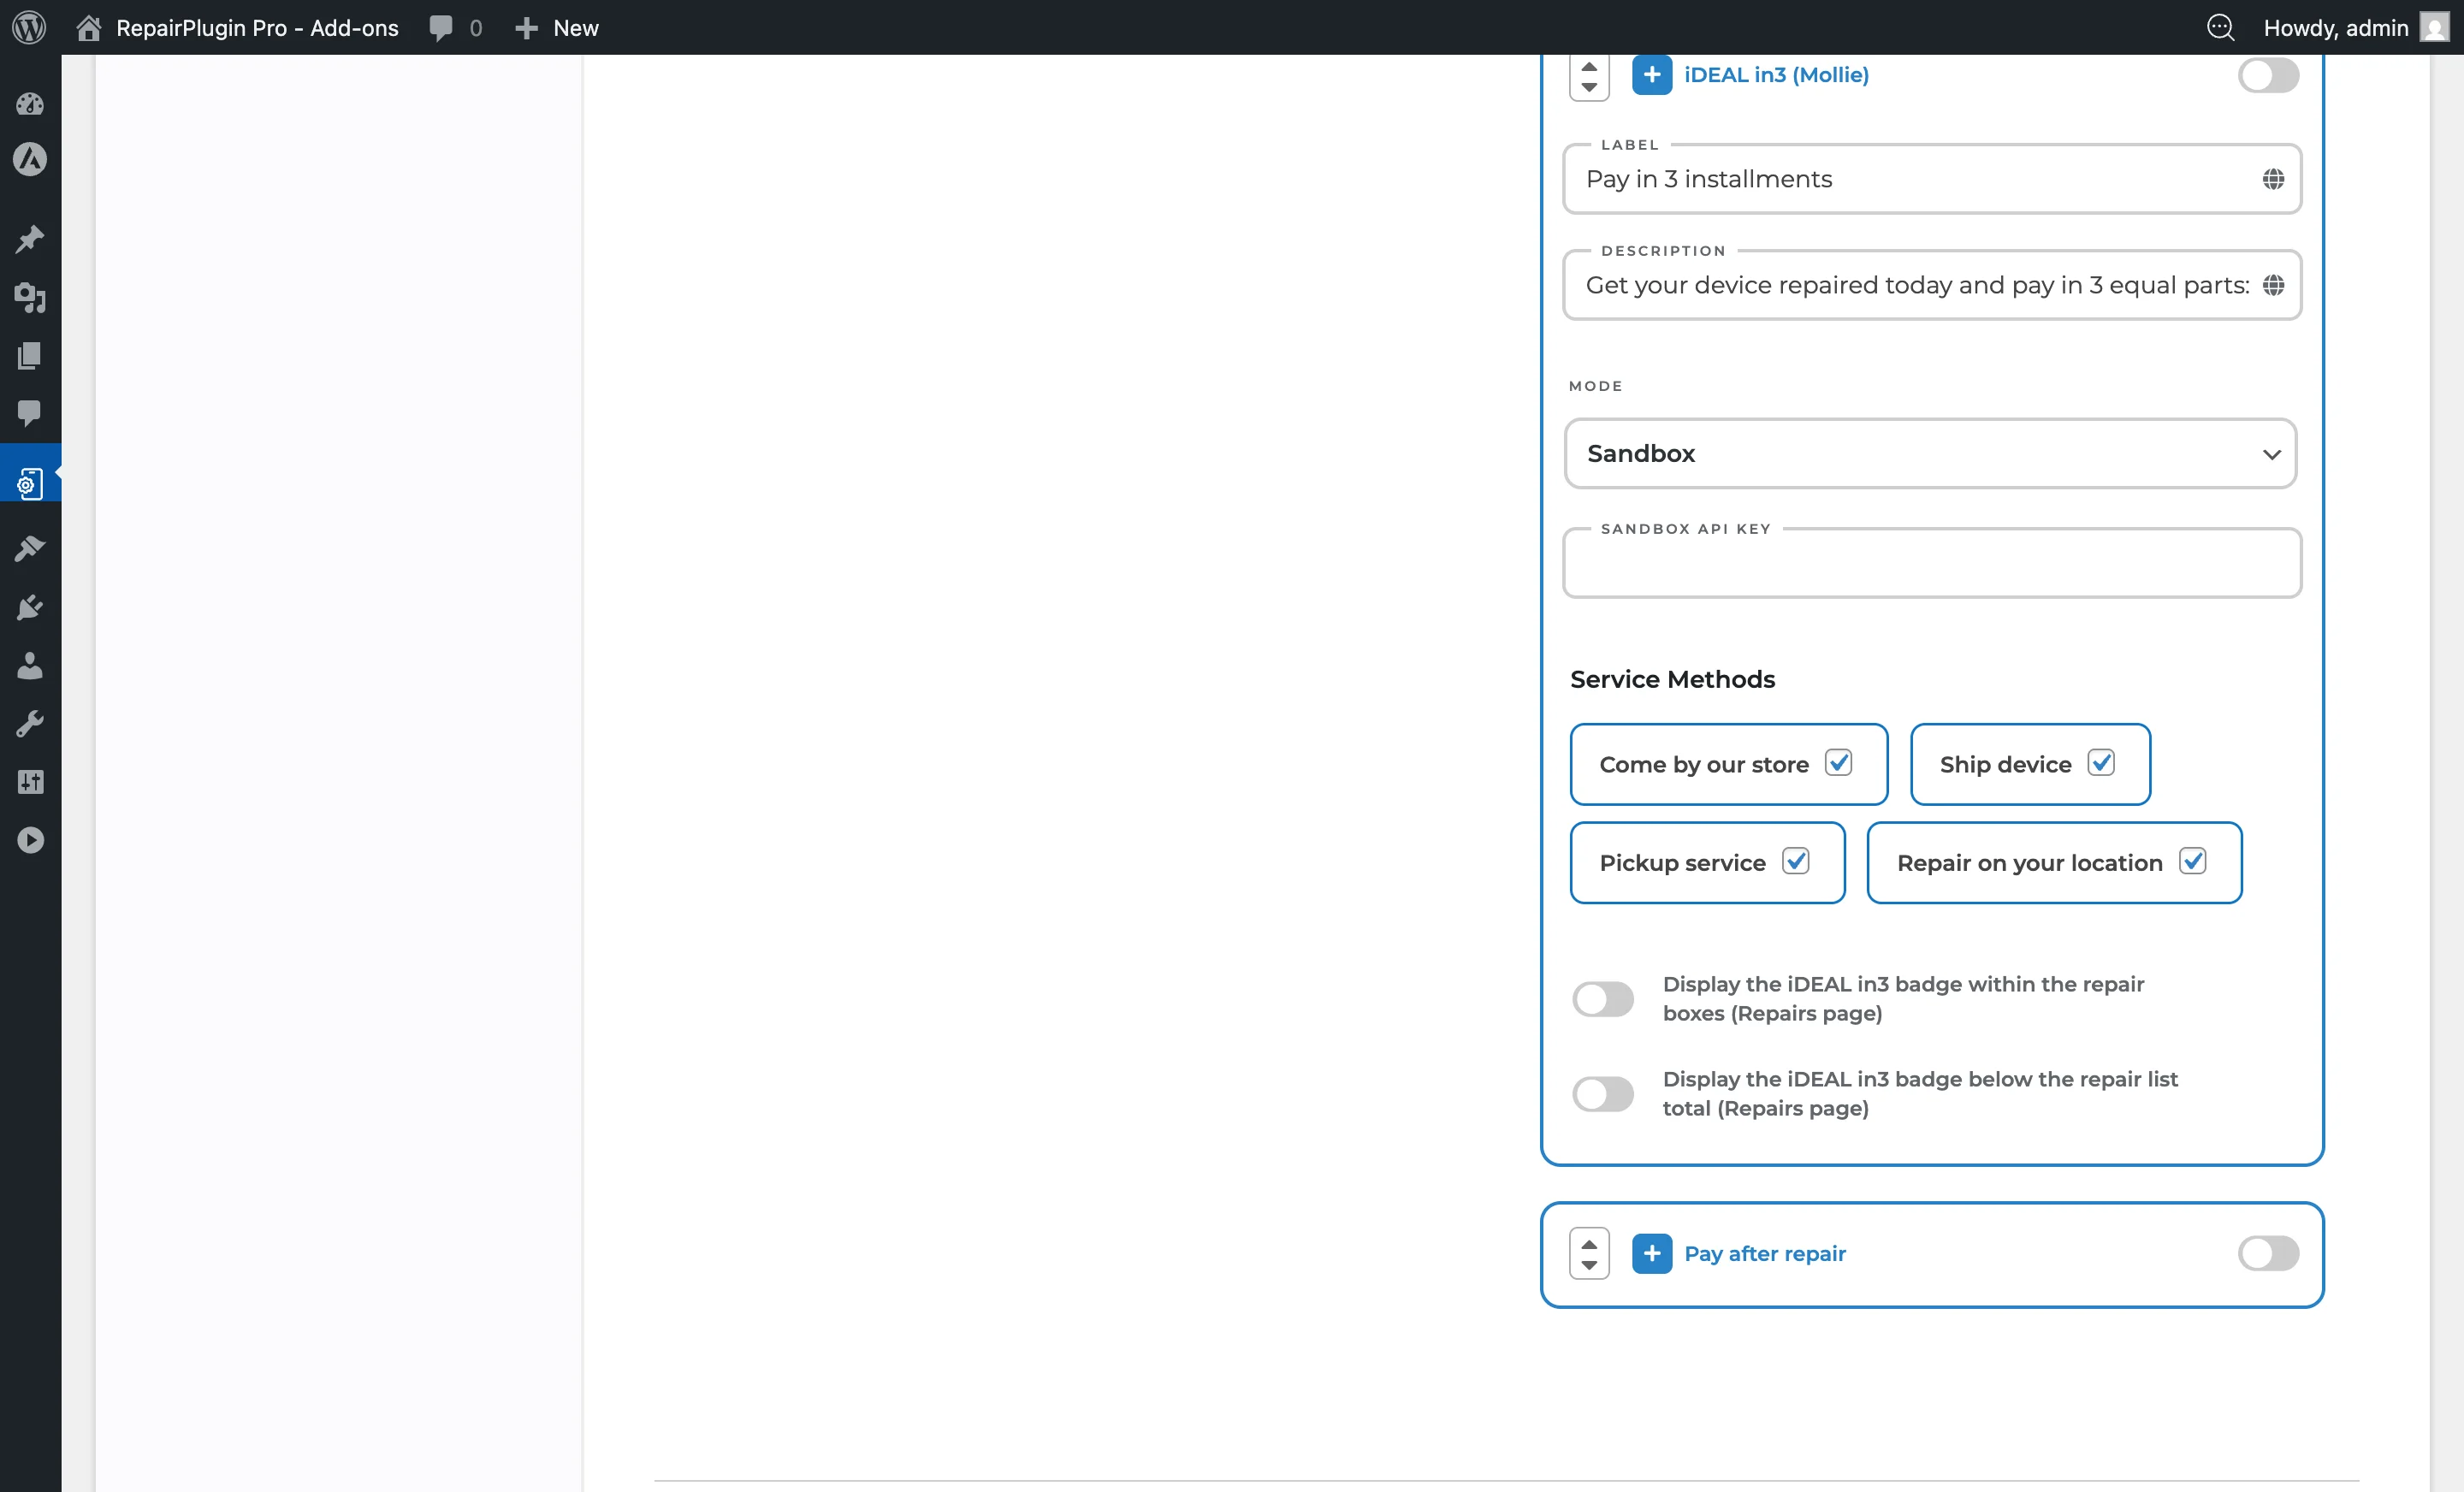
- Expand the iDEAL in3 (Mollie) section by clicking the + icon.
- Set a custom Label (default: "iDEAL in3"). Click the globe icon for translations.
- Set a custom Description for the payment option. Click the globe icon for translations.
- Choose the Mode: Sandbox or Live.
- Enter your API key:
- Live mode: Enter your Live API key.
- Sandbox mode: Enter your Sandbox API key.
- Set the Service Methods this payment method is available for.
- Optionally turn on Display the iDEAL in3 badge within the repair boxes on the Repairs page.
- Optionally turn on Display the iDEAL in3 badge below the repair list total on the Repairs page.
- Click Save.
Note: iDEAL in3 doesn't support surcharges or discounts. Charging extra fees isn't allowed for this payment method, so those fields are hidden.
Configure Pay after repair
https://www.repairplugin.com/wp-admin/admin.php?page=wp_repair_settings§ion=planning_discount
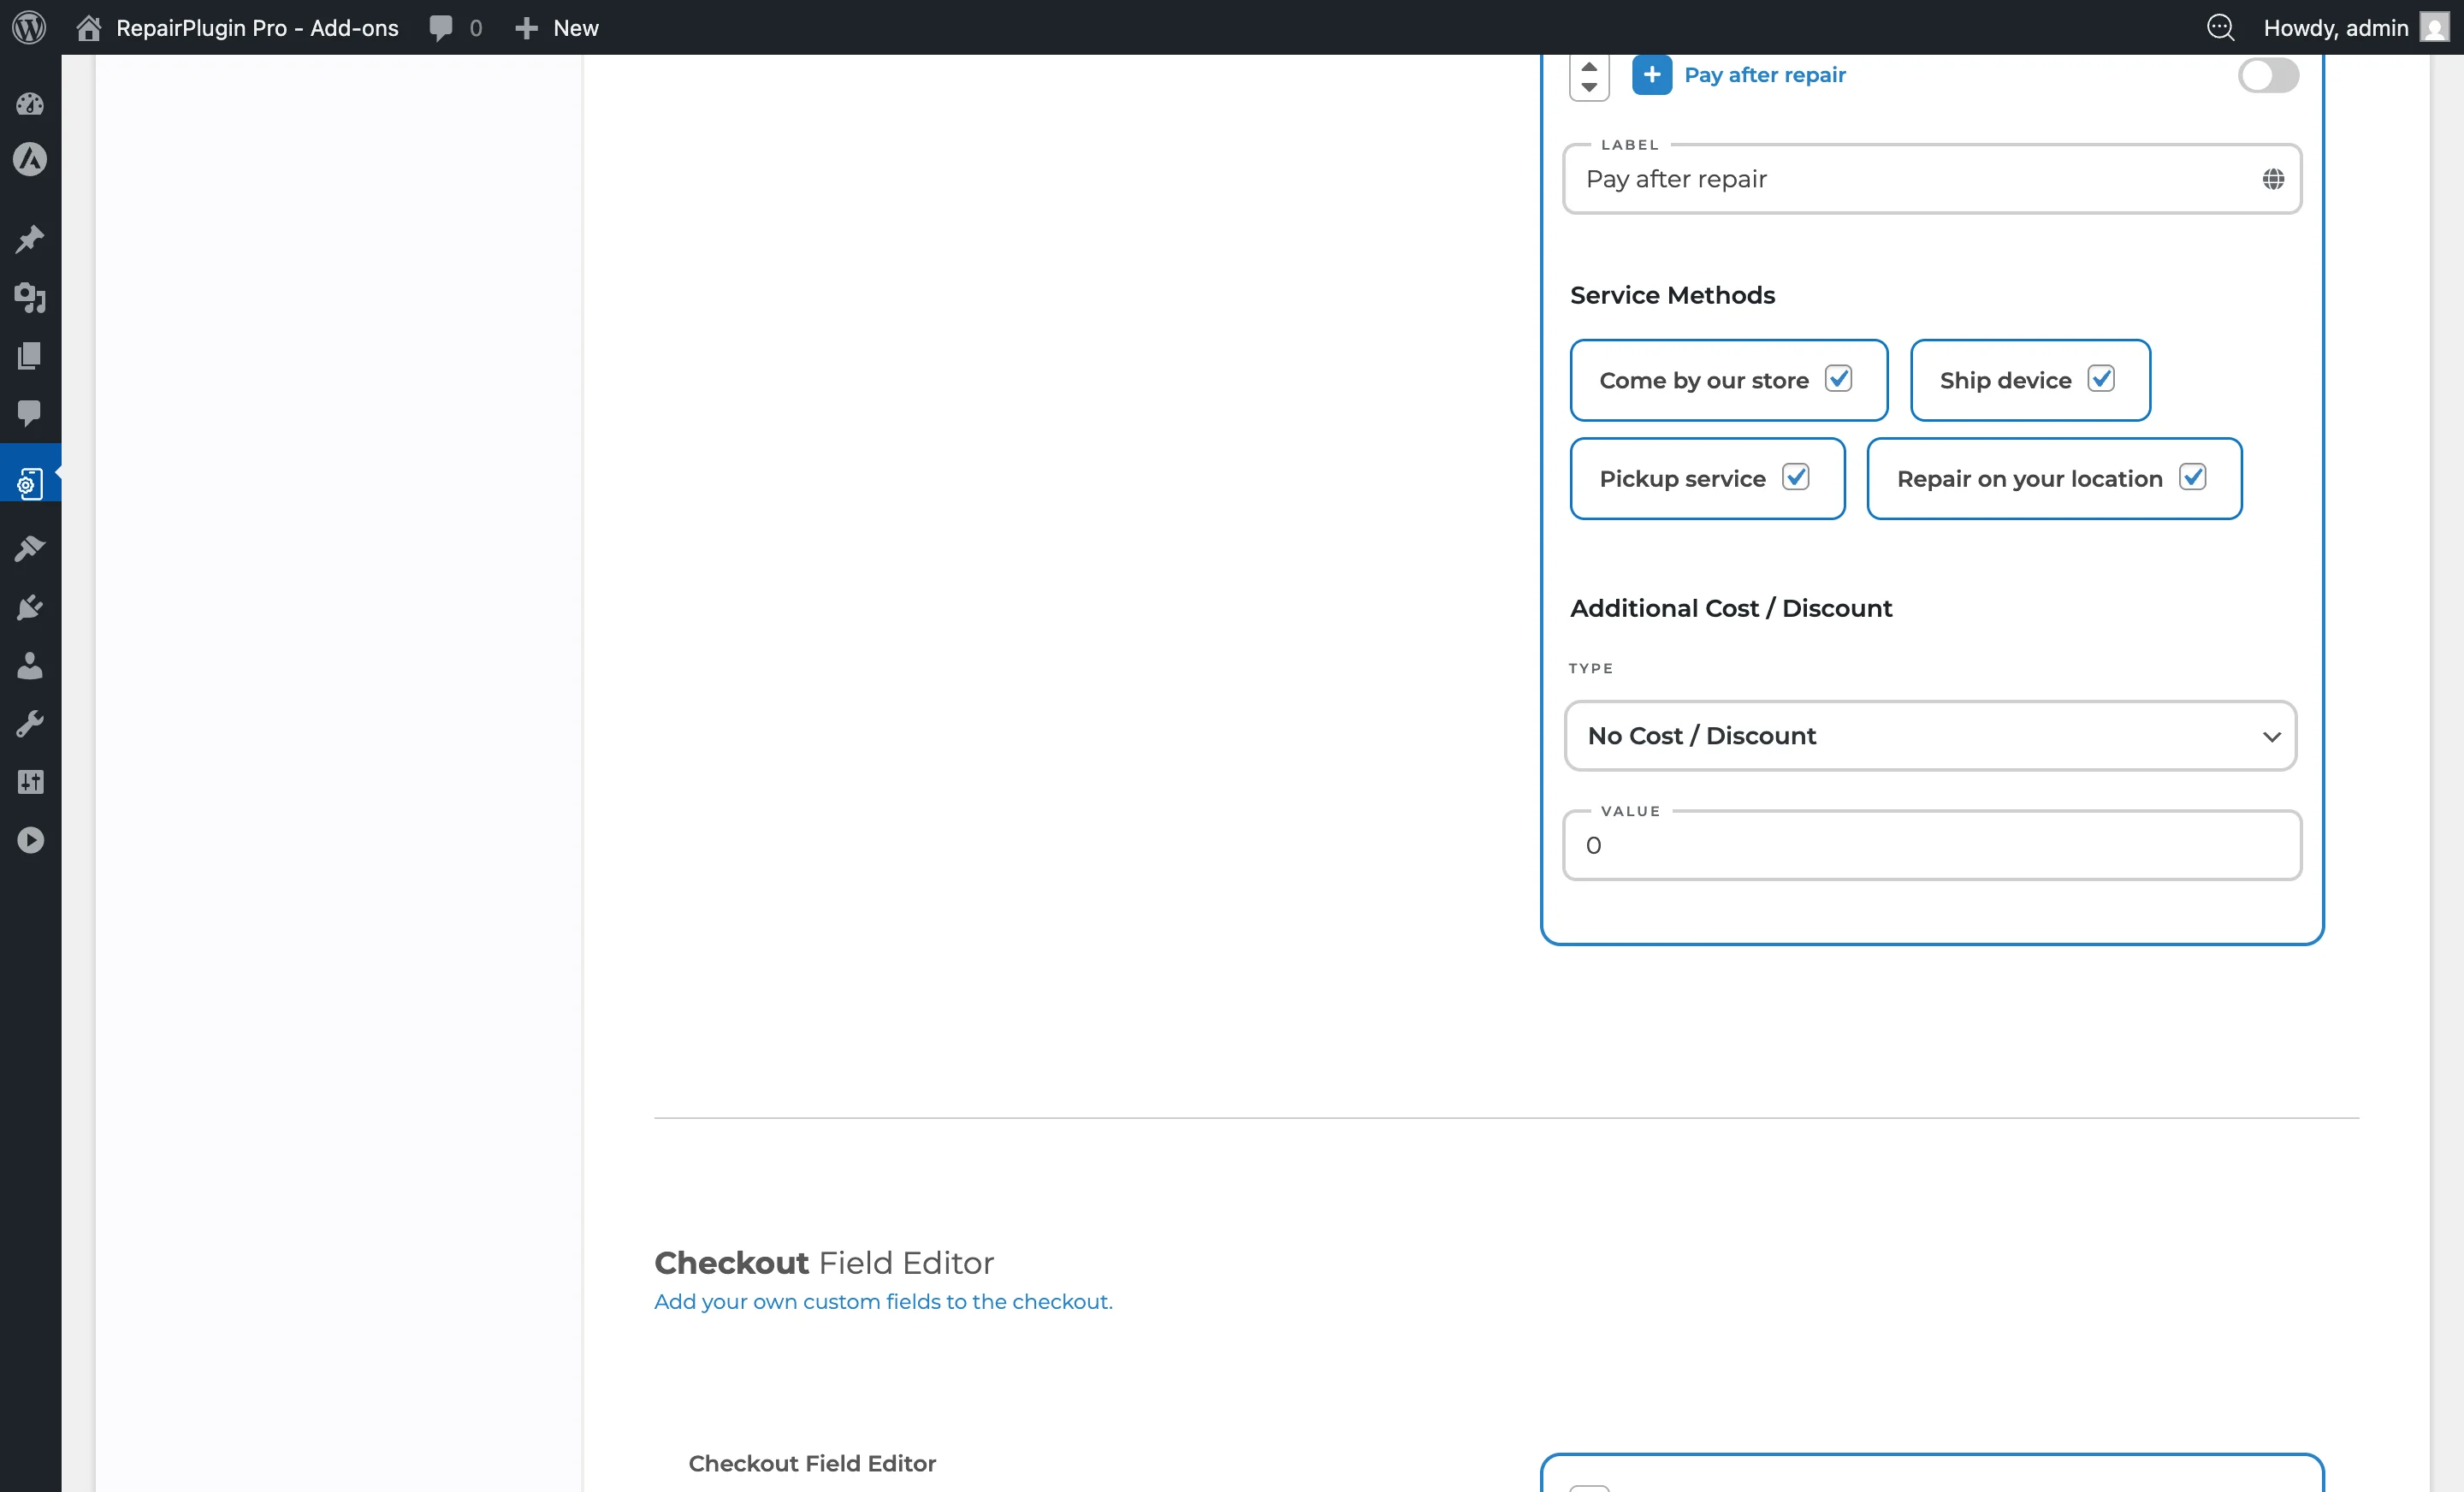
- Expand the Pay after repair section by clicking the + icon.
- Set a custom Label (default: "Pay after repair"). Click the globe icon for translations.
- Set the Service Methods this payment method is available for.
- Optionally add a surcharge or discount.
- Click Save.
This is an offline payment method -- no API keys are needed. Customers select it at checkout to indicate they'll pay later (e.g., at pickup).
Settings reference
| Setting | Description | Default | Customers see |
|---|---|---|---|
| Accept Payments when creating an appointment | Master switch that turns the entire payment methods section on or off. When it's off, no payment options appear during checkout | off | When on, a payment method selection step appears during checkout. When off, customers complete bookings without choosing a payment method. |
| Setting | Description | Default | Customers see |
|---|---|---|---|
| Payment method switch | Turns an individual payment method on or off. The method also needs valid API credentials to work (except Pay after repair) | off | Only enabled methods appear in the payment selection step at checkout. |
| Label | Sets the name customers see for this payment method | method name (e.g., "Stripe," "Paypal," "Mollie," "iDEAL in3," "Pay after repair") | The custom label replaces the default method name in the checkout payment selection. |
| Mode | Switches between test mode (for development and testing) and live mode (for real transactions). The API key fields change based on the selected mode Tip: Start in Sandbox mode to test the full booking and payment flow. Once everything works, switch to Live and enter your live API keys. | Sandbox | In Sandbox mode, no real payments are processed. Always switch to Live before going into production. |
| Service Methods | Controls which service methods this payment method is available for. Unchecking a service method hides this payment option when a customer picks that service method Tip: Disable "Pay after repair" for the "Ship Device" service method so shipped repairs are always paid online. | all enabled | Only payment methods enabled for their chosen service method appear at checkout. |
| Display the iDEAL in3 badge within the repair boxes | Shows the iDEAL in3 badge inside individual repair selection boxes on the Repairs page | off | A small iDEAL in3 badge appears on each repair box, promoting the installment payment option. |
| Display the iDEAL in3 badge below the repair list total | Shows the iDEAL in3 badge below the total on the Repairs page | off | A badge appears beneath the repair list total, letting them know installment payments are available. |
Do I need API keys for "Pay after repair"?
No. "Pay after repair" is an offline method -- no API keys or payment gateway setup is needed.
Can I use different payment methods for different service types?
Yes. Each payment method has a Service Methods checkbox list. Uncheck any service method where you don't want that payment option to appear.