SMTP Settings
Configure SMTP settings in RepairPlugin to improve email delivery, set custom sender details, send test emails, and monitor logs for troubleshooting.
What can you do with this?
- Improve email delivery -- route emails through your own SMTP server instead of relying on your hosting provider's default mail function, which is often restricted or blocked.
- Brand your sender details -- set a custom "From" name and email address so customers see your shop name instead of a generic WordPress address.
- Test your setup -- send a test email to verify everything works before going live.
- Monitor email delivery -- browse a log of every email RepairPlugin has sent, including status, content, and error messages for failed deliveries.
- Apply settings site-wide -- optionally use the same SMTP settings and sender details for all WordPress emails, not just RepairPlugin.
Where to find it
- In your WordPress admin, click RepairPlugin.
- Click Settings.
- In the settings sidebar, click Email Settings & Logs.
- The page opens on the Settings tab. Use the tabs at the top to switch between Settings, Email Test, and Email Logs.
How to set it up
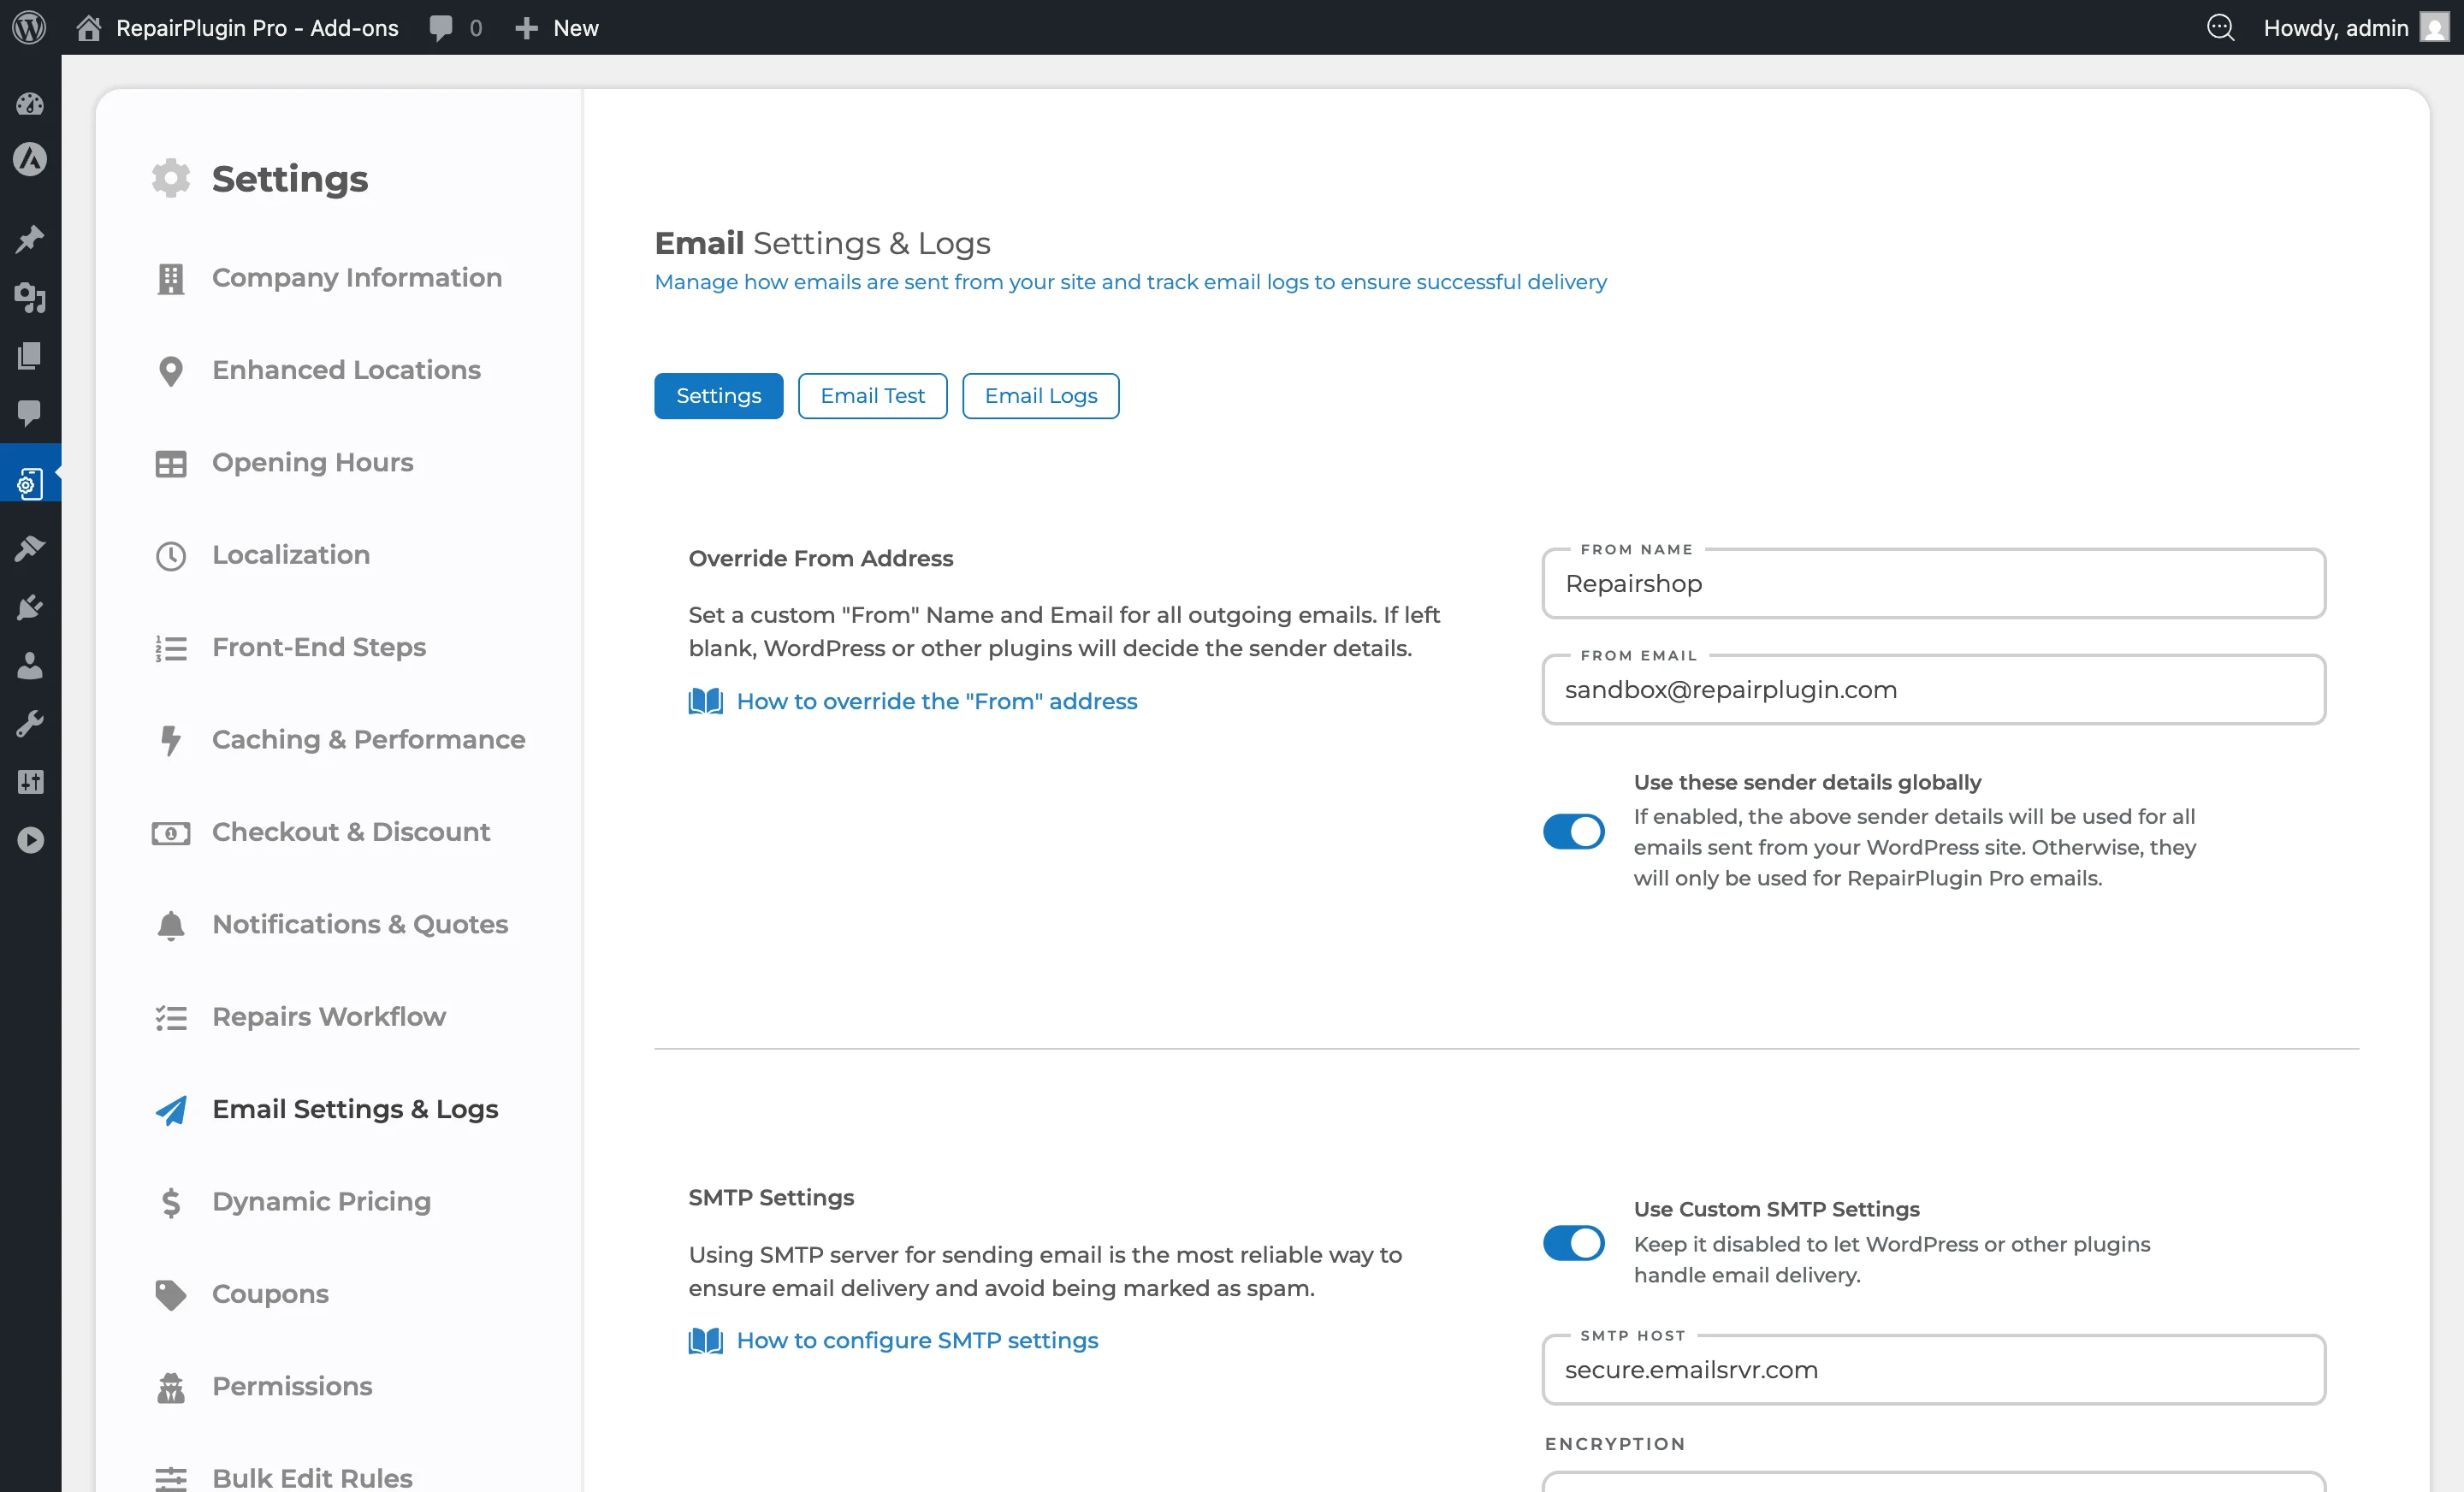
Set a custom "From" address
- On the Settings tab, find the top section.
- Enter a value in the From Name field (e.g.,
Acme Repairs). - Enter a value in the From Email field (e.g.,
info@acmerepairs.com). - Optionally switch Use these sender details globally to ON to apply these sender details to all WordPress emails, not just RepairPlugin.
- Click Save Settings.
If both fields are left blank, WordPress (or another plugin) decides the sender details.
Turn on and configure SMTP
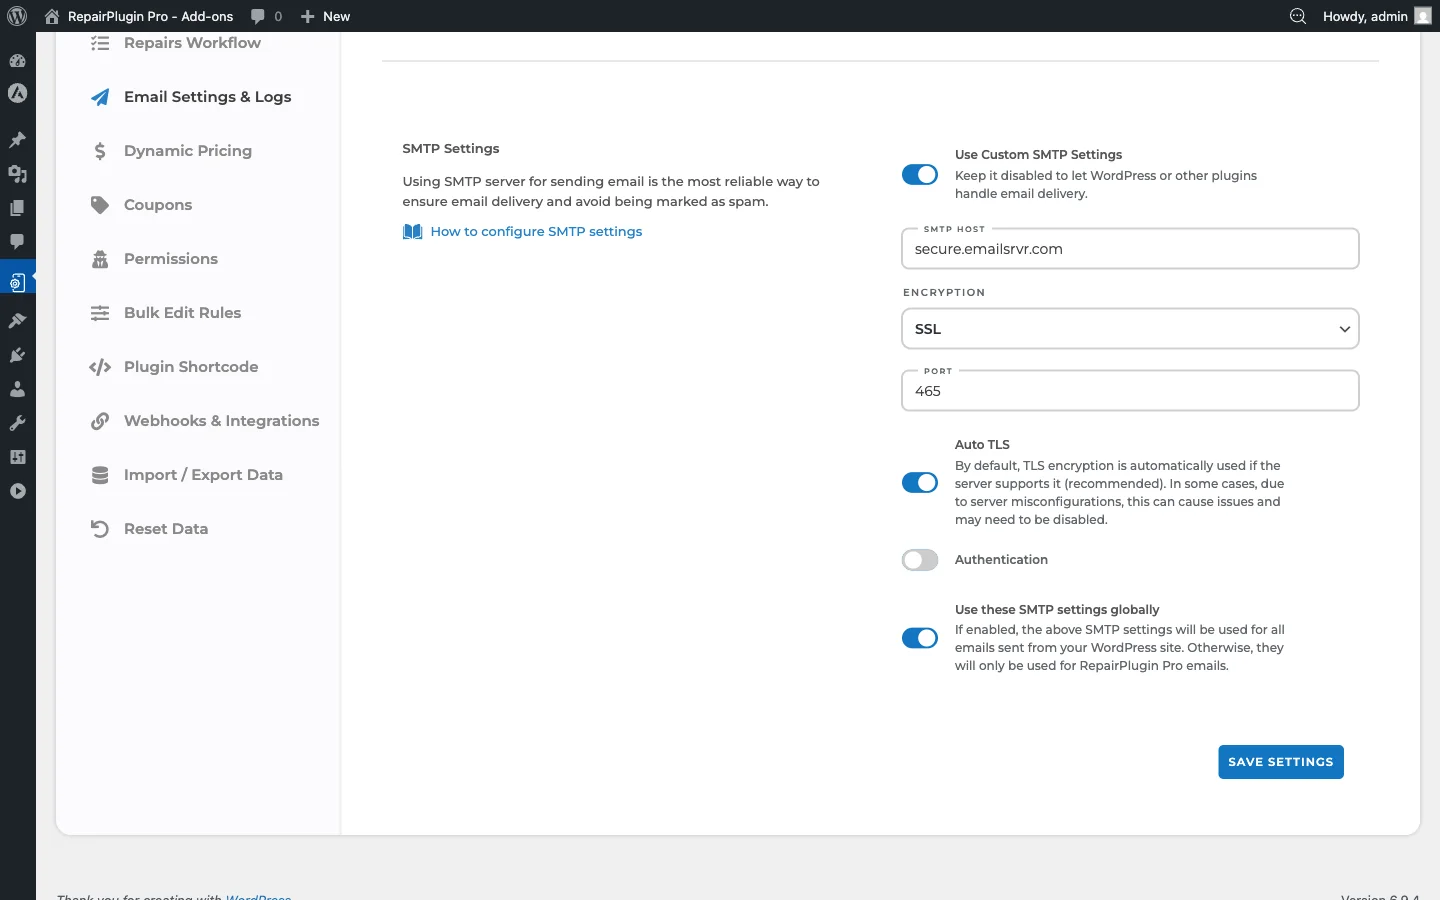
- On the Settings tab, scroll down to the SMTP Settings section.
- Switch Use Custom SMTP Settings to ON.
- Fill in the fields that appear:
- SMTP Host -- the hostname of your mail server (e.g.,
smtp.gmail.com,secure.emailsrvr.com). - Encryption -- select
None,SSL, orTLS. Choosing SSL auto-fills port 465; choosing TLS auto-fills port 587; choosing None auto-fills port 25. - Port -- automatically set when you pick an encryption type, but you can change it.
- Auto TLS -- keep turned on unless your server has compatibility issues (hidden when TLS encryption is selected because TLS is already enforced).
- Authentication -- switch to ON if your mail server requires login credentials (most do).
- Username and Password -- your SMTP account credentials (only visible when Authentication is turned on).
- SMTP Host -- the hostname of your mail server (e.g.,
 4. Optionally switch Use these SMTP settings globally to ON to route all WordPress emails through this SMTP server.
5. Click Save Settings.
4. Optionally switch Use these SMTP settings globally to ON to route all WordPress emails through this SMTP server.
5. Click Save Settings.
Send a test email

- Click the Email Test tab at the top of the page.
- Enter the recipient email address in the Send To field.
- Click Send Test Email.
- A success or failure message appears on screen. If the test fails, switch to the Email Logs tab to check the error.
Review email logs
- Click the Email Logs tab.
- The table shows all outgoing RepairPlugin emails with columns: To Email, Subject, Status, Sent At, and Actions.
- Click View on any row to open a window with the full email details: headers, recipient, subject, message body, attachments, status, and error message (if failed).
- Click the trash icon to delete a single log entry, or click Delete All Email Logs at the bottom to clear the entire log (you'll need to type
DELETEto confirm).
Only emails sent by RepairPlugin appear in this log. Emails sent by other plugins or WordPress itself aren't tracked here.
Settings reference
From address section
| Setting | Description | Default | Customers see |
|---|---|---|---|
| From Name | Sets the sender name on all outgoing RepairPlugin emails | empty (WordPress default is used) | This name appears as the email sender in their inbox. |
| From Email | Sets the sender email address on outgoing emails | empty (WordPress admin email is used) | This address appears as the sender; replies go to this address. |
| Use these sender details globally | When turned on, the From Name and From Email apply to every email sent from your WordPress site, not just RepairPlugin emails | off | All site emails (password resets, WooCommerce, etc.) also use these sender details. |
SMTP settings section
| Setting | Description | Default | Customers see |
|---|---|---|---|
| Use Custom SMTP Settings | Turns on the built-in SMTP configuration. When turned off, email delivery is handled by WordPress or another SMTP plugin | off | No visible change -- this affects how emails are delivered behind the scenes. |
| SMTP Host | Specifies the hostname of your outgoing mail server | empty | No visible change. An incorrect value causes email delivery to fail. |
| Encryption | Sets the encryption method for the SMTP connection. Selecting SSL sets the port to 465. Selecting TLS sets the port to 587 and hides the Auto TLS switch. Selecting None sets the port to 25 | None | No visible change. This ensures emails are transmitted securely. |
| Port | Specifies the SMTP server port. Common values: 465 (SSL), 587 (TLS), 25 (unencrypted) | 0 (auto-filled when encryption is selected) | No visible change. An incorrect value causes email delivery to fail. |
| Auto TLS | Automatically uses TLS encryption if the server supports it. Hidden when Encryption is set to TLS. Recommended to keep turned on when using SSL or no encryption | off | No visible change. Improves transport security when available. |
| Authentication | Turns on username/password authentication for the SMTP server. Most mail servers require this | off | No visible change. Required for most SMTP providers. |
| Username | The login username (often the full email address) for SMTP authentication. Only visible when Authentication is turned on | empty | No visible change. |
| Password | The login password for SMTP authentication. Stored securely and shown as dots. Only visible when Authentication is turned on | empty | No visible change. |
| Use these SMTP settings globally | When turned on, all WordPress emails are routed through this SMTP configuration. When turned off, only RepairPlugin emails use these SMTP settings | off | Affects delivery of all site emails, not just repair-related ones. |
Email test tab
| Setting | Description | Default | Customers see |
|---|---|---|---|
| Send To | Sends a test email to the specified address using your currently saved email configuration. The test email subject reads "Test Email from RepairPlugin" and contains a confirmation message | last used test email address | Nothing -- this is an admin-only diagnostic tool. |
Email logs tab
| Setting | Description | Default | Customers see |
|---|---|---|---|
| Email Log Table | Shows a record of every outgoing email from RepairPlugin. Each row shows recipient, subject, status (green "success" or red "failed"), timestamp, and action buttons (View, Delete). Failed emails show the error message in a red-bordered row beneath the entry | — | Nothing -- this is an admin-only feature for monitoring and troubleshooting. |
Frequently asked questions
Do I need to configure SMTP?
It depends on your hosting. Many hosting providers restrict the default WordPress mail function, which causes emails to end up in spam or not arrive at all. If your customers aren't receiving emails, configuring SMTP is usually the fix.
Can I use Gmail, Outlook, or a transactional email service?
Yes. Any SMTP server works -- Gmail (smtp.gmail.com), Outlook (smtp.office365.com), Mailgun, SendGrid, or your hosting provider's mail server. Just enter the correct host, port, encryption, and credentials.