Models & Repairs
Manage device models and repair prices in RepairPlugin — adjust pricing, add sub-repairs, configure colors, and control visibility per model.
modelsrepairspricingsub-repairsdevice management
What can you do with this?
- Fine-tune prices per model — override default repair prices for specific devices that need different pricing (e.g., charge more for a premium model's screen repair).
- Add new devices — manually add models that aren't in the database yet, complete with image, release date, and model code.
- Manage device colors — add or remove the selectable colors customers see during booking.
- Offer quality options per model — add sub-repairs like "Original" or "OEM" with different price points under a single repair.
- Control visibility — turn individual models or repairs on and off without deleting anything.
Where to find it
- In the WordPress admin sidebar, click RepairPlugin.
- Click Models & Repairs in the submenu.
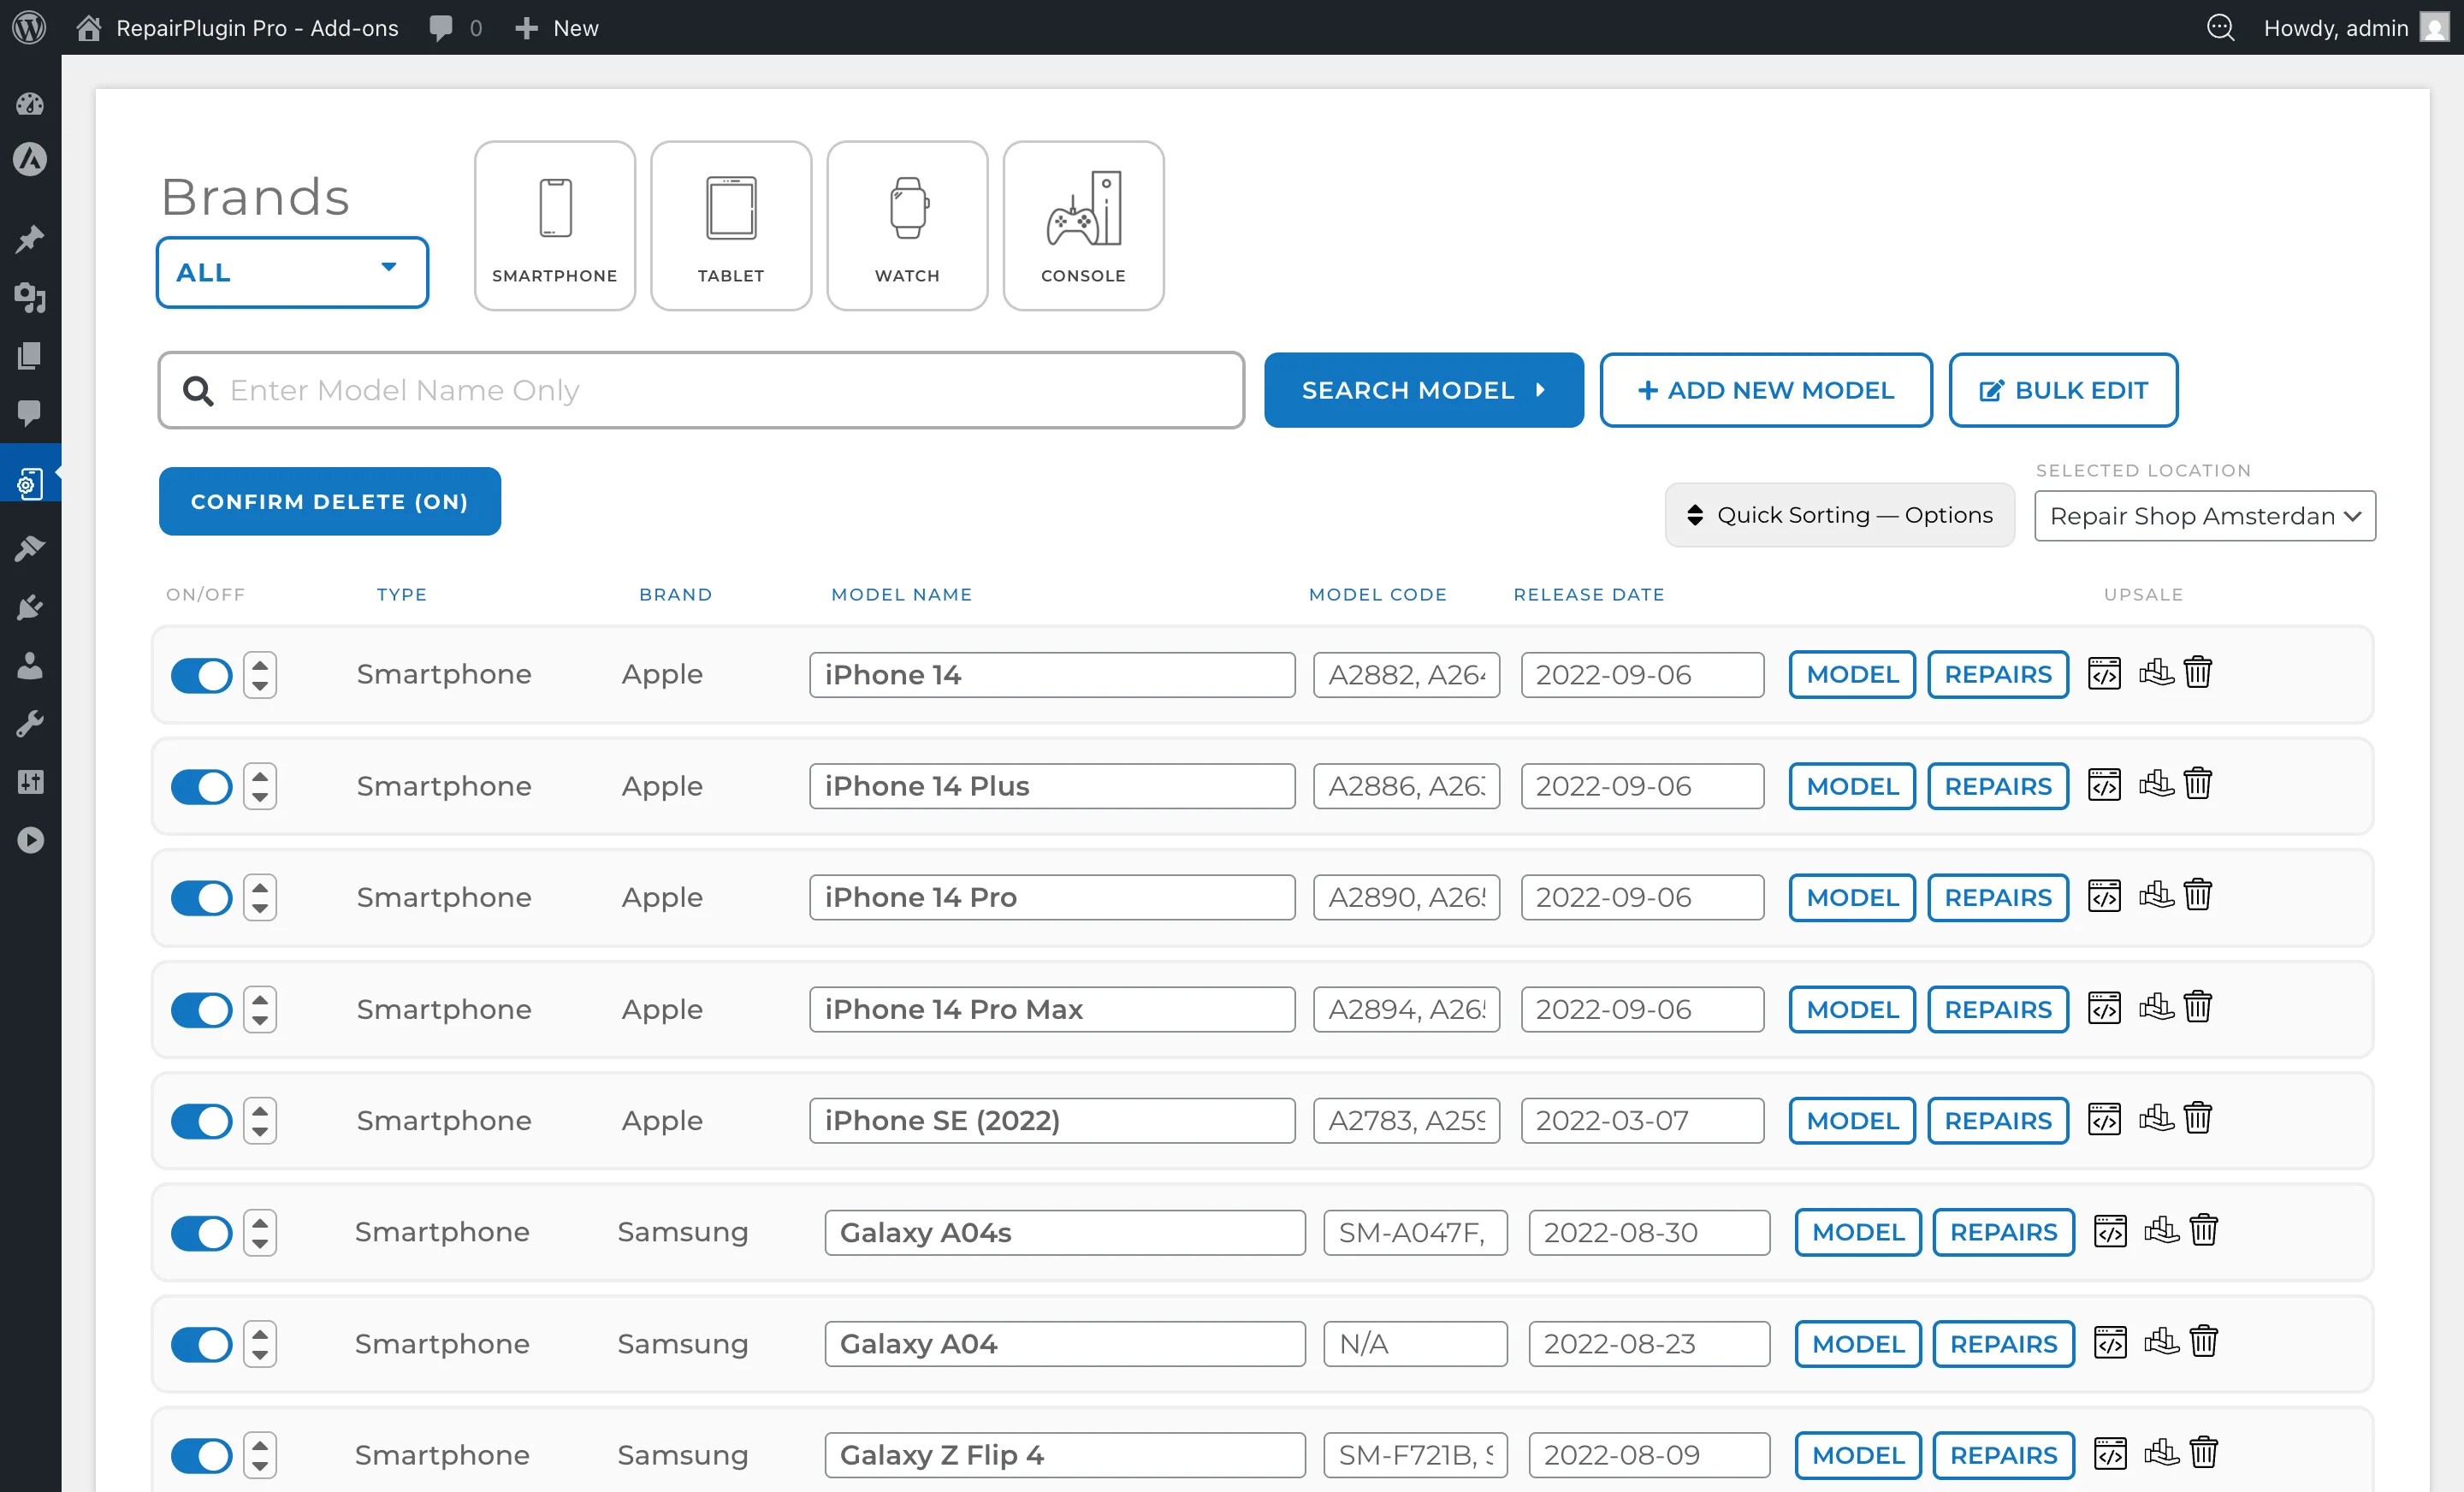
- The page opens showing a paginated list of all models (10 per page) with filters and a search bar at the top.
https://www.repairplugin.com/wp-admin/admin.php?page=wp_repair_manage_models
How to set it up
Find a model
The page offers several ways to locate a specific model:
- Search bar — type a model name or model code to search. This is the fastest method.
- Filter by Brand — use the brand dropdown to filter models by a specific brand.
- Filter by Category — use the category dropdown to filter models by device type.
- Sort columns — click column headers (Model Name, Model Code, Brand, Category, Release Date) to sort ascending or descending.
- Browse — scroll through the paginated list.
Edit a model
- Find the model using search or filters.
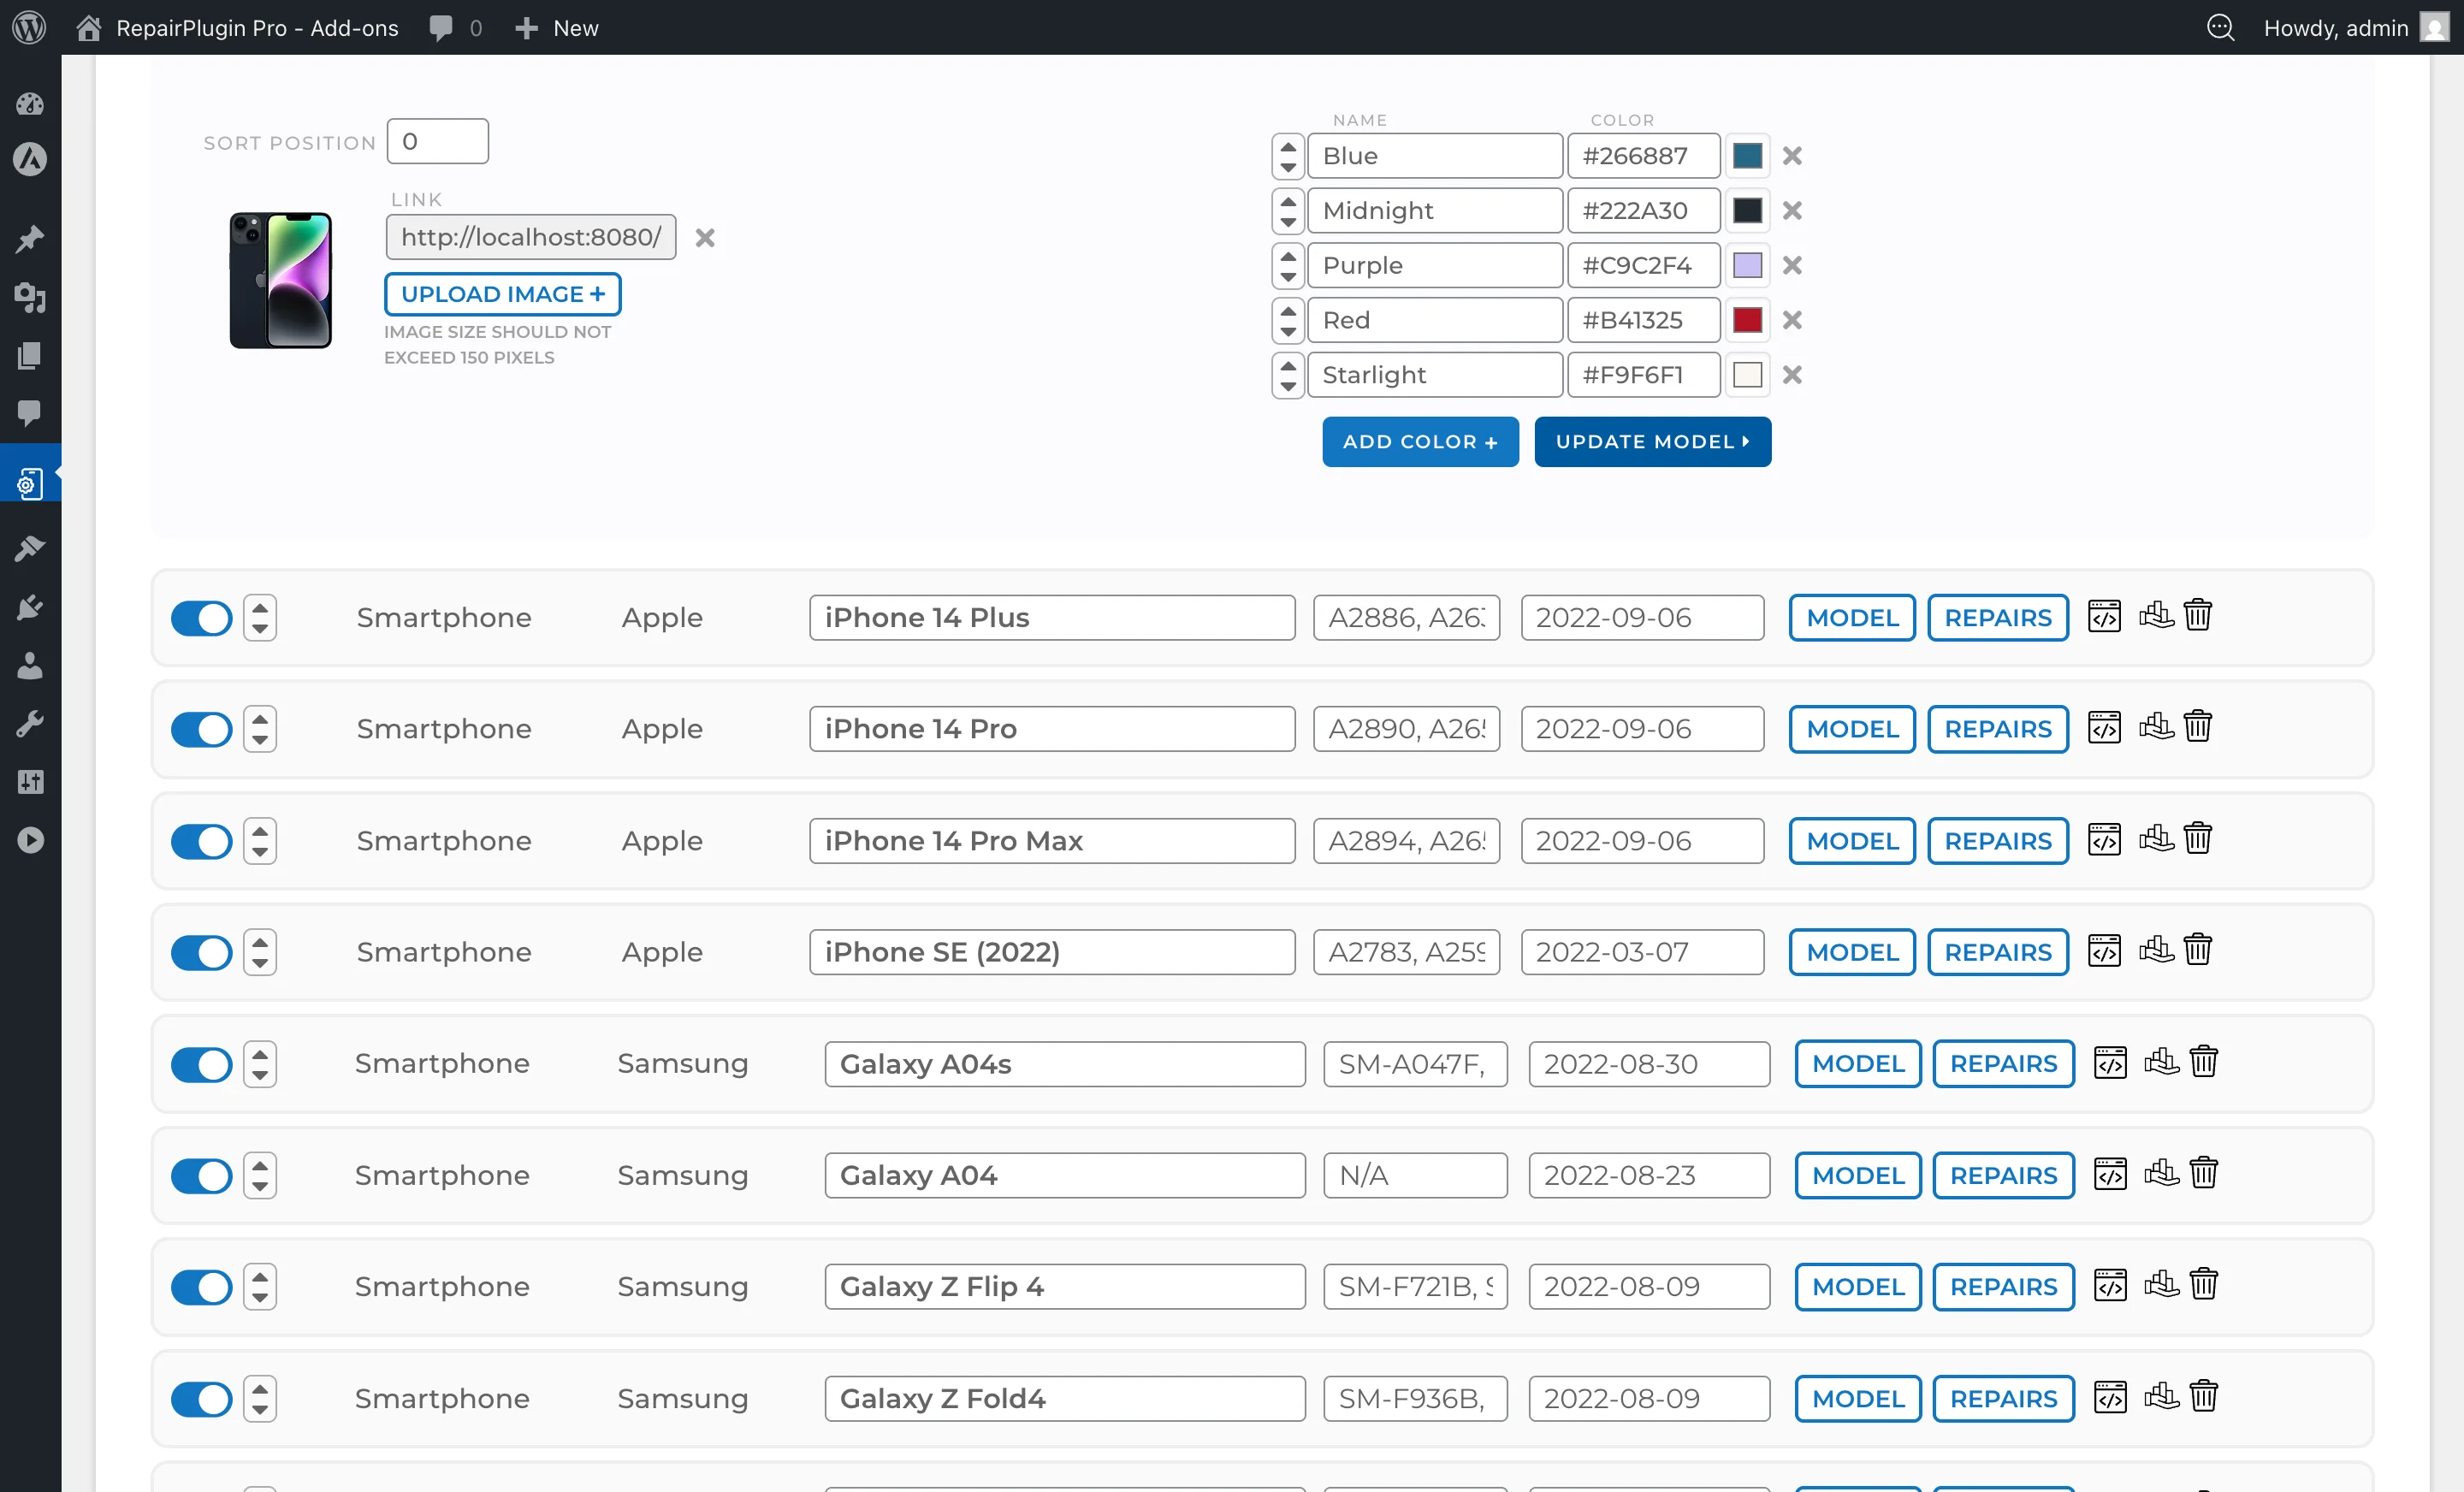
- Click the Model button on the model row to expand the model details panel.
- Adjust the desired fields:
- Model Name — the display name of the device.
- Model Code — the type or part number (e.g., "A2894").
- Release Date — the date the device was released.
- Model Image — upload or change the device image via the image upload button.
- To add a new color, click the Add color button and provide the color name and hex code.
- To delete a color, click the trash icon next to the color entry.
- Click Update model to save your changes.
https://www.repairplugin.com/wp-admin/admin.php?page=wp_repair_manage_models
Add a new model
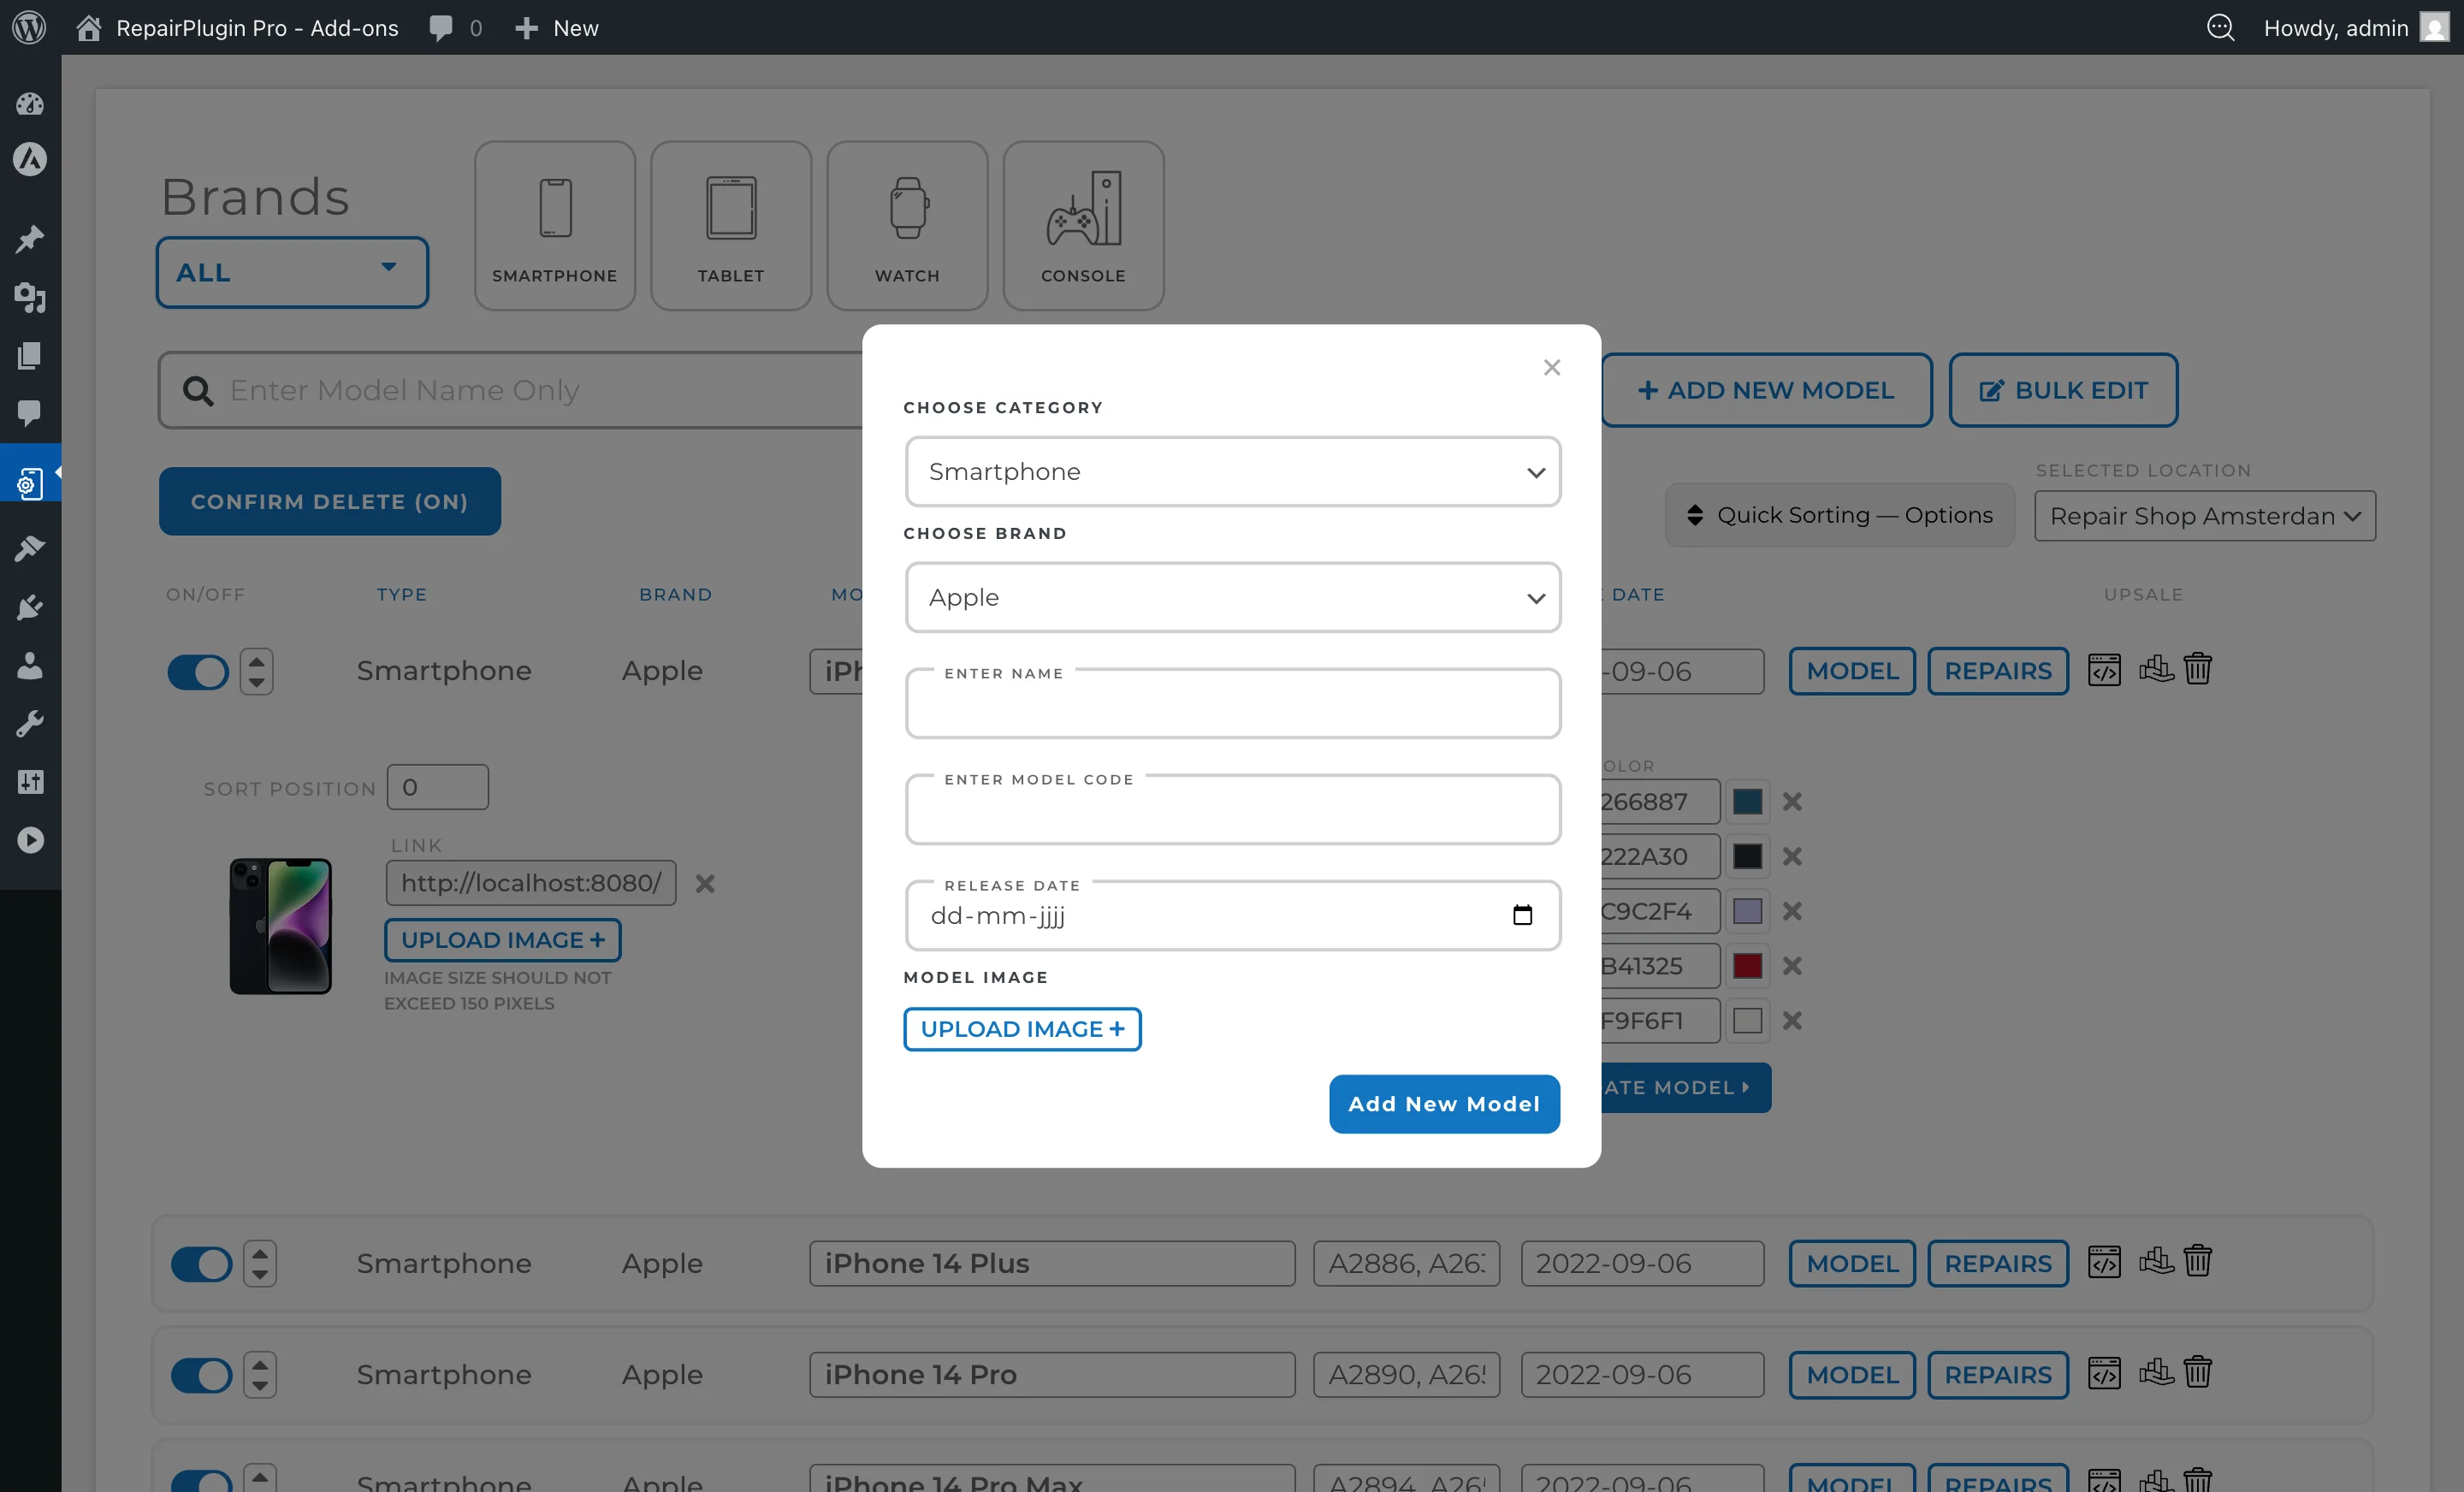
- Click the Add new model button at the top of the page.
- A dialog opens with the following fields:
- Model Name — the device name.
- Model Code — the type/part number.
- Release Date — the device release date.
- Category — select the device type category from the dropdown.
- Brand — select the brand (options update based on selected category).
- Model Image — upload a device image.
- Click Add Model to save. The new model automatically inherits the default repair list from its category.
https://www.repairplugin.com/wp-admin/admin.php?page=wp_repair_manage_models
Enable or disable a model
- Use the switch on the model row to turn it on or off.
- Save your changes. Disabled models don't appear on the booking form.
Delete a model
- Click the trash icon on the model row.
- Confirm the deletion when prompted.
- Warning: Deleting a model removes all associated repairs, colors, and related booking data. This action can't be undone.
Edit repairs for a model
- Find the model and click the Repairs button on the model row.
- The repair editor expands, showing all repairs inherited from the Default Repairs list plus any model-specific additions.
- For each repair, you can:
- Set the price — enter the repair price in the price field. Press TAB to quickly move to the next price field.
- Turn a repair on or off — use the blue switch on the left side of each repair row.
- Add a sub-repair (quality option) — click the blue plus (+) button on the right side to add options such as "Original", "OEM", or "Refurbished". Each sub-repair has its own name and price.
- Reorder repairs — use the sort arrows on the left side to move repairs up or down.
- Set repair duration — enter the estimated time and choose the unit (minutes, hours, or days).
- Add a repair badge — enter a short label (e.g., "Popular", "New") shown on your website.
- Set description — add a repair description shown to customers.
- To add a new repair specific to this model, click the Add repair button at the bottom of the repair list.
- Click Update repair at the bottom to save all changes.
- To reset repairs back to defaults, click the Reset Repair button. Warning: This resets all manually entered repair data for this model back to the default values and can't be undone.
https://www.repairplugin.com/wp-admin/admin.php?page=wp_repair_manage_models

Copy a model shortcode
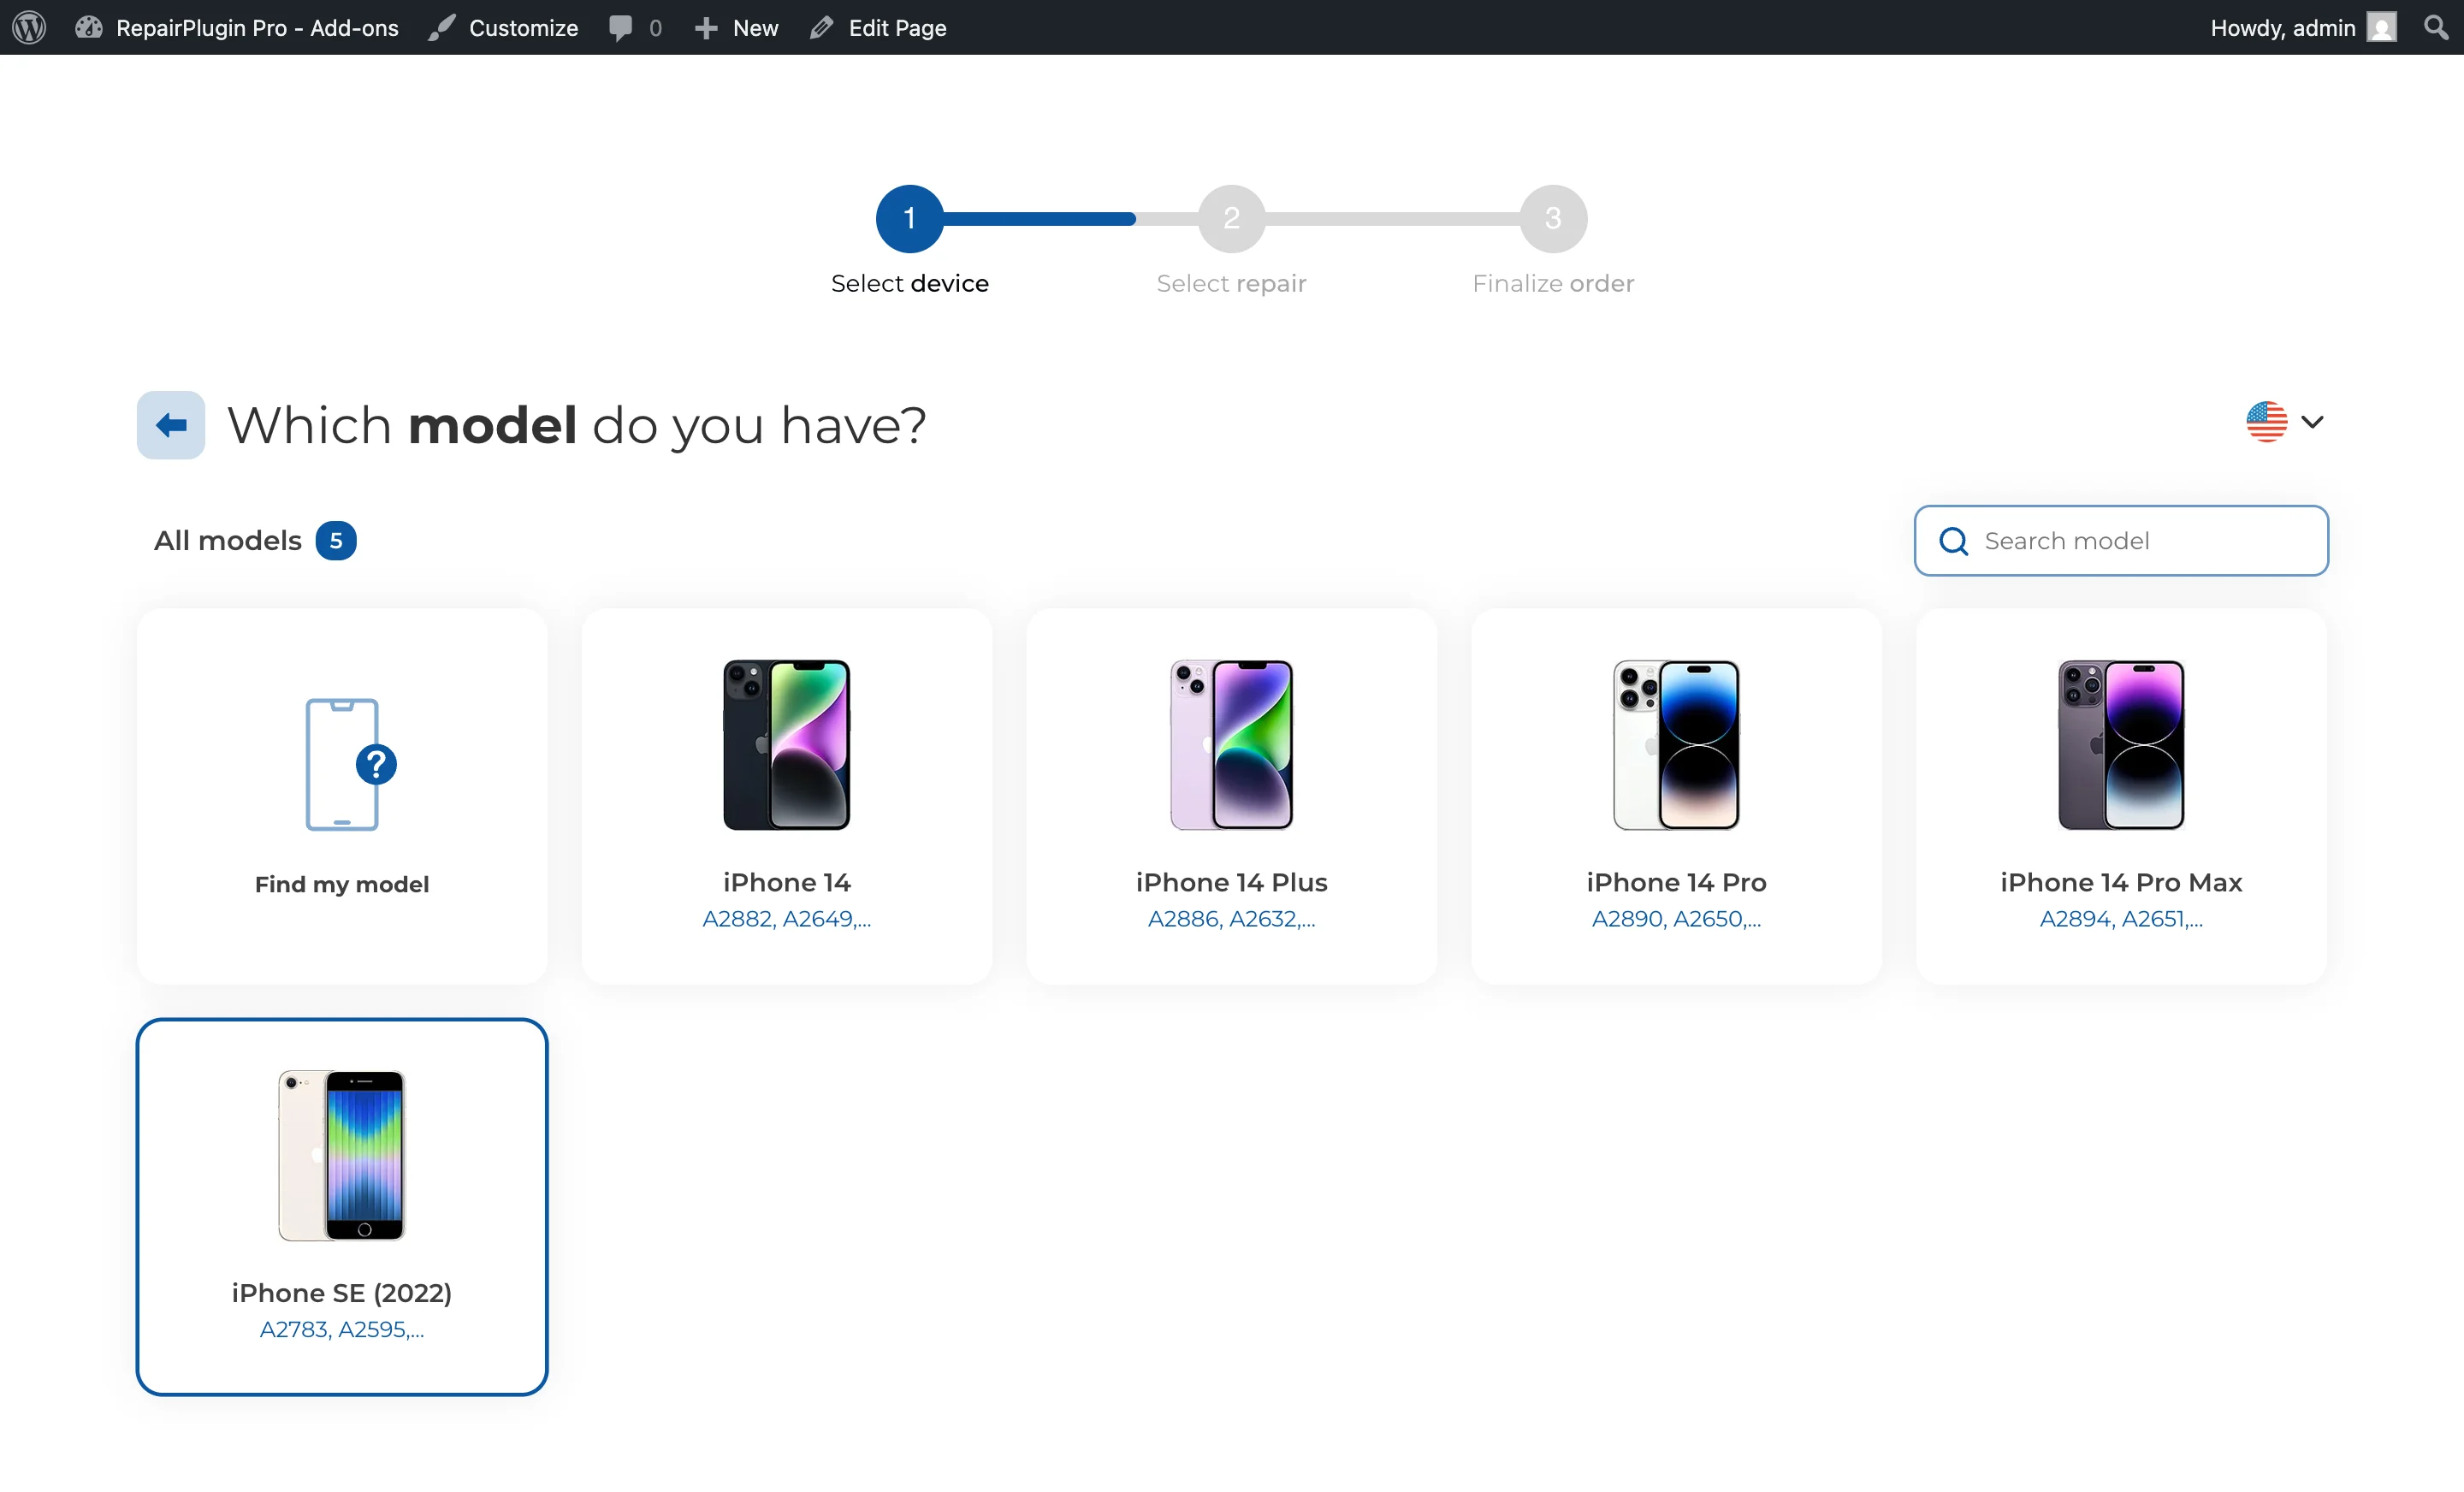
Click the shortcode button (code icon) on the model row to copy a model-specific shortcode. Place this shortcode on any WordPress page to display the booking form pre-filtered to that specific model.
https://www.repairplugin.com/book-a-repair#models
Settings reference
| Setting | Description | Default | Customers see |
|---|---|---|---|
| Model Name | Sets the display name for the device model | imported from database or entered manually | The model name appears on the model selection step of the booking form and in appointment confirmations. |
| Model Code | Stores the manufacturer type or part number. Used for search matching in the admin | imported from database or empty | Not typically shown to customers, but helps you find the right model quickly. |
| Release Date | Records when the device was released. Can be used for sorting the model list | imported from database or empty | Not shown to customers by default. |
| Model Image | Associates an image with the model for visual identification | imported from database or none | The device image appears alongside the model name on the booking form. |
| Model Active | Controls whether the model is visible on your website | on | When turned off, the model is hidden from the booking form. |
| Color Name / Color Code | Defines selectable device colors for this model | imported from database or added manually | A list of color options to choose from during the booking process. |
| Repair Price | Sets the price for a specific repair on this specific model. A value of 0 shows "Price on Request." Tip: Press TAB to jump from one price field to the next — it's the fastest way to enter prices for multiple repairs. | inherited from Default Repairs or 0 | The repair price on the booking form. This overrides the default repair price for this model. |
| Repair Active | Turns a specific repair on or off for this model | on | Disabled repairs aren't shown on the booking form for this model. |
| Sub-Repair (Quality Option) | Adds quality or variant options under a parent repair (e.g., "Original Screen" at one price, "OEM Screen" at another) | inherited from default repair or added manually | Expandable sub-options appear under the parent repair on the booking form, each with its own price. |
| Repair Duration | Sets the estimated time to complete the repair | inherited from default repair or 0 | The estimated repair time shown alongside the repair details. |
| Repair Badge | Adds a small label next to the repair name | empty | A visual badge (e.g., "Popular", "Sale") shown next to the repair on the booking form. |
Frequently asked questions
Does a new model automatically get all the repairs from my default list?
Yes. When you add a new model, it inherits the complete default repair list from its category. You can then override individual prices or turn specific repairs on or off as needed.
What happens if I reset repairs for a model?
All manually entered repair data for that model goes back to the default values from the Default Repairs list. This action can't be undone, so use it carefully.